
BetterDocs Test Bench lets you check how well your AI Chatbot answers real customer questions before your visitors ever ask them. It runs a set of questions against the chatbot, gives you a pass score, and shows a clear reason for every failed answer, such as Wrong doc or Refused. This way, you can spot weak answers, fix the docs behind them, and make sure your chatbot gives accurate replies every time.
Uwaga: Make sure the BetterDocs AI Chatbot is already set up and your docs are synced. If you haven’t done that yet, follow this guide on how to configure BetterDocs AI Chatbot.
Step 1: Navigate to Test Bench #
From your WordPress dashboard, go to wp-admin → BetterDocs → AI Chatbot. From the left panel of the AI Chatbot settings, click on ‘Test Bench’.

Here you will see the current test status, the number of questions in your set, and an estimated cost for the next run. You will also find three tabs: ‘Results’, ‘Questions’ i ‘Run history’.
Step 2: Build Your Question Set #
Click on the ‘Questions’ tab. This is where you create the list of questions Test Bench will ask your chatbot. You can build the set in several ways, and you can combine them.
Step 2.1. Get AI Suggestions from Your Docs #
Click ‘Suggest from docs’. With one click, AI reads your docs and suggests 20 questions your visitors are likely to ask. Each suggested question is tagged as ‘Suggested’ and is automatically linked to the doc that should answer it.
Step 2.2. Add Questions Manually #
Paste your own questions in the ‘Paste questions, one per line’ field and click ‘Add’. This is useful when you already know the questions your customers ask most often.
Step 2.3. Import Questions from a CSV File #
Click ‘Import CSV’ to upload questions in bulk. Your CSV file should have these columns:
- question: the question you want to test
- expected_doc: the doc that should answer it (ID, URL, slug or title)
- expected_answer: the answer you expect the chatbot to give
Step 2.4. Import from Chat History #
Click ‘Import from chat history’ to add the 50 most recent visitor questions from your real chatbot conversations. This helps you test the chatbot with questions people have actually asked.
Step 2.5. Fine-Tune Each Question #
Under each question, you can adjust how it is checked:
- Expected doc: shows the doc linked to the question. Click the × icon to remove it.
- ‘+ Expected answer’: add the answer you expect, so the Test Bench can compare it with the chatbot’s reply.
- ‘+ Image’: attach an image to the question, for example a product photo a visitor might share.
- ‘Remove’: delete the question from your set.

Step 3: Run the Test #
Before you start, check the cost estimate on the status card. Test Bench shows the approximate token usage and cost on your connected AI model key before every run, so you always know what a test will cost. The estimate gets more accurate after your first run.
When you are ready, click the ‘Run [number] questions’ button. Test Bench will start asking your chatbot each question in the set.
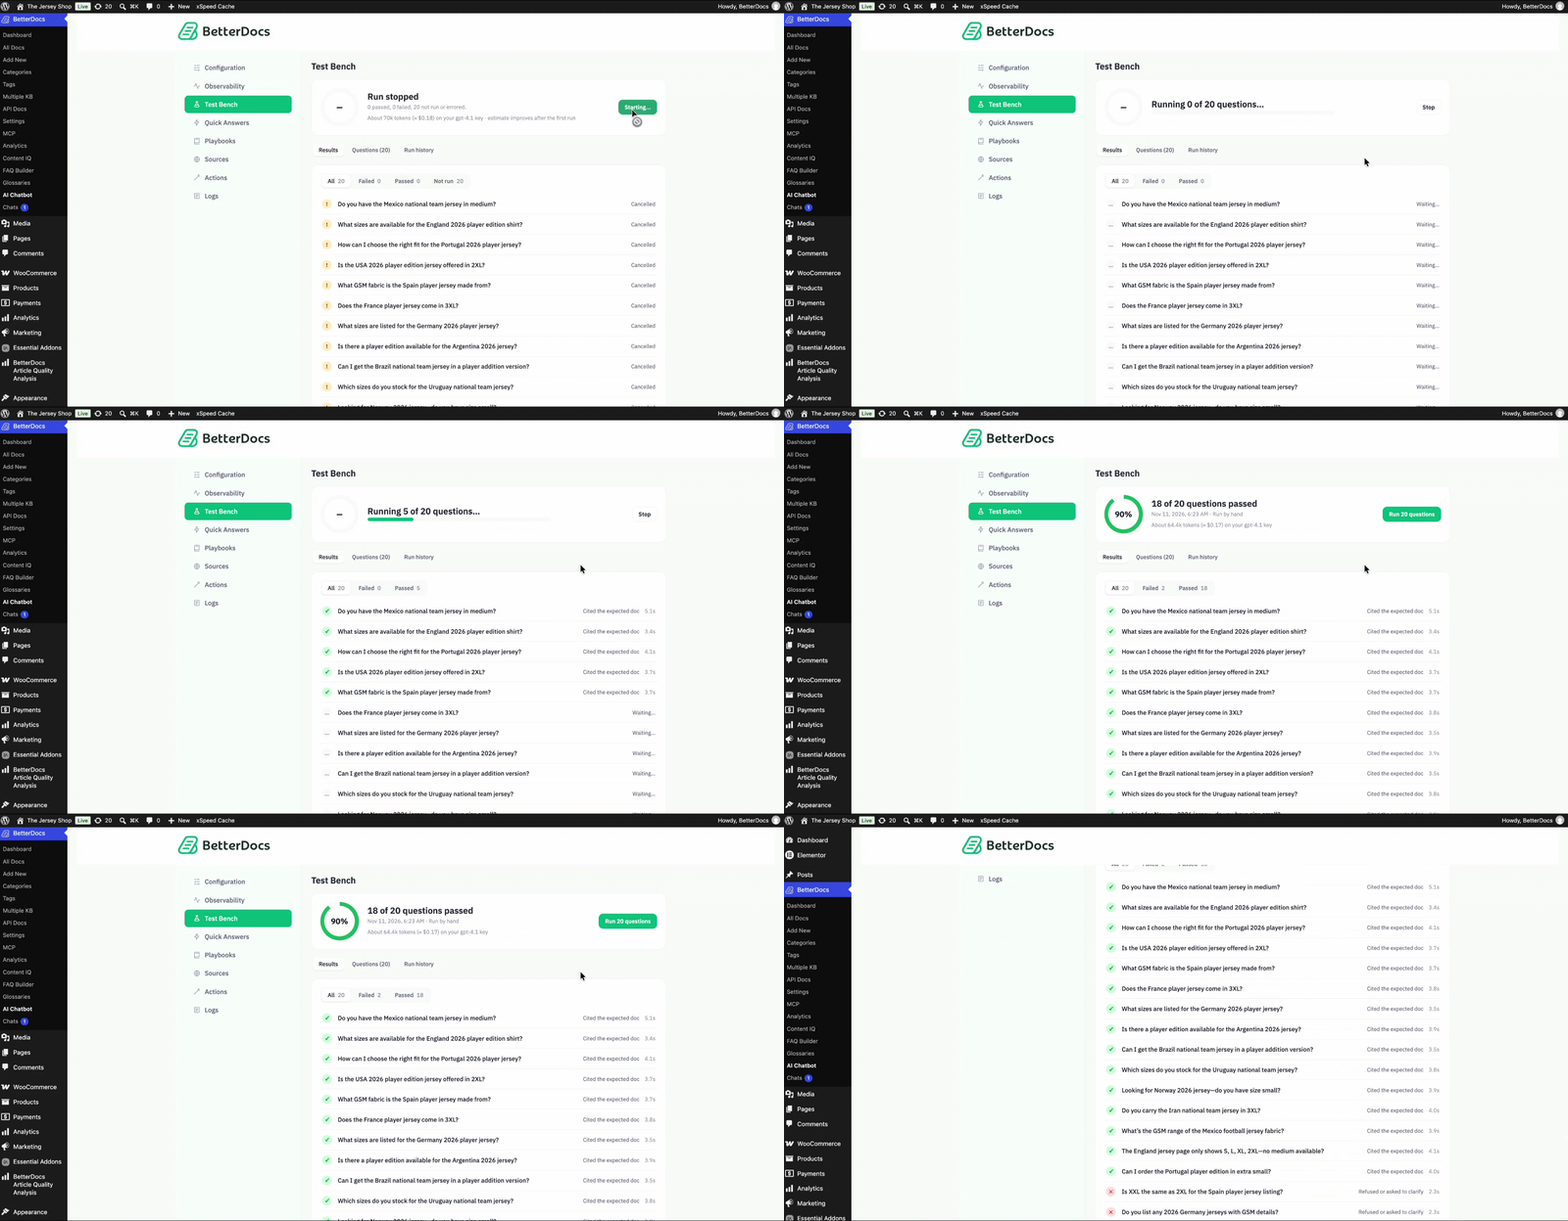
Test runs don’t count toward your chat history or analytics, so your real visitor data stays clean.
Step 4: Review the Results #
Once the run finishes, the status card shows your pass score along with how many questions passed, for example ’18 of 20 questions passed’.
Idź do ‘Results’ tab to see each question’s outcome. You can filter the list by:
- All: every question in the set
- Failed: questions the chatbot answered incorrectly
- Passed: questions answered correctly
- Not run: questions that were skipped, cancelled or errored
For every failed question, Test Bench shows the reason, such as Wrong doc (the chatbot pulled from the wrong doc) or Refused (the chatbot didn’t answer). Use these reasons to find which docs need to be updated or added.

Step 5: Track Your Run History #
Click the ‘Run history’ tab to see every previous test. For each run, you will find:
- When: the date and time of the run
- Why: what started the run, for example ‘Run by hand’
- Score: the pass score, or the run status if it was cancelled or failed
- Passed: the number of questions passed out of the total
- Model: the AI model used for the run
Click ‘View’ next to any run to see its full results. This helps you compare scores over time and check whether your doc updates improved the chatbot’s answers.

Automatic Re-Test After Re-Sync #
You don’t have to remember to re-test after big content changes. Test Bench automatically re-runs your question set after a full re-sync of your docs. If your score drops by 5 points or more, it warns you, so you can catch problems right away.
Ostateczny wynik #
Your AI Chatbot now has a ready-made test set, a pass score and clear failure reasons. You can find and fix bad answers before your visitors ever see them.

This is how, with the help of BetterDocs AI Chatbot’s Test Bench, you can test your chatbot’s answers and keep them accurate as your docs grow.
Getting Stuck? Feel free to contact our Dedykowany zespół wsparcia.


