Hindi
 English
 Spanish
 German
 Dutch
 Russian
 French
 Italian
 Polish
 Romanian
 Chinese
BetterDocs AI Chatbot feature lets your website’s visitors get quick and accurate information on your documentation based on their input by chatting with an AI-powered chatbot. In this documentation, we will show you how to configure BetterDocs AI Chatbot.
How to Configure BetterDocs AI Chatbot Feature? #
In just a few easy steps, you can set up the BetterDocs AI Chatbot feature. Using this functionality, one can get in-depth or summarized details of your docs without exploring the entire doc section. This, in turn, offers the benefit of reducing the pressure on your support team. Follow the step-by-step guide below to learn how to configure this feature.
ध्यान दें:Before getting started, you need to install and activate BetterDocs, BetterDocs प्रो, BetterDocs AI Chatbot on your website. Then, activate the BetterDocs PRO license key to proceed. Also, make sure you have your knowledge base created using BetterDocs.
Step 1: Download And Activate BetterDocs AI Chatbot Addon #
First, you have to purchase and then download the BetterDocs AI Chatbot addon from the WPDeveloper store. The addon will be downloaded as a ZIP file.
Now, go to the ‘प्लगइन्स’ tab in the left side panel of your wp-admin. Here, click on the ‘Add New Plugin’ button. Next, hit the ‘Upload Plugin’ button and then the ‘Choose file’ to upload the BetterDocs AI Chatbot addon ZIP file. Click on the ‘Install Now’ button to install the addon. Then, hit the ‘Activate Plugin’ to activate the addon on your website.
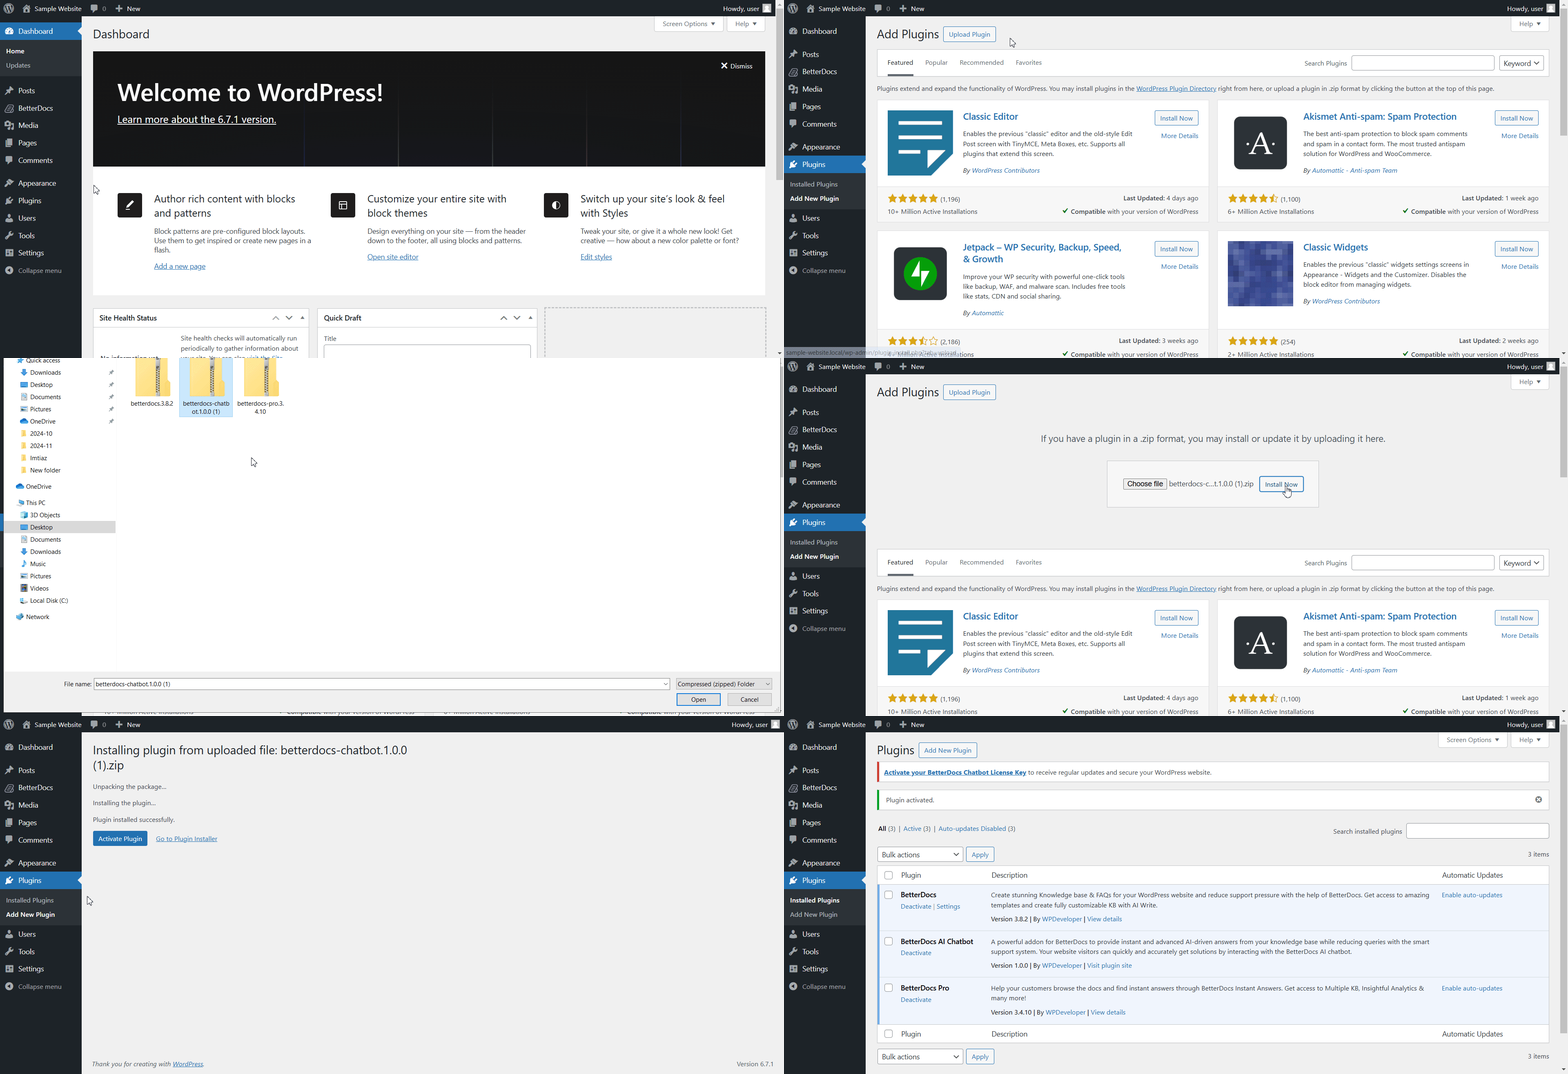
You can also activate the addon from your plugin list. From the ‘Installed Plugins’ option under the ‘प्लगइन्स’ tab, find the installed addon from the list. Then, hit the ‘Activate’ button to activate the addon.

Now, navigate to ‘BetterDocs’ → ‘Settings’ → ‘License’. Here, paste the BetterDocs AI Chatbot license key in the designated field after copying it from your WPDeveloper store account. Hit the ‘लाइसेंस को सक्रिय करें’ button and you will get a license verification code in your email. Enter this verification code in the designated field and click on the ‘Verify’ button to complete the verification process.

Step 2: Add Your API Key in BetterDocs AI Chatbot #
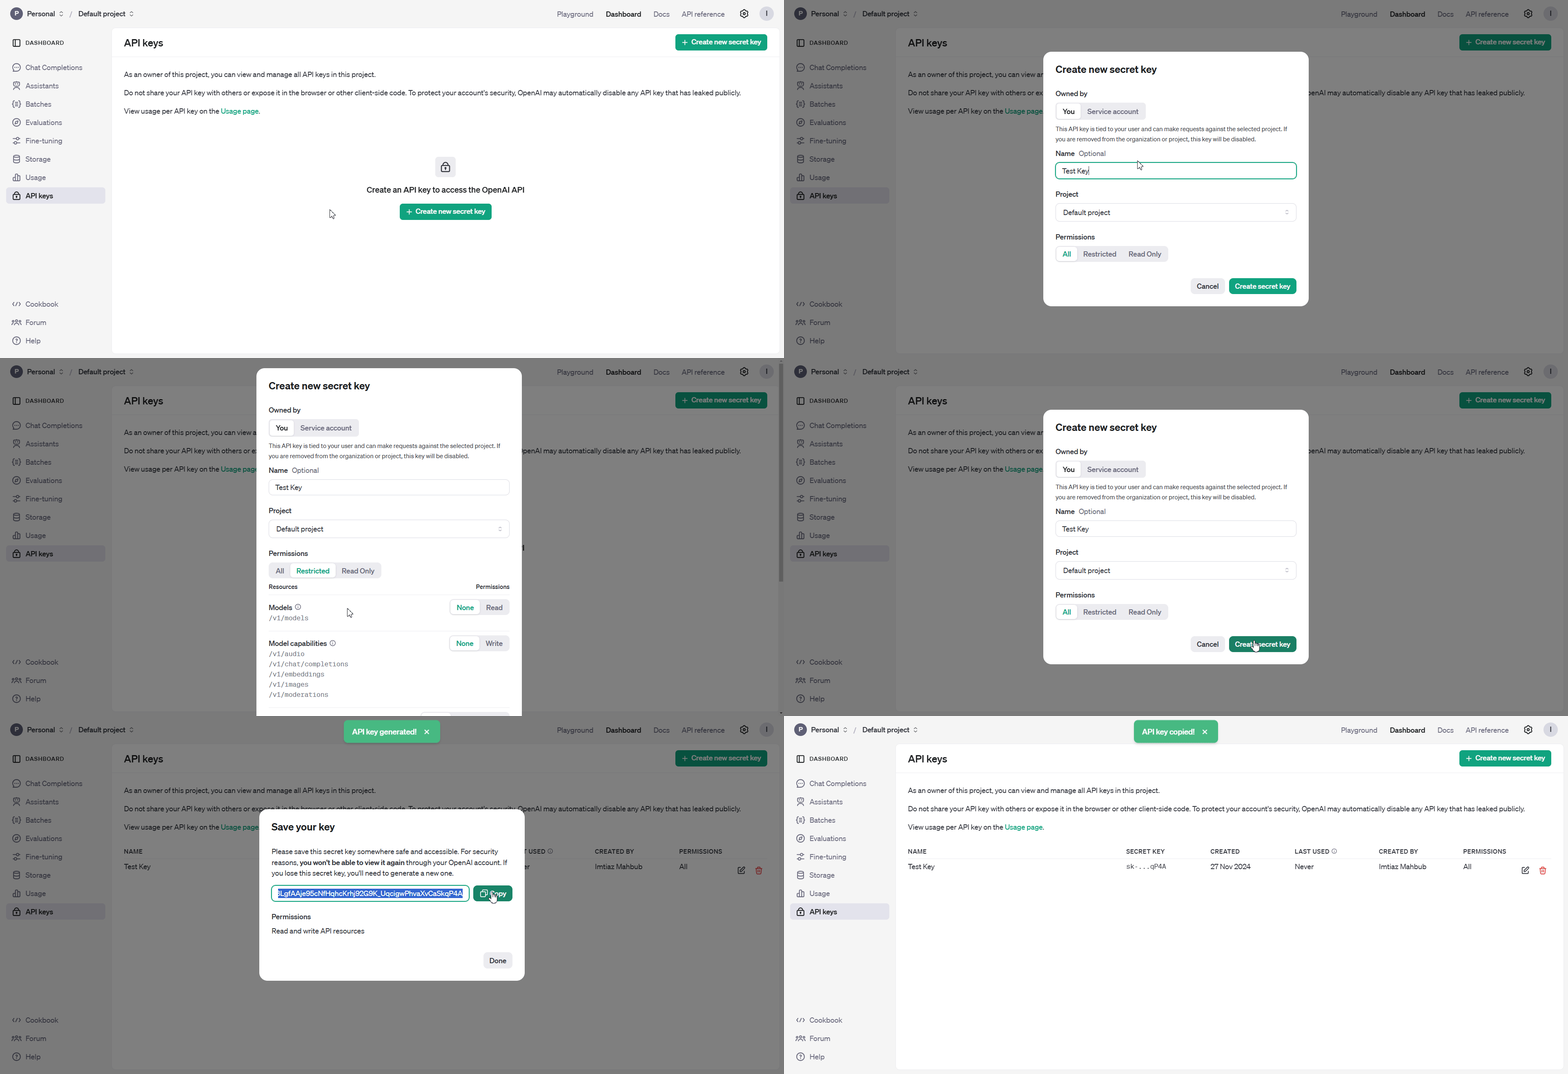
Now, you have to collect and add your OpenAI API key for BetterDocs AI Chatbot to work. Go to the OpenAI platform’s API keys page. Then, click on the ‘Create new secret key’ button. Provide an optional name and other details for the key. Hit the ‘Create secret key’ button to complete the key creation process. Copy the key and come back to the BetterDocs plugin.
ध्यान दें: You must have an OpenAI paid plan to use the BetterDocs AI Chatbot feature.
Navigate to ‘BetterDocs’ → ‘AI Chatbot’. Under ‘Configuration’, open the ‘Chatbot Configuration’ tab and toggle ‘Enable AI Chatbot’ to turn on the feature.

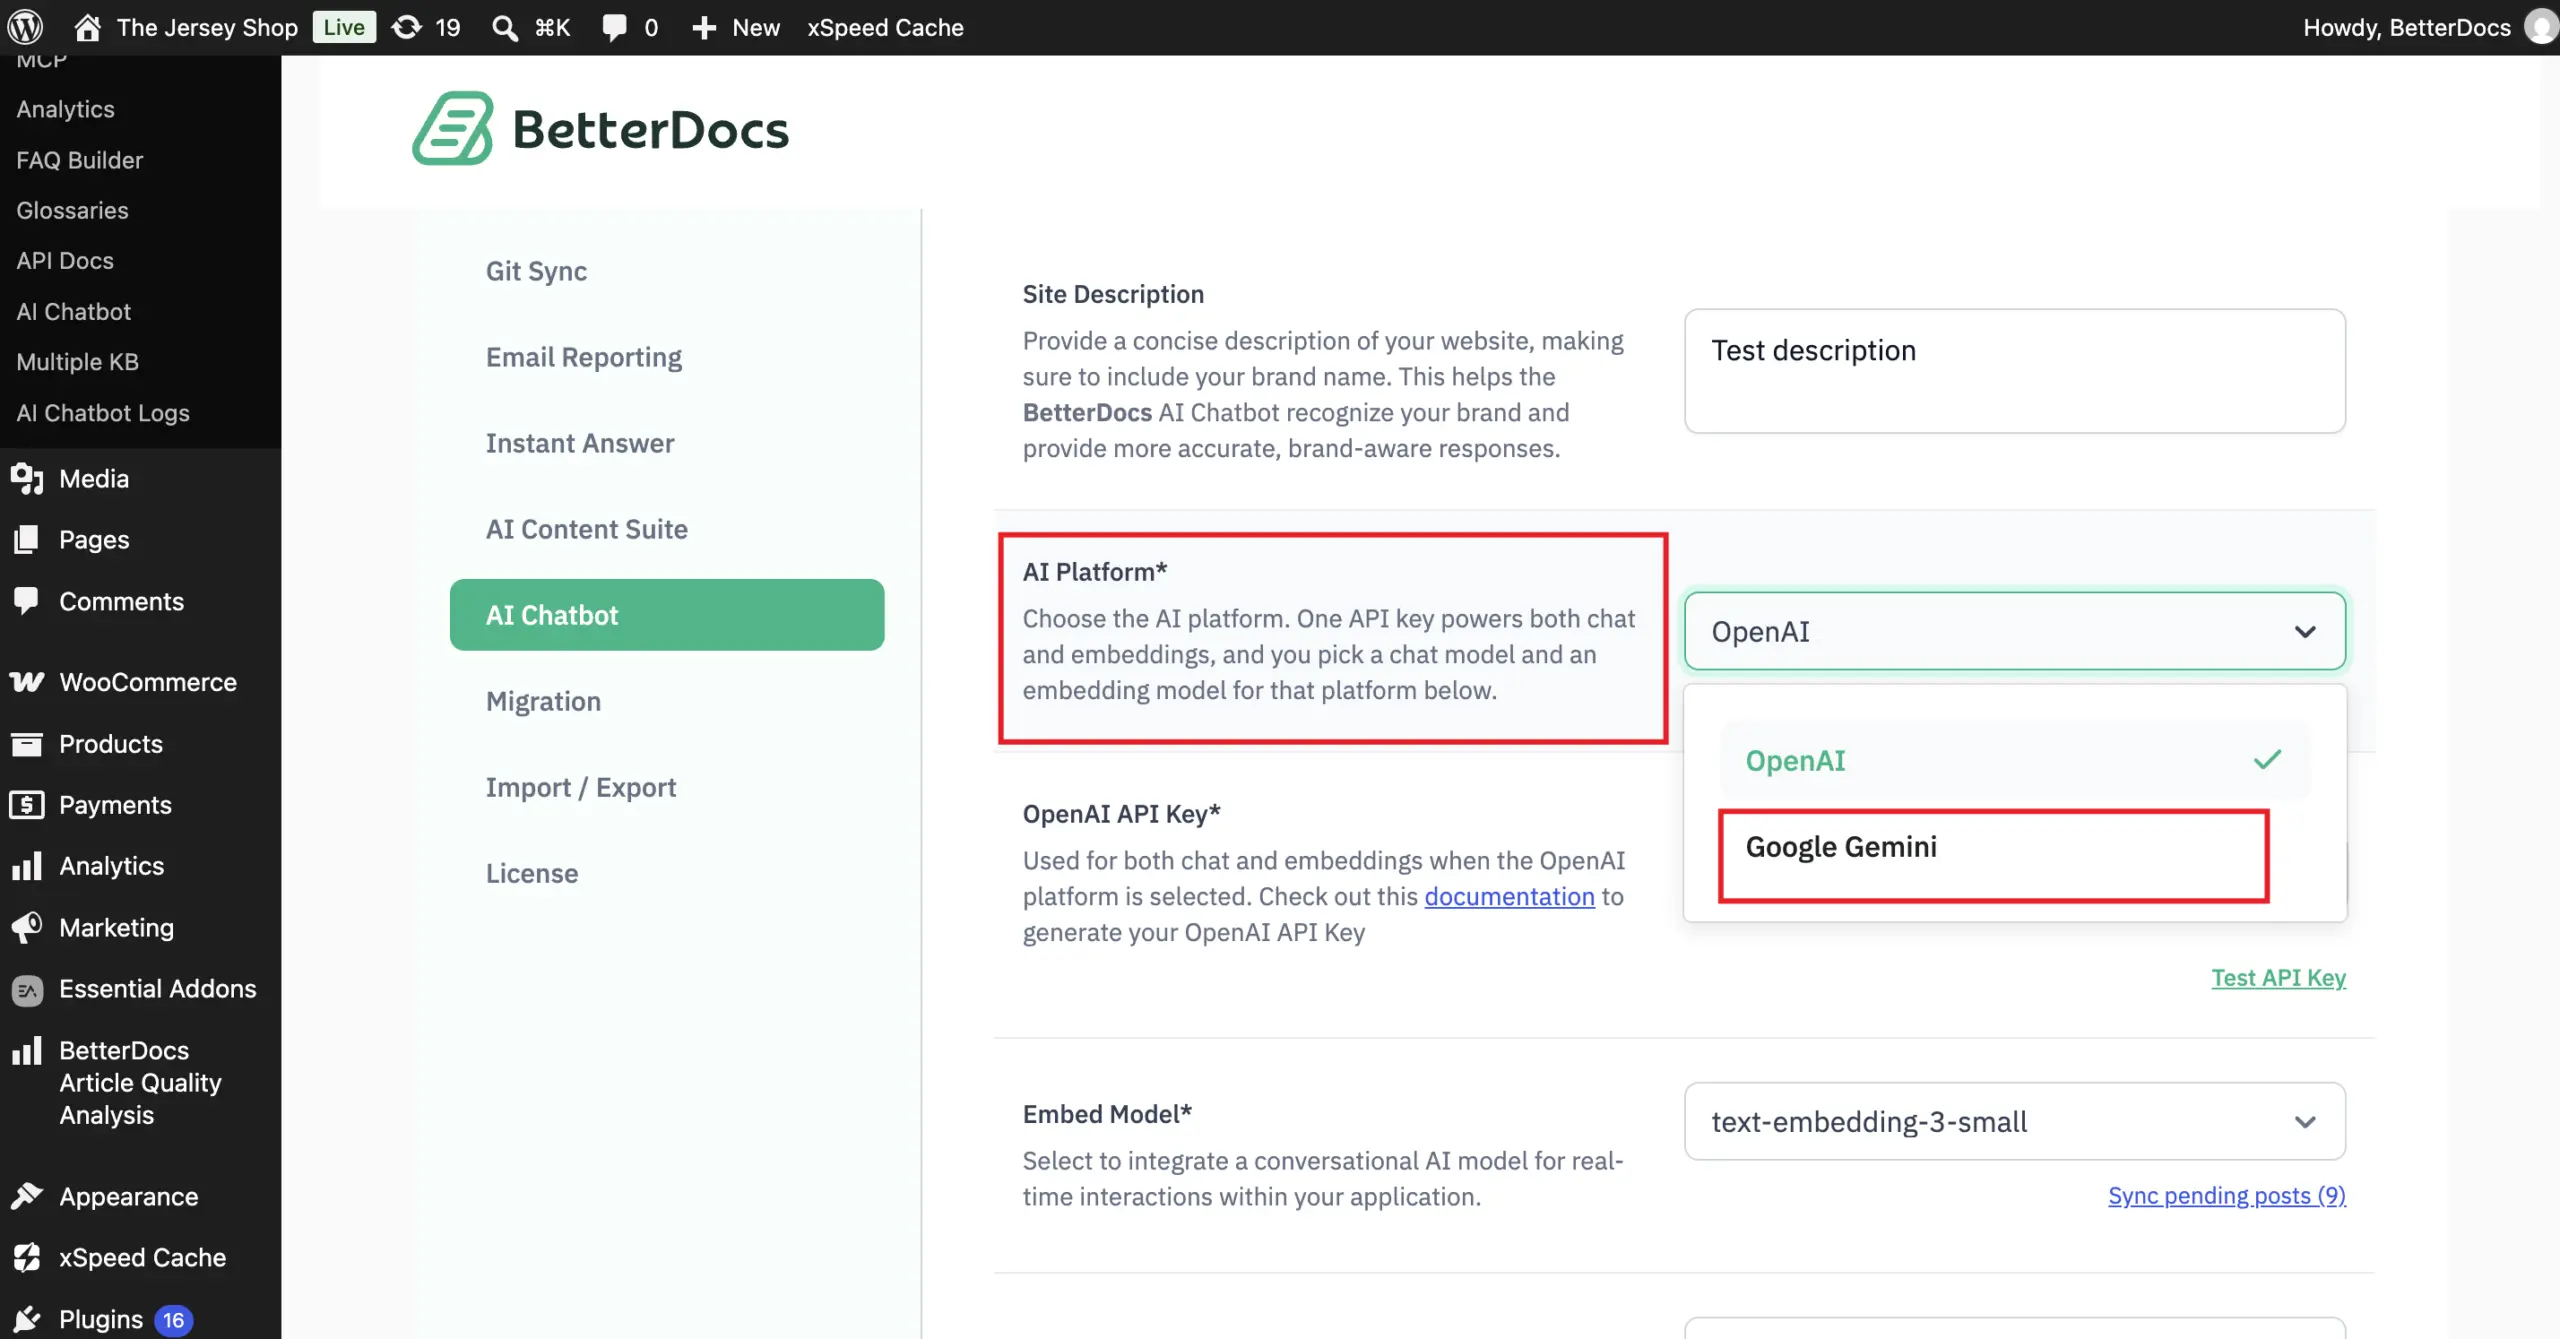
Next, add your detailed ‘Site Description’ and, optionally, a ‘Support Contact’: a support page URL or email address that the chatbot shares when a visitor asks for a person, or when it cannot answer from your content. Then, select your ‘AI Platform’ (OpenAI in this example), paste your copied OpenAI API key in the designated field and click on ‘Test API Key’ to check it. One API key powers both chat and embeddings.

Next, choose your desired Embed Model and Chat Model from the options in the respective dropdowns. Under ‘Chat Model’, you will also see an estimated cost per 1,000 conversations on your API key, so you can compare models before you pick one. There are three embedded models to choose from.
- text-embedding-3-large: The most accurate model for understanding and responding to complex questions.
- text-embedding-3-small: A fast and efficient model for handling document-based queries with improved accuracy.
- ada v2: A reliable and cost-effective model for general document understanding tasks.
ध्यान दें: We do not recommend changing the Embed Model when data processing has started after you have chosen an Embed Model option. Doing this might lead to issues due to the change of the Embed Model in the middle of the process.
If you want to add a Gemini API key select the ‘Google Gemini’ from the AI platform.
To get the Gemini API key, go to your Google AI Studio dashboard. From there sign in to your Google account. From the dashboard click on the key icon on the bottom of left sidebar.

फिर पर क्लिक करें ‘Create API key’ बटन।

After clicking on the button give a name to your ‘API key’ and click on create button.

After that, your Gemini API key will be generated. Simply copy the key and paste it into your BetterDocs dashboard.

You will find another field named ‘Retrievable Post Types’. From there, you can choose which post types the AI Chatbot can retrieve from. This allows the chatbot to customize its responses to your website’s content structure.
You can also turn on “Auto Sync on Publish” so that new posts from your allowed post types sync to the AI Chatbot automatically when they are published. You can also enable “Display Error Logs” to show the Chatbot Logs tab on the AI Chatbot ‘Logs’ page. Logs are always stored regardless of this setting.
Click on the ‘Save’ button once done.

How to Customize AI Chatbot Appearance #
After setting up the chatbot, move to the ‘Chatbot Appearance’ tab. You will find fields to add ‘Chatbot Title’, ‘Chatbot Sub Title’ तथा ‘Welcome Message’. From there, add a suitable title, subtitle and welcome message for your chatbot.
You can also upload a ‘Chatbot Tab Icon’ (SVG, PNG, JPG or GIF, max. 800x400px) and set a ‘Chatbot Avatar’ to match your brand. Click on the ‘Save’ button once done.

BetterDocs will now start processing the data from your documentation in the background for the AI Chatbot. Once the data processing is complete, you will see a ‘Sync complete!’ notice at the top of the page.

How to Download or Send a Transcript from the Chatbot #
In BetterDocs AI Chatbot, you can either send a transcript or download it in TXT format. To do this from your website on the chatbot, click on the three-dot option on the chatbot. Then you will find two options to download the transcript or send it to an email. You can also click on ‘Start a New Chat’ to start a fresh conversation.

After clicking on ‘Download Transcript’, the TXT format of your conversation will be downloaded. If you want to send a transcript to someone, then click on ‘Send Transcript,’ and a field will appear. Give the email address where you want to send the transcript and the conversation will be sent.
Enable Chat Reaction & Feedback #
Chat Reaction lets your visitors rate each AI answer with a thumbs up or thumbs down in the chat widget. Reactions show which answers work and which need improvement, and they appear in the chat history.
With Feedback enabled, visitors can also add a short written note after reacting, explaining what was helpful or missing. Feedback is available only while Chat Reaction is enabled.
Navigate to ‘BetterDocs’ → ‘AI Chatbot’ → ‘Configuration’ → ‘Chat Features’ and turn on ‘Enable Chat Reaction’ and ‘Enable Feedback’.

Enable File & Image Attachments #
Let your visitors attach, paste or drag up to 3 files into the chat. They can share screenshots and photos, PDF, Word, Excel and PowerPoint files, or text files such as logs, CSV and JSON. Each file can be up to 5 MB.
Navigate to ‘BetterDocs’ → ‘AI Chatbot’ → ‘Configuration’ → ‘Chat Features’ and enable ‘File & Image Attachments’.

Once enabled, the chatbot reads the attached files with your chat model and answers from your docs.
ध्यान दें: Each message with attachments adds one extra request on your own AI key. Files are sent to your AI provider only to generate the reply and are never stored on your site.

Enable Voice Input #
Voice Input shows a microphone in the chat so your visitors can speak their question instead of typing it. The transcript appears in the message box, so they can review it before sending.
Navigate to ‘BetterDocs’ → ‘AI Chatbot’ → ‘Configuration’ → ‘Chat Features’ and enable ‘Voice Input’.
ध्यान दें: Voice Input needs an HTTPS site, as browsers only allow the microphone on secure pages.
Choose a Voice Transcription Method #
Voice Transcription controls how your visitors’ speech is turned into text. You can choose between two options:
- AI platform: The most accurate option, and it works with any language. It is billed per audio minute on your own AI key (OpenAI or Gemini).
- Browser: A free option that uses the visitor’s browser speech recognition. It works in Chrome, Edge and Safari (not Firefox), and the audio is sent to the browser vendor.
If one option is unavailable, the chatbot falls back to the other automatically.
Select your preferred method from ‘Voice Transcription’ in the same settings.
You can also choose a ‘Maximum Recording Length’ (for example, 60 seconds). Recording stops automatically at this length, and shorter limits keep transcription costs down. Turn on ‘Send Voice Messages Automatically’ to send the transcript as soon as it is ready, instead of letting the visitor review it first. Click on the ‘Save’ button once done.

Set Up Human Support #
Human Support lets your visitors ask for a real person from the chat. When they do, your team receives:
- The full chat transcript
- An AI summary covering the issue, what was already tried, and what to do next
- The visitor’s details, sent to the places you choose in the settings: email, Fluent Support, Slack or a webhook.
Your team can then reply under the conversation in ‘Chats’. Replies appear in the visitor’s chat, or go to their email if they have already left.
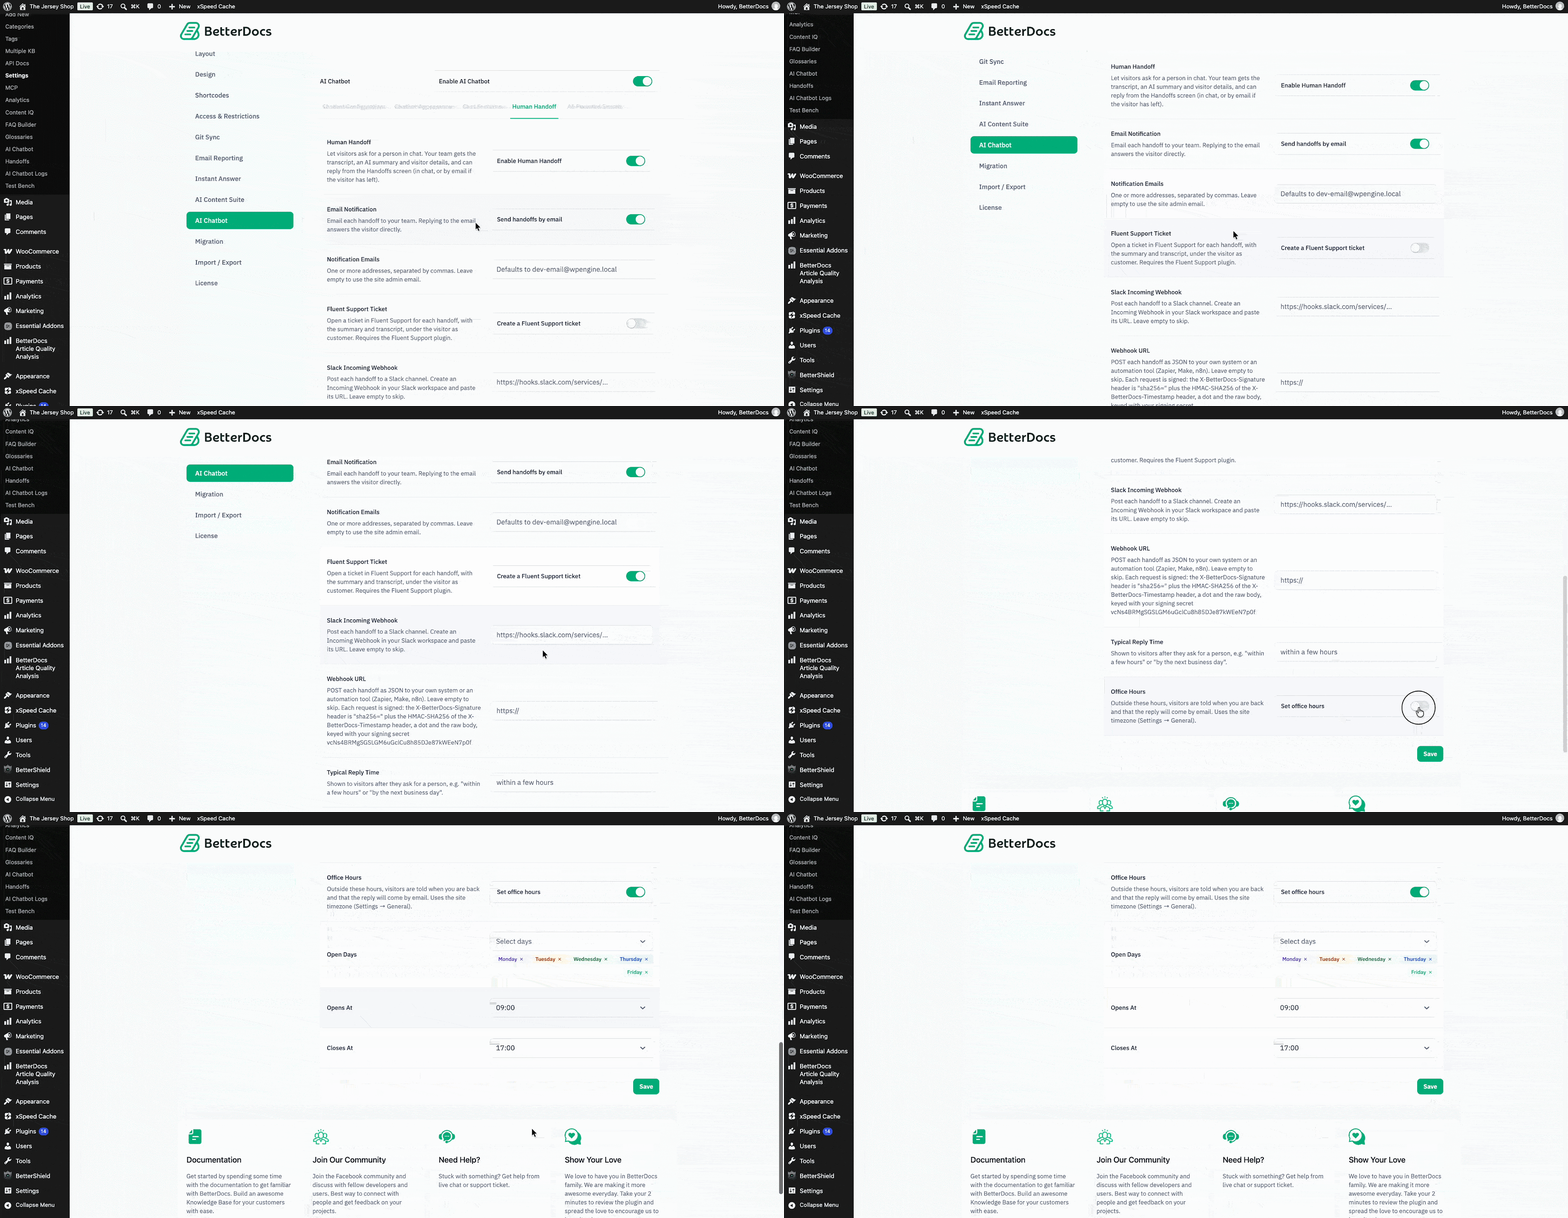
Navigate to ‘BetterDocs’ → ‘AI Chatbot’ → ‘Configuration’ → ‘Human Support’ tab and turn on ‘Turn on Human Support’.
Once enabled, you can set up the following options on the same tab:
- AI Summary: Turn on ‘Summarise each request with AI’ to add a three-line note (Issue, Tried, Needs) to each request, written by your chat model from the conversation. It uses one short AI request per Human Support request on your AI key. Turn it off and your team gets the conversation and the visitor’s note without a summary.
- Email Notification: Turn on ‘Send Human Support requests by email’ to email each Human Support request to your team. When your team replies to that email, the answer goes straight to the visitor.
- Notification Emails: Add one or more email addresses, separated by commas. Leave it empty to use your site admin email.
- Fluent Support Ticket: Turn on ‘Create a Fluent Support ticket’ to open a ticket in Fluent Support for each Human Support request. The ticket includes the summary and transcript, with the visitor as the customer. This requires the Fluent Support plugin.
- Slack Incoming Webhook: Post each Human Support request to a Slack channel. Create an Incoming Webhook in your Slack workspace and paste its URL here. Leave it empty to skip.
- Webhook URL: Send each Human Support request as JSON (a POST request) to your own system or an automation tool like Zapier, Make or n8n. Leave it empty to skip. Each request is signed, so you can verify it came from your site: the ‘X-BetterDocs-Signature’ header is ‘sha256=’ plus the HMAC-SHA256 of the ‘X-BetterDocs-Timestamp’ header, a dot and the raw body, keyed with your signing secret.
- Typical Reply Time: Add the reply time visitors see after they ask for a person, such as “within a few hours” or “by the next business day”.
- Office Hours: Turn on ‘Set office hours’ to add your team’s working hours. Then select your ‘Open Days’ and set the ‘Opens At’ तथा ‘Closes At’ times. Outside these hours, visitors are told when you are back and that the reply will come by email. Office hours follow your site timezone (‘Settings’ → ‘General’).
Click on the ‘Save’ button once you are done.
अंतिम परिणाम #
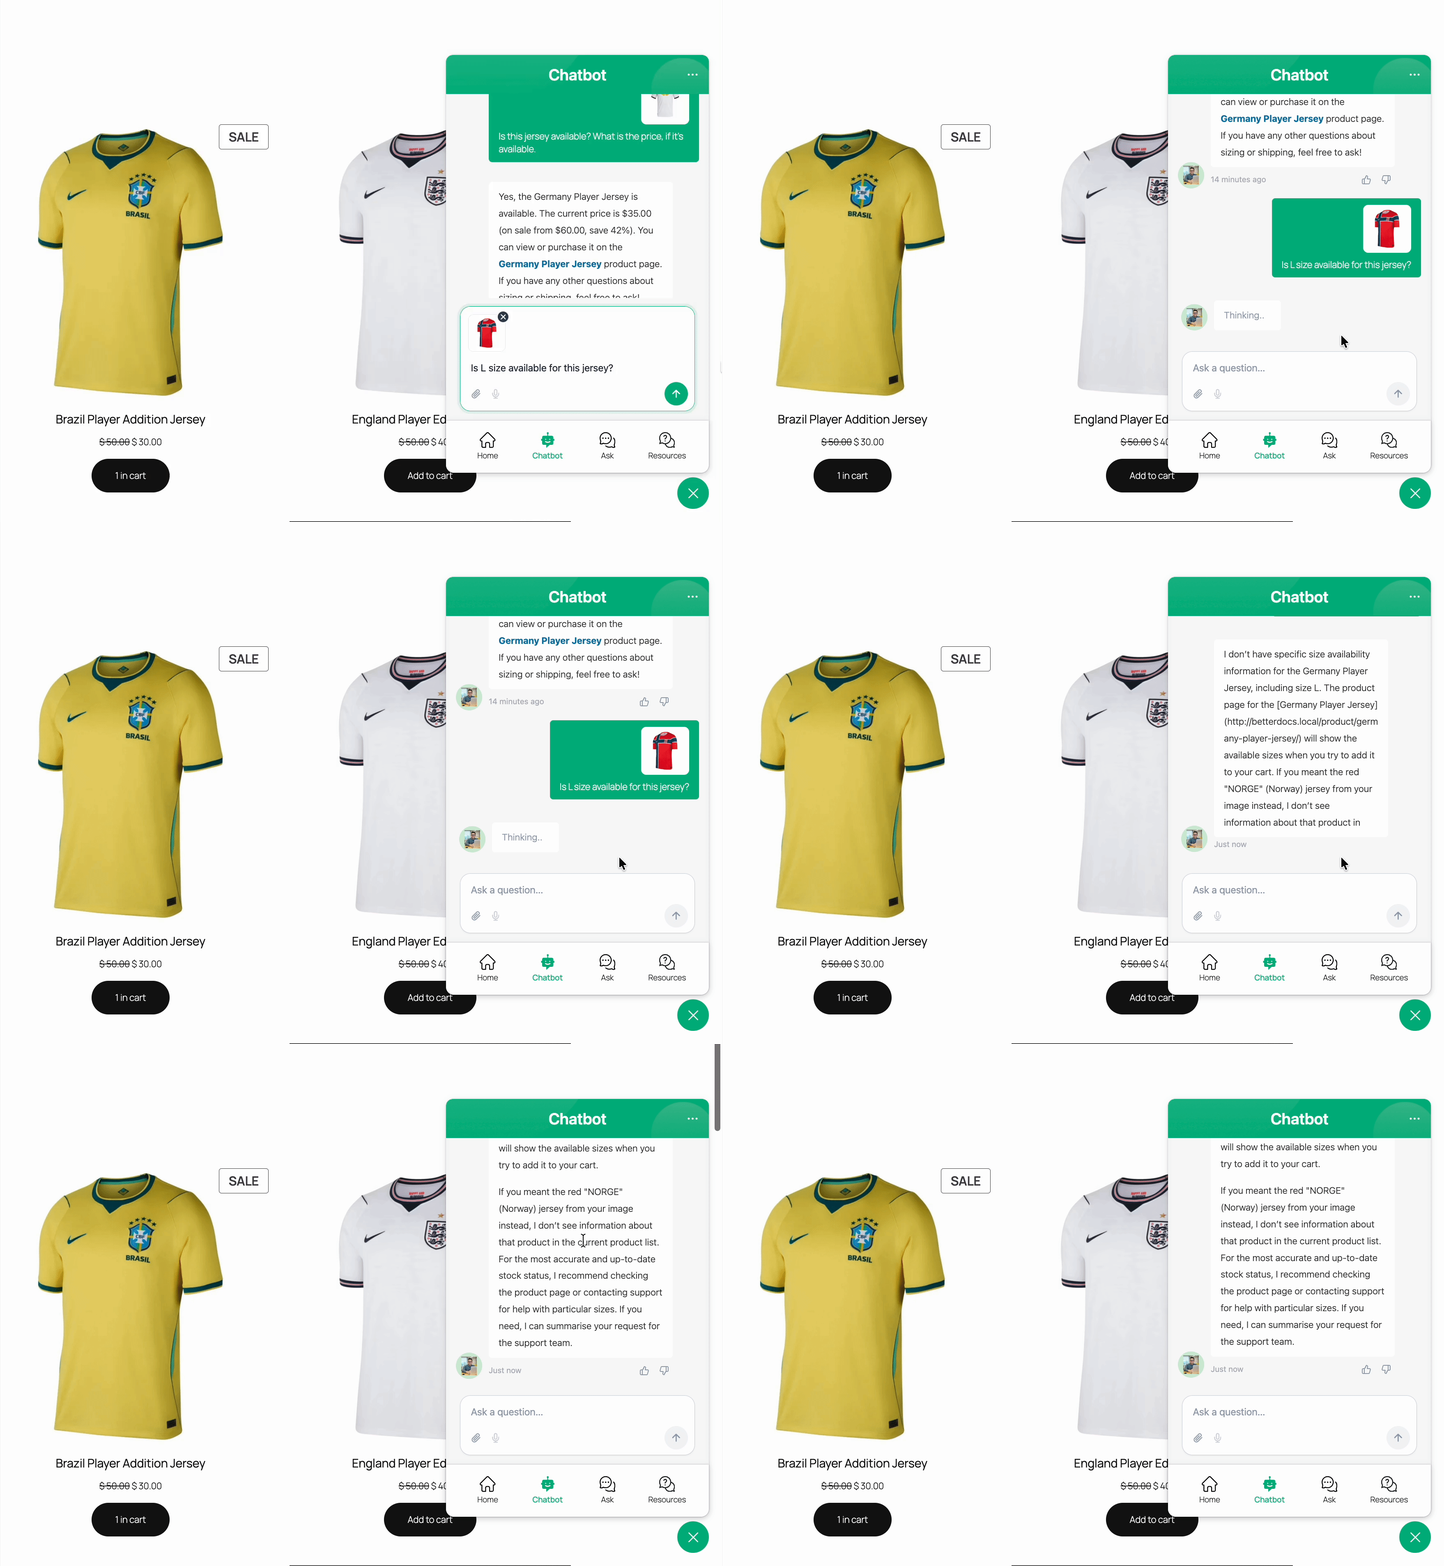
Now, your website’s visitors can start conversing with BetterDocs AI Chatbot. To interact with the chatbot, visitors have to click on the ‘BetterDocs Live Chat’ icon on the screen and go to the ‘Chatbot’ section. Here, they can enter their inputs to get instant, AI-generated replies based on your documentation’s data.
This is how easily you can configure the BetterDocs AI Chatbot feature for your website’s visitors. Getting stuck? Feel free to reach out to our dedicated support team for further assistance.