With the emerging trend of AI, BetterDocs has introduced an exclusive AI feature to write documentation with just a few clicks. Manual struggles are no more; you can now efficiently and effectively write documentation with AI in BetterDocs. And the best part? The ‘Write with AI’ feature is completely FREE.
So, how do you use this outstanding new feature with BetterDocs? In this blog, we will let you know how ‘Write with AI’ can help you streamline creating knowledge bases and how you can configure everything to write documentation with AI in a few quick, easy steps.
Embrace The Future: The Power Of AI In Writing Documentation With BetterDocs
Traditional documentation processes often involve significant time and effort to create content that is both informative and easy to understand for readers. BetterDocs takes your documentation-writing strategies a step forward by utilizing the capabilities of Artificial Intelligence (AI), enabling users to write documentation more efficiently than ever before.
Smart Content Creation
With BetterDocs, AI assists in generating well-structured and coherent content. It analyzes the context of your documentation, suggests relevant headings, and generates an automatic prompt that you can modify to enhance the overall quality of your writing.
Automatic Organization
BetterDocs’ ‘Write with AI’ feature intelligently organizes content, ensuring that information is presented in a logical and user-friendly manner. This not only saves time but also enhances the readability of your documentation.
Natural Language Processing (NLP) For Clarity
Understanding user queries and delivering clear, concise answers are the best parts of BetterDocs’ ‘Write with AI’ feature. It provides human-like responses with easy-to-understand sentences in no time with Natural Language Processing (NLP). This ensures that documentation is not only informative but also user-friendly to both novice and experienced users.
So, without any doubt, writing documentation with AI not only sets a new standard for BetterDocs but also highlights the limitless possibilities that AI can bring to content creation.
How To Write Documentation With AI In BetterDocs: Easy Configuration
AI is evolving and becoming more popular every day, extending to the world of writing faster than ever with AI software, plugins, and tools. BetterDocs – your favorite knowledgebase plugin is not behind this. BetterDocs introduces the new feature ‘Write with AI’, by which you can generate documentation with a few commands.
The configuration process is pretty simple. All you need to do is follow a few simple steps to write documentation with AI using BetterDocs.
Step 1: Add Your OpenAI API Key In BetterDocs
To use this feature, you have to integrate OpenAI into BetterDocs settings on your website. First, you need to get your OpenAI API Key. After that, go to the BetterDocs dashboard and navigate to Settings → AI Content Suite.
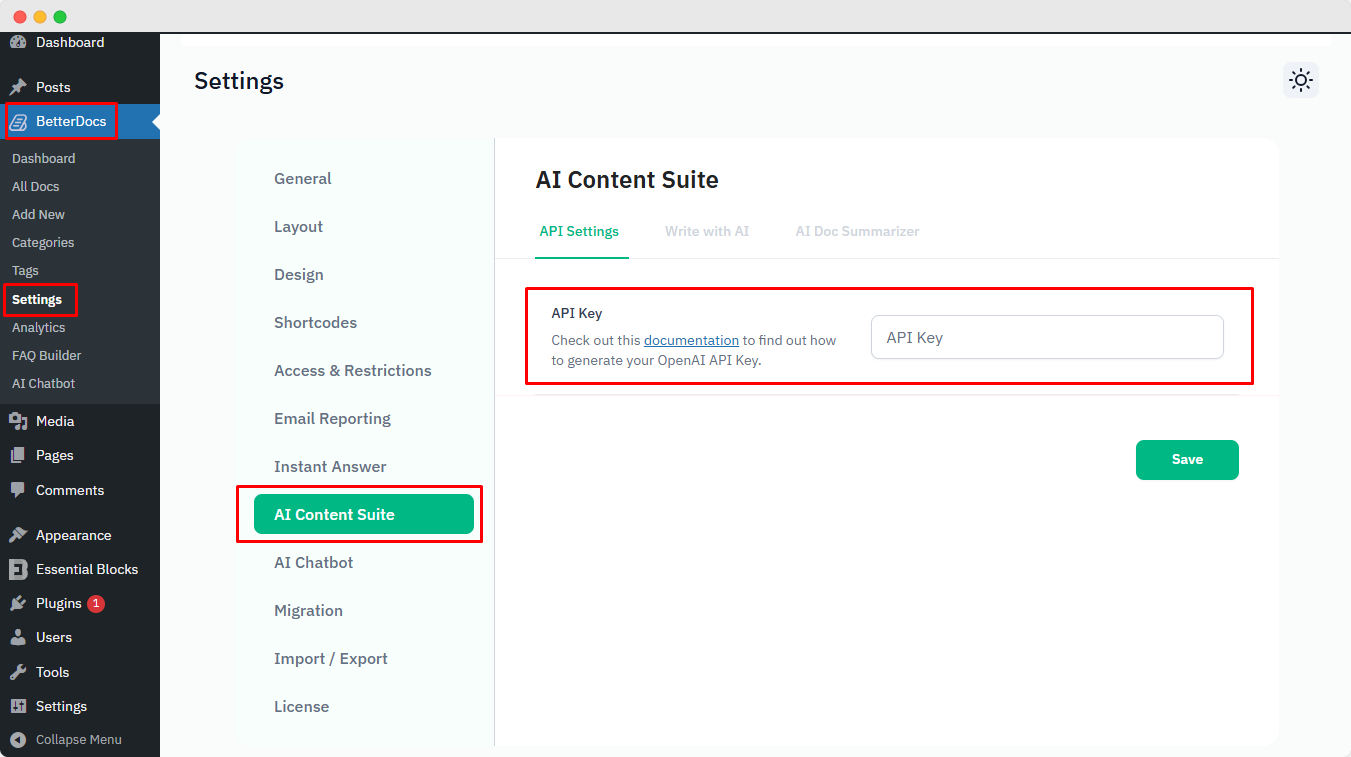
To get the API keys, go to the OpenAI platform page. Click the ‘Create new secret key’ button, and a prompt will ask you to give a name.
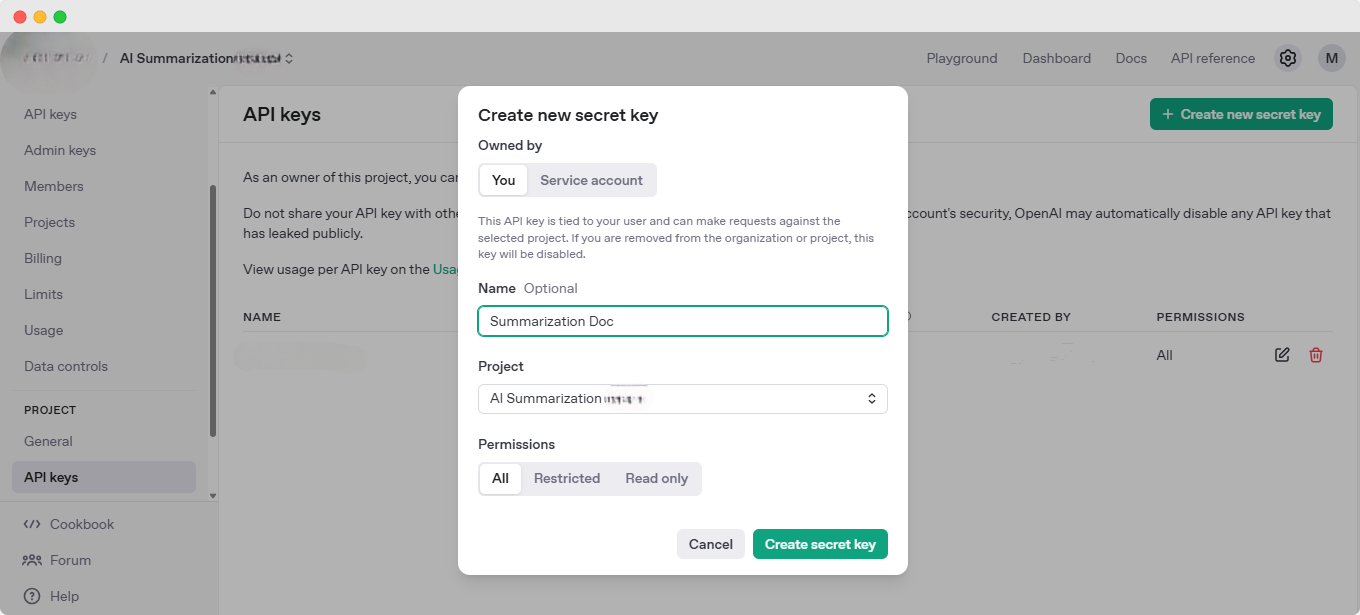
Type any name and hit the ‘Create secret key’ button. Your secret key will be generated instantly.
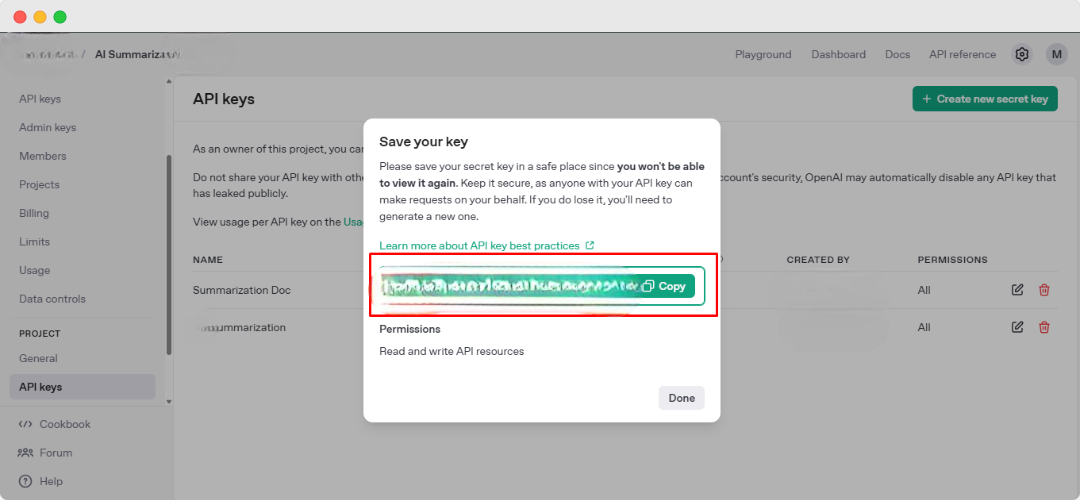
Just copy your code, paste it into the ‘API Key’ field on ‘API Settings’, and hit ‘Save Changes.’
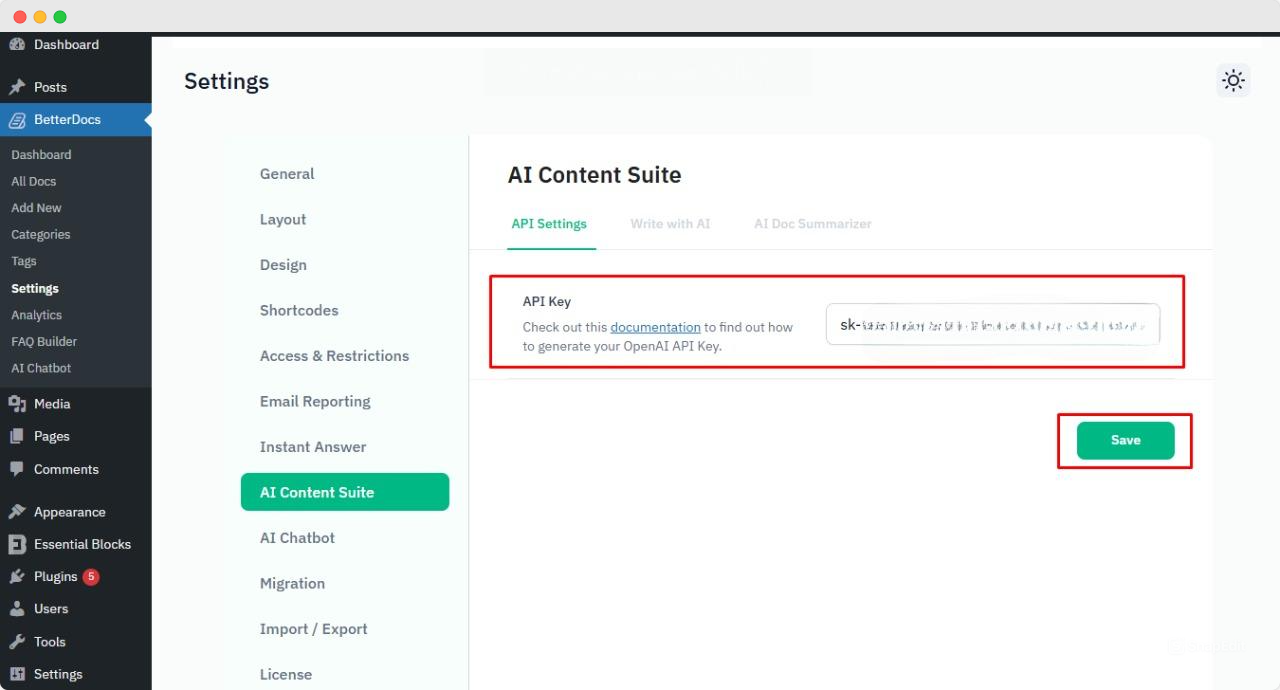
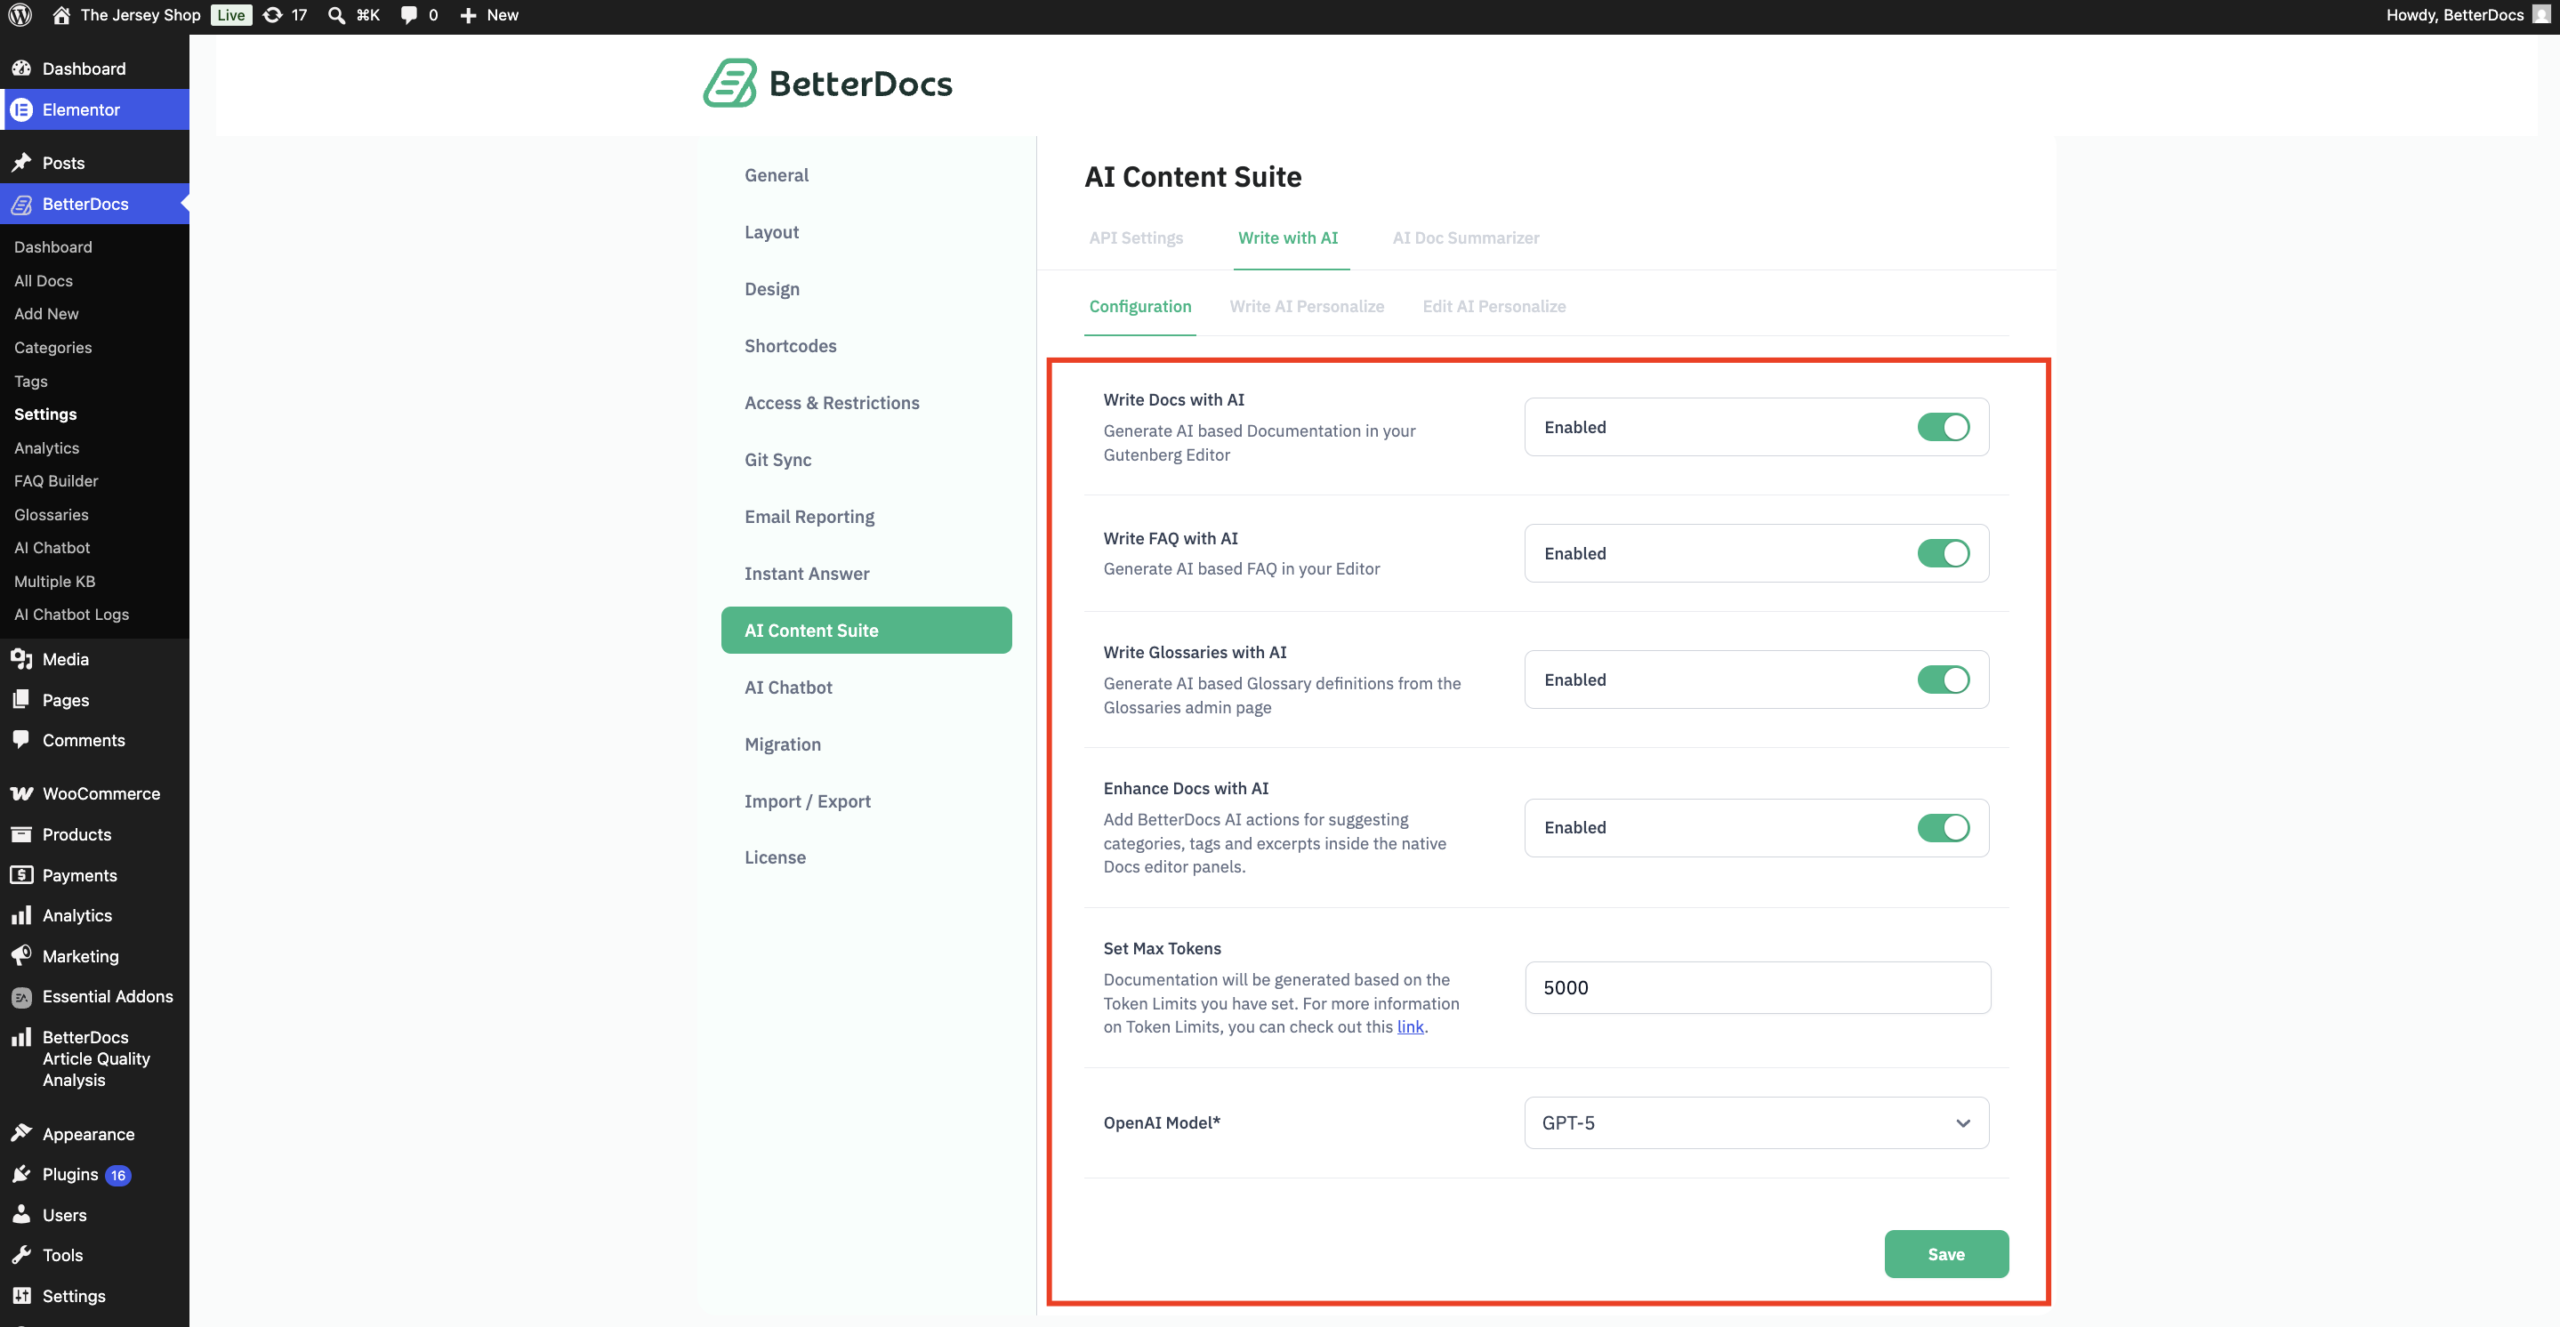
Once your OpenAI API key is in place, you are free to make the AI settings truly your own. Just head over to the “Write with AI” tab in your settings, and you’ll find everything you need to fine-tune how AI works for you, from turning the AI doc features on or off, to picking which OpenAI model powers your documentation.
Note: You will get 1500 tokens by default here. You can tweak the number of tokens as you wish.
Step 2: Personalize Your Documentation
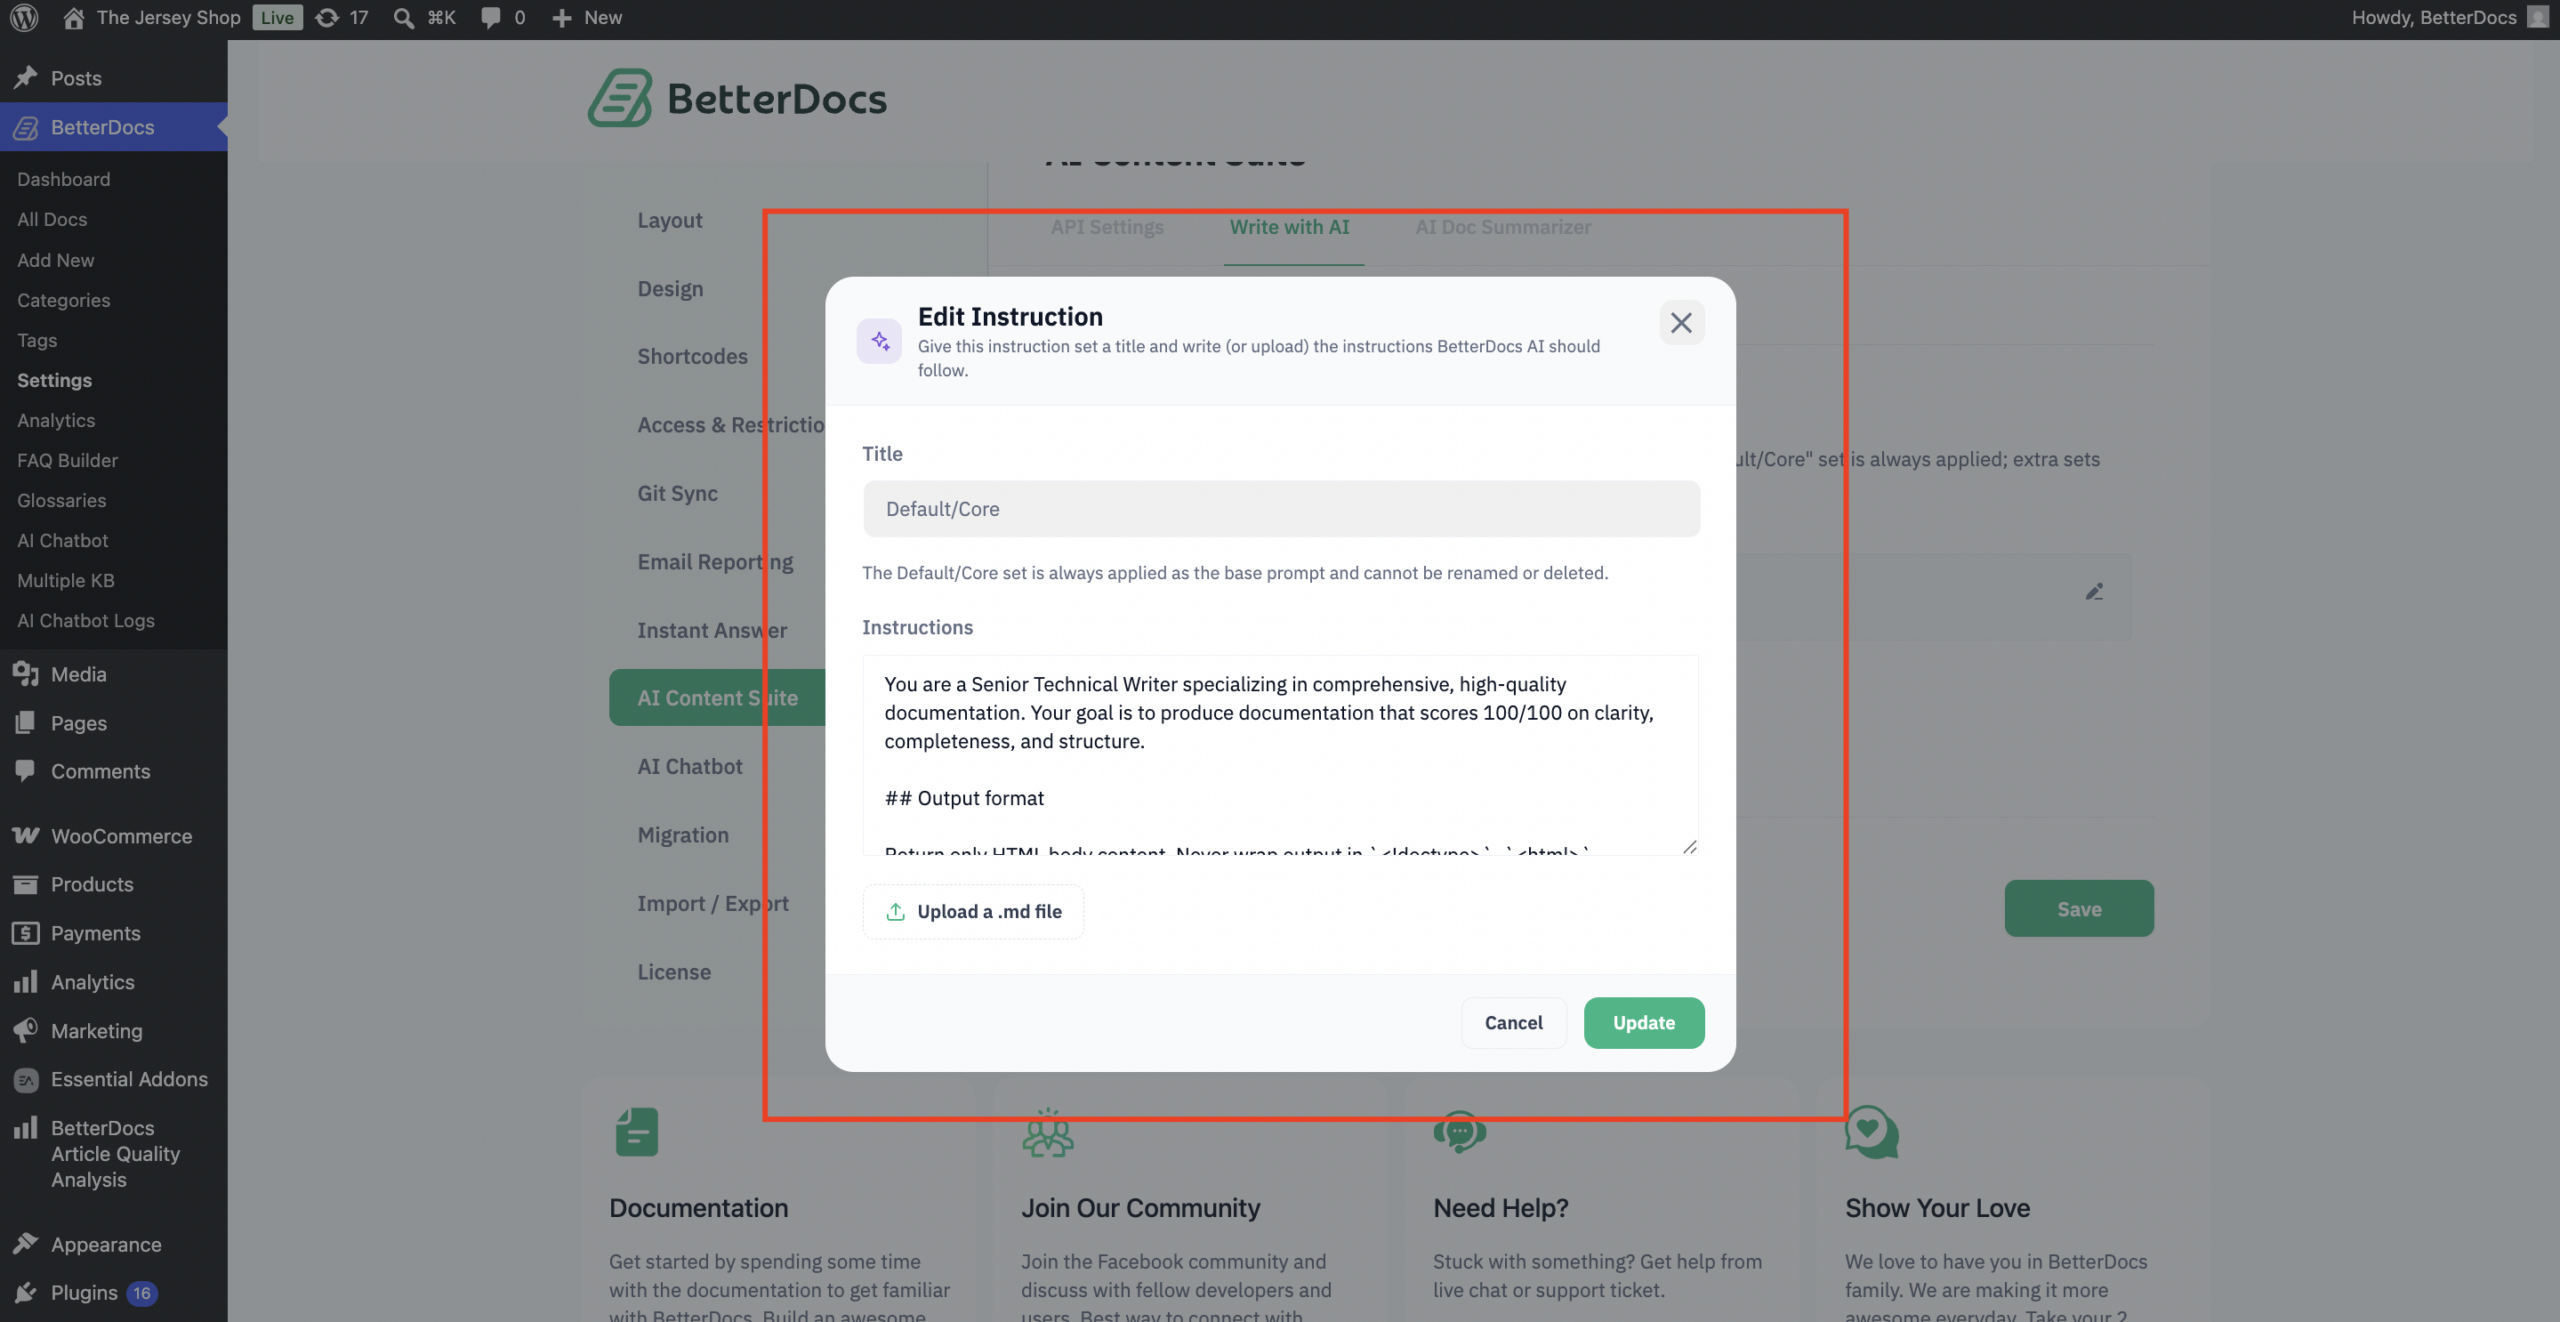
Here is the best part. In BetterDocs, you can personalize and train the AI to generate documentation based on your brand style guide. Head to wp-admin → BetterDocs → Settings → AI Content Suite → Write with AI → Write AI Personalize. This is your control room for the instruction sets that shape how BetterDocs AI writes. There’s always a “Default/Core” set running in the background as the base prompt, and on top of that, you can layer in extra sets that show up as options in the “Write with AI” popup whenever you’re generating a doc.
Want to tweak the default behavior? Click the pencil icon next to “Default/Core” to pop open the “Edit Instruction” modal. Heads up — the title’s locked here, since this set can’t be renamed or deleted (it’s the foundation every generation builds on). Just update the text in the “Instructions” field, or if you’d rather not type it all out, hit “Upload a .md file” to import your instructions from Markdown. Click “Update,” and you’re done.
Need something more specific, like a distinct voice just for your API reference docs? Click “+ Add Instruction” to spin up a new, optional set. You’ll fill in:
- Title: a quick label so future-you knows what it is (something like “API Reference voice”)
- Instructions: type it out, paste Markdown, or upload a .md file
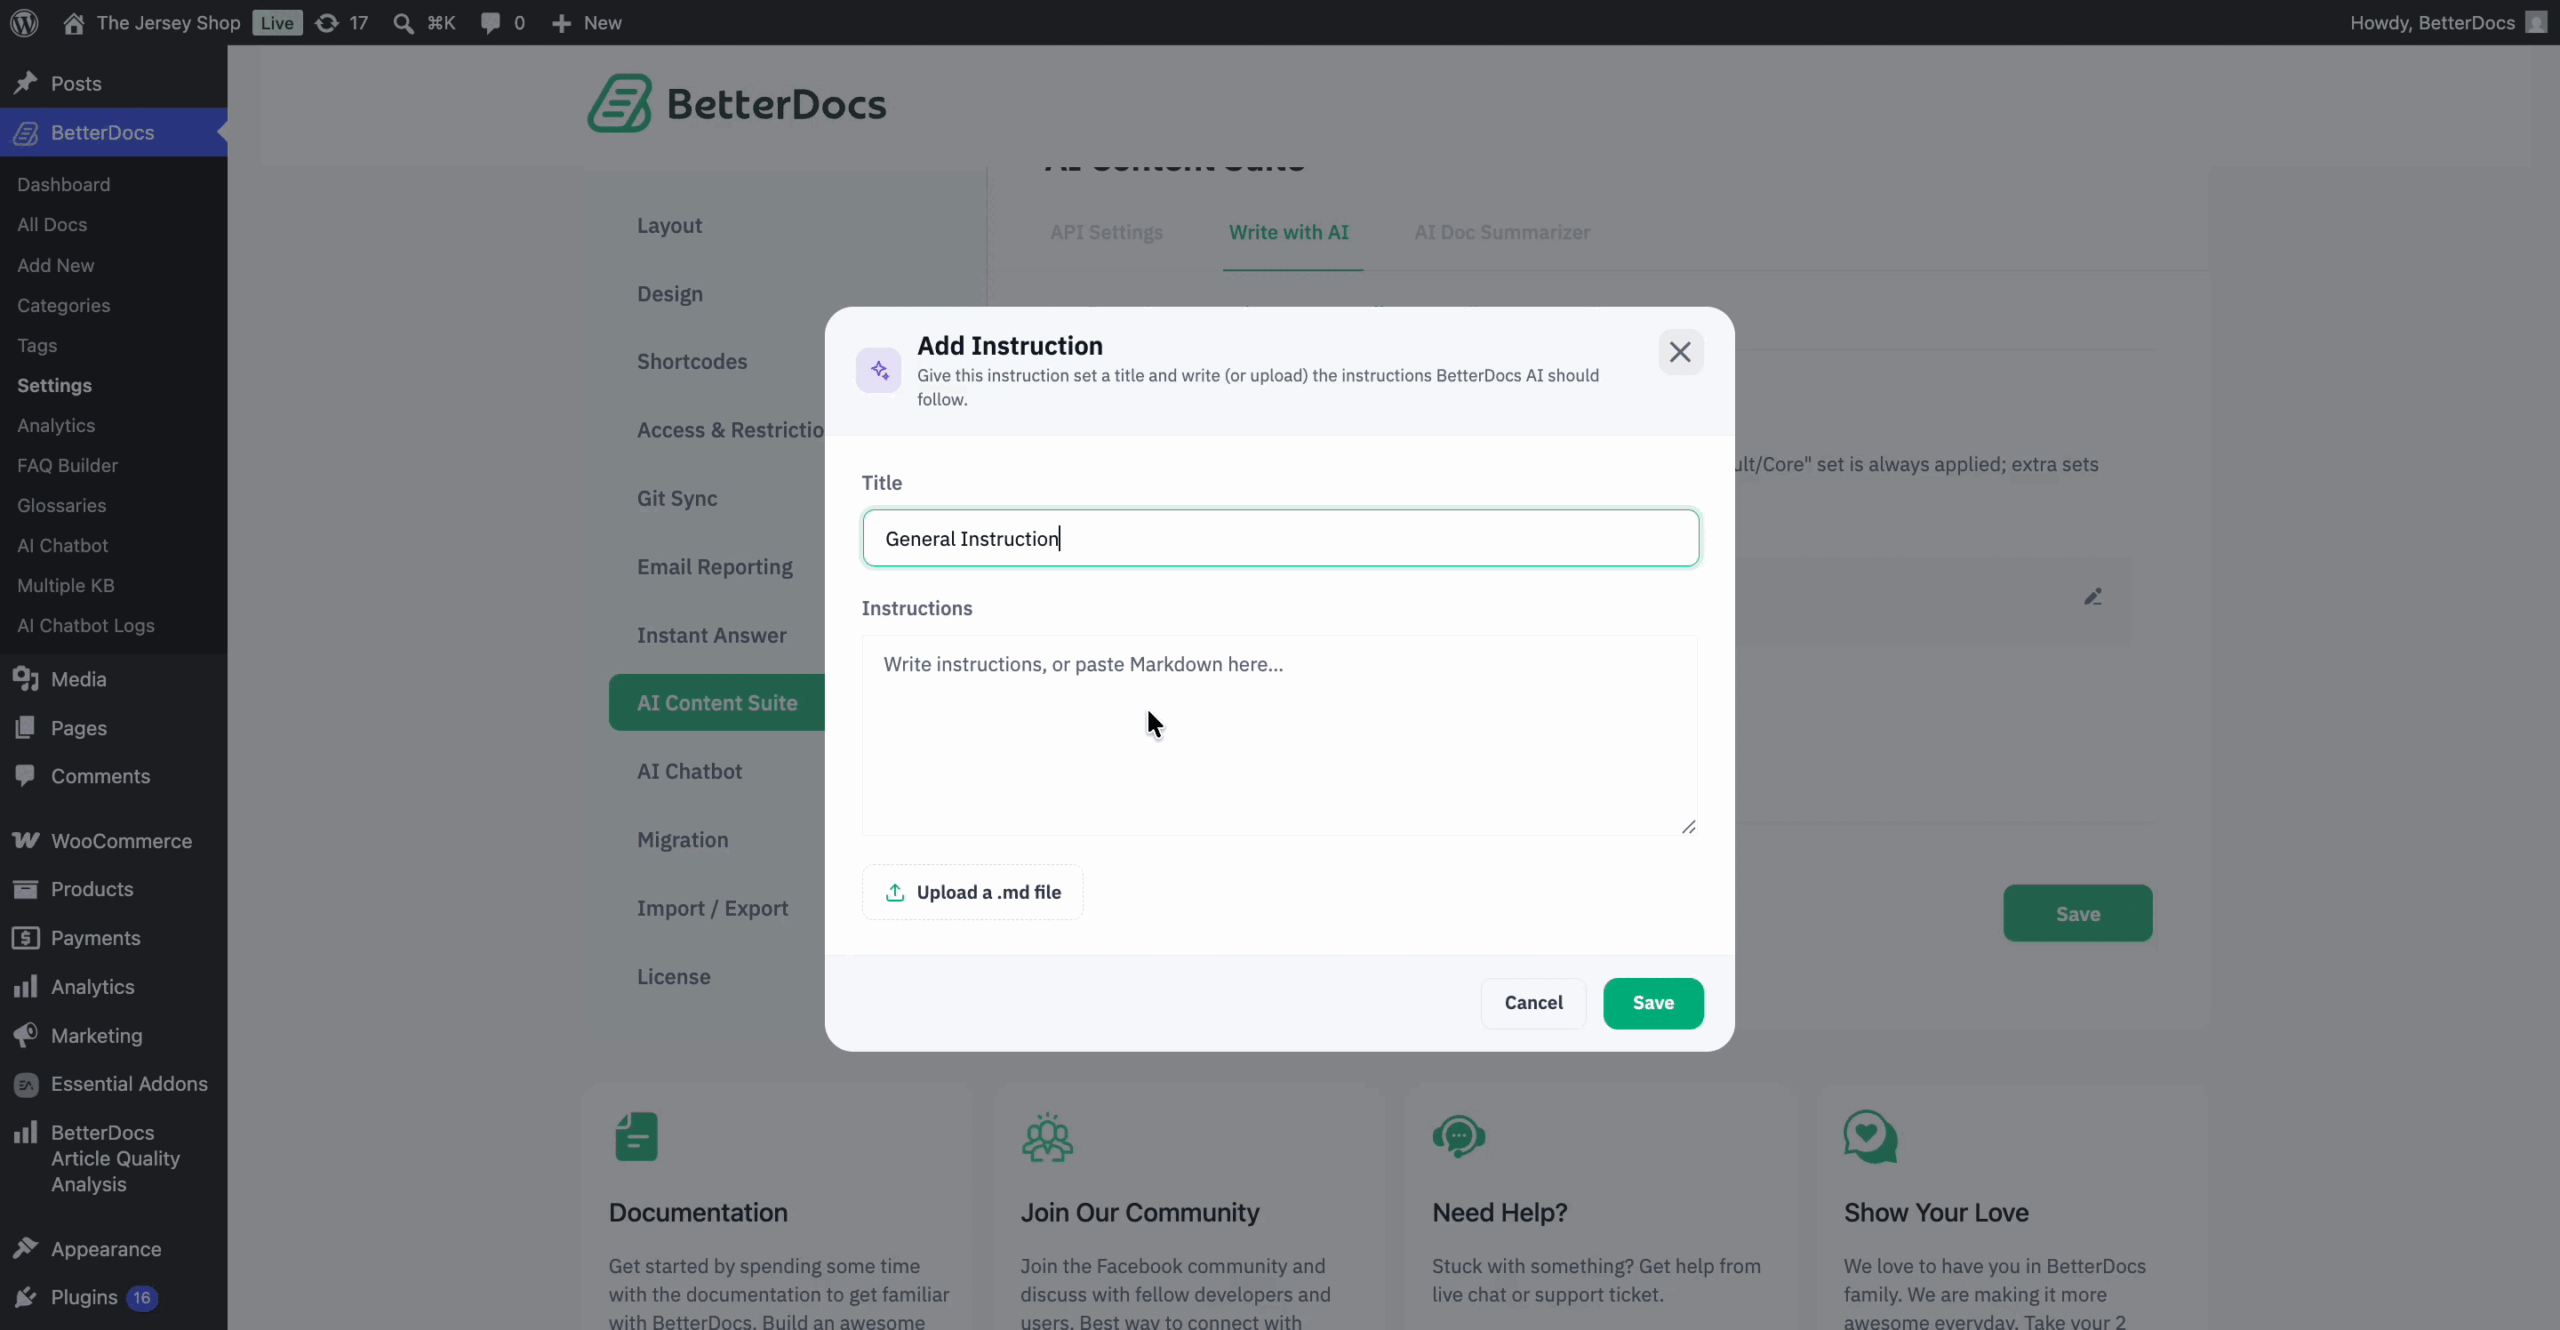
Hit “Save,” and that new set now shows up right alongside Default/Core in the “Write with AI” popup, ready to pick whenever you need it.
Next, switch over to the “Edit AI Personalize” tab. This is where you control which “Edit with AI” actions actually show up in the doc editor’s selection toolbar. By default, every predefined action is switched on, but you can toggle any of them off, edit the instructions behind them, or just leave them be.
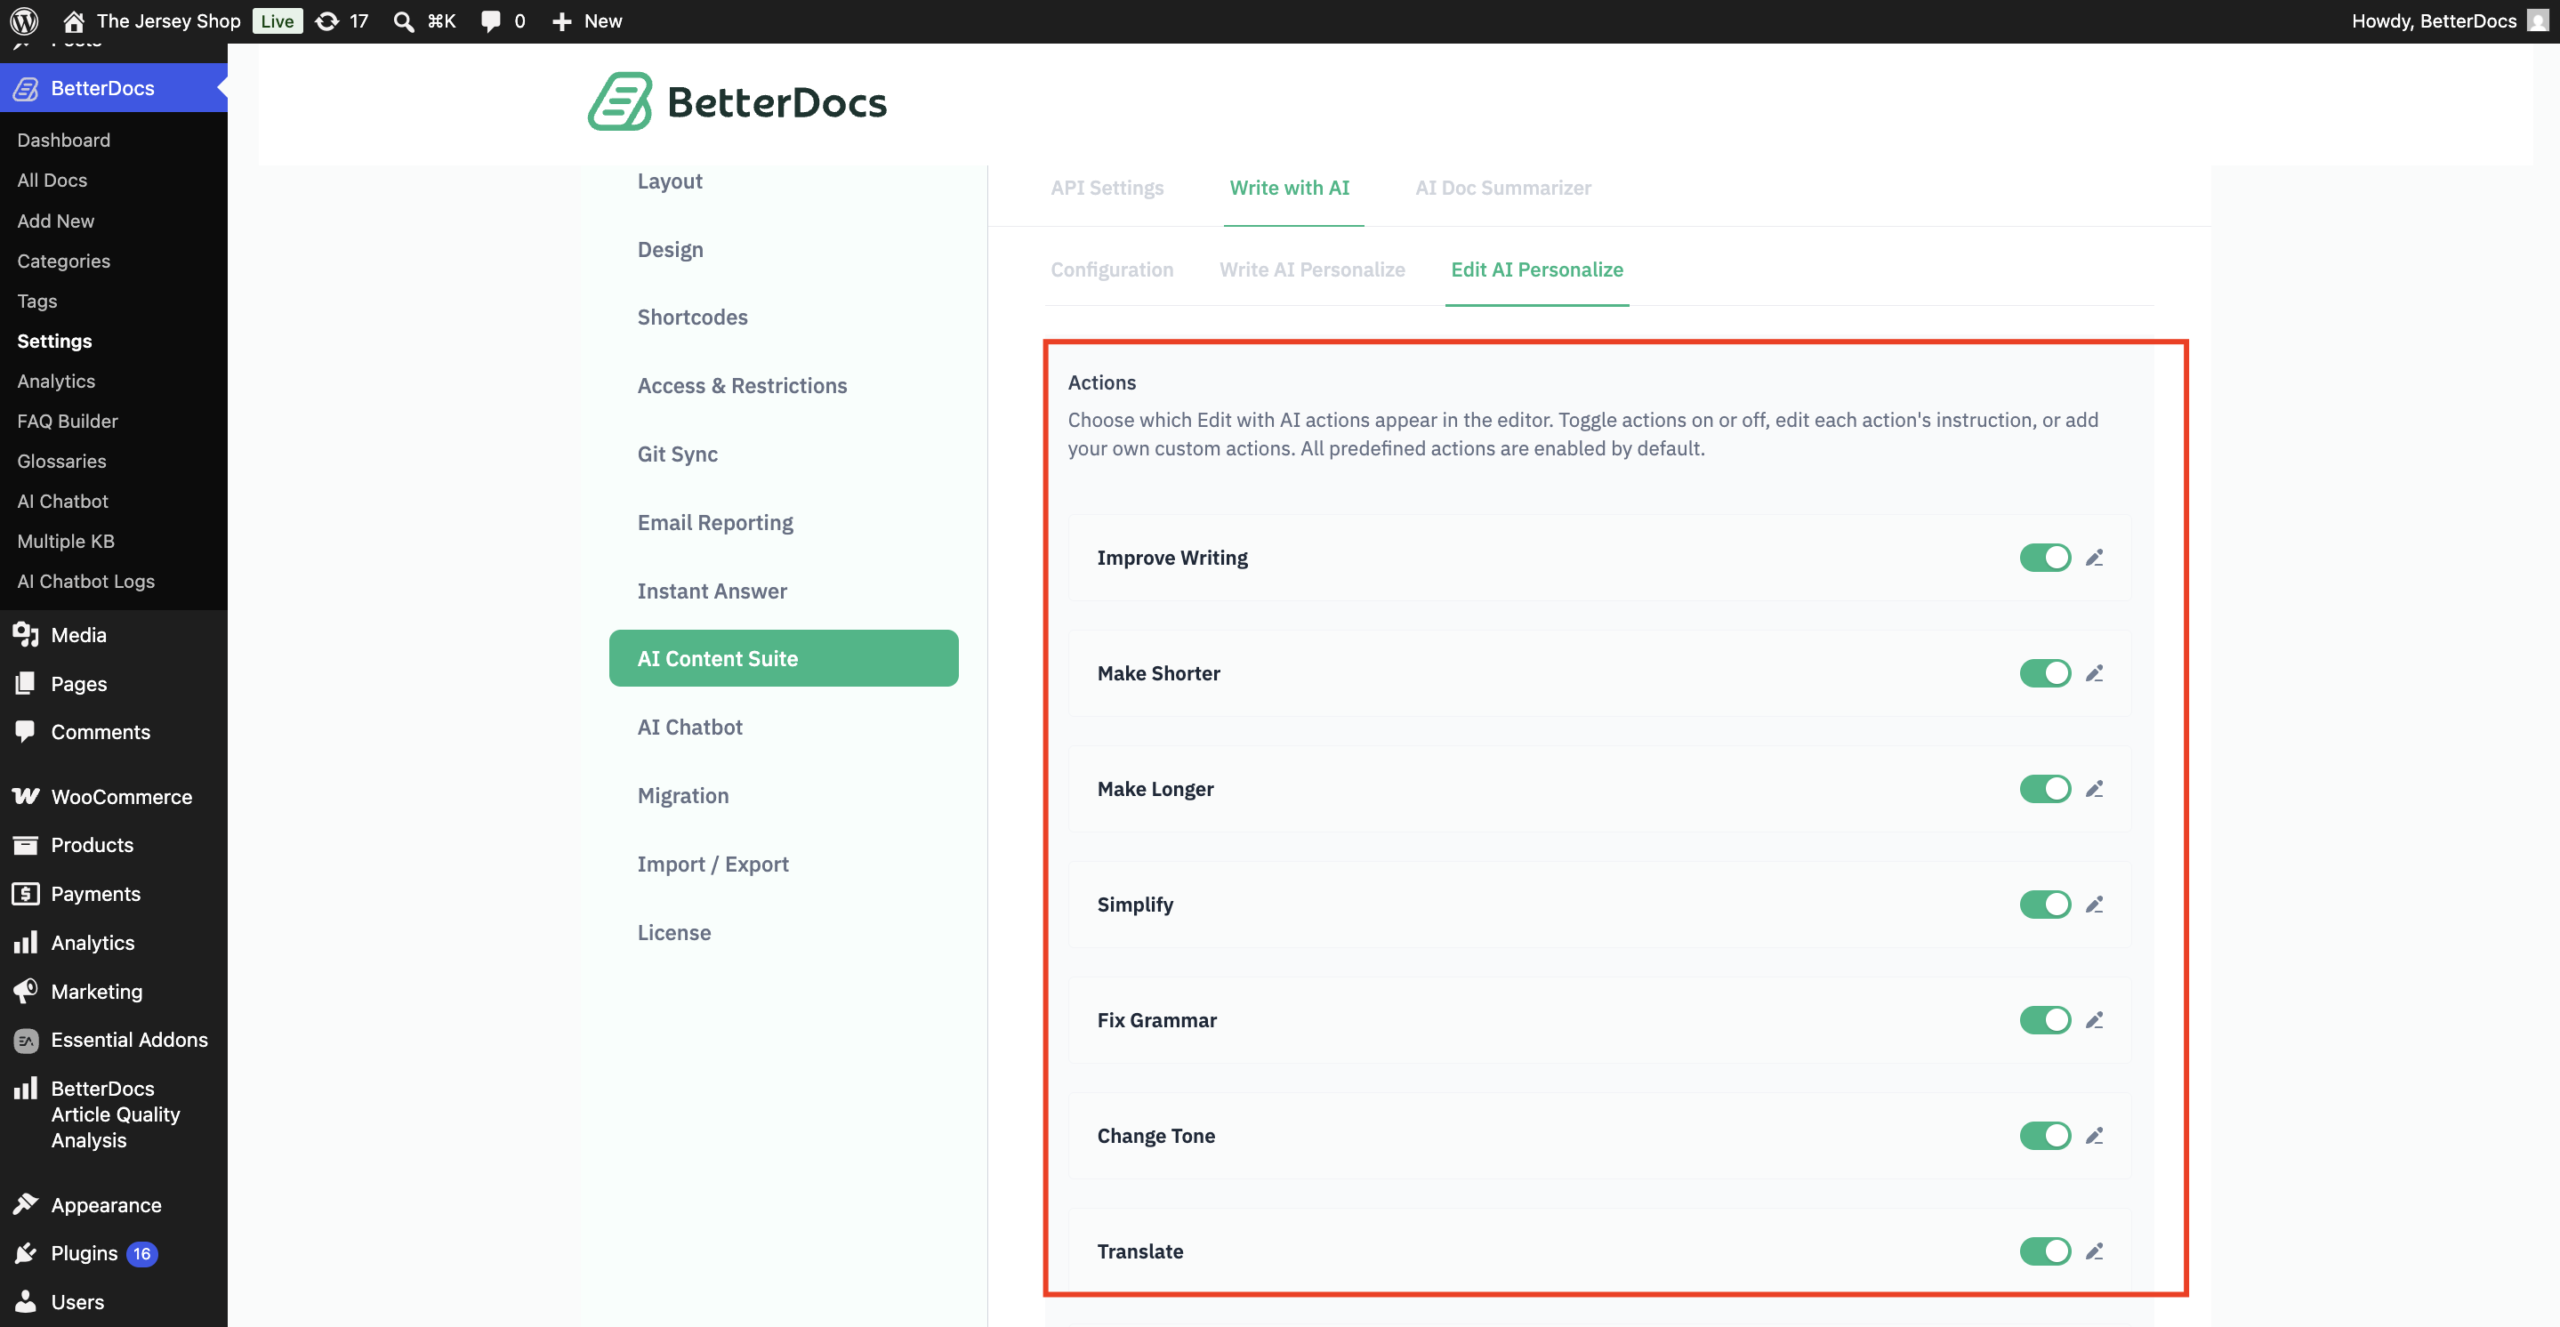
Flip the toggle to turn an action on or off, or click the pencil icon to fine-tune what it actually does.
And if none of those quite hit the mark, you can build your own. Click “+ Add Action” and fill in:
- Action name: what shows up in the editor’s Edit with AI menu (e.g., “Add a TL;DR”)
- Instruction: spell out exactly what you want the AI to do with the selected text
Hit “Save,” and your custom action joins the list, ready to use anytime.
Step 3: Add A New Doc From The Dashboard
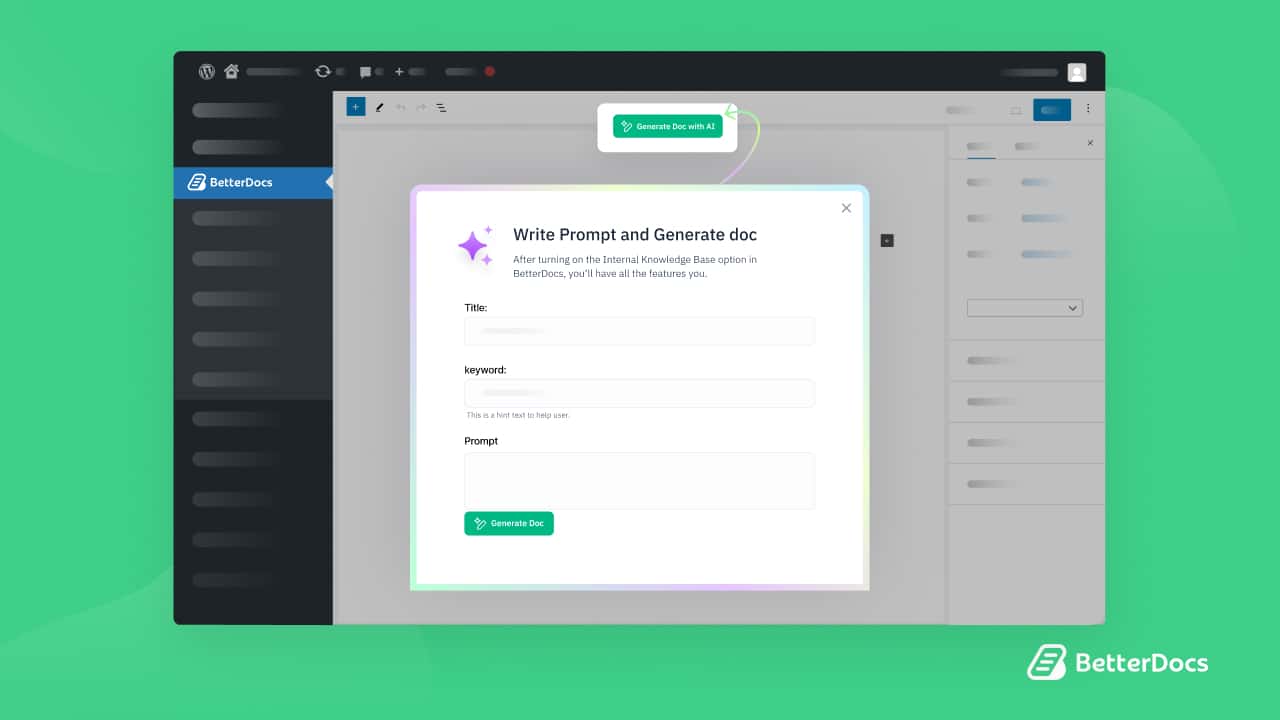
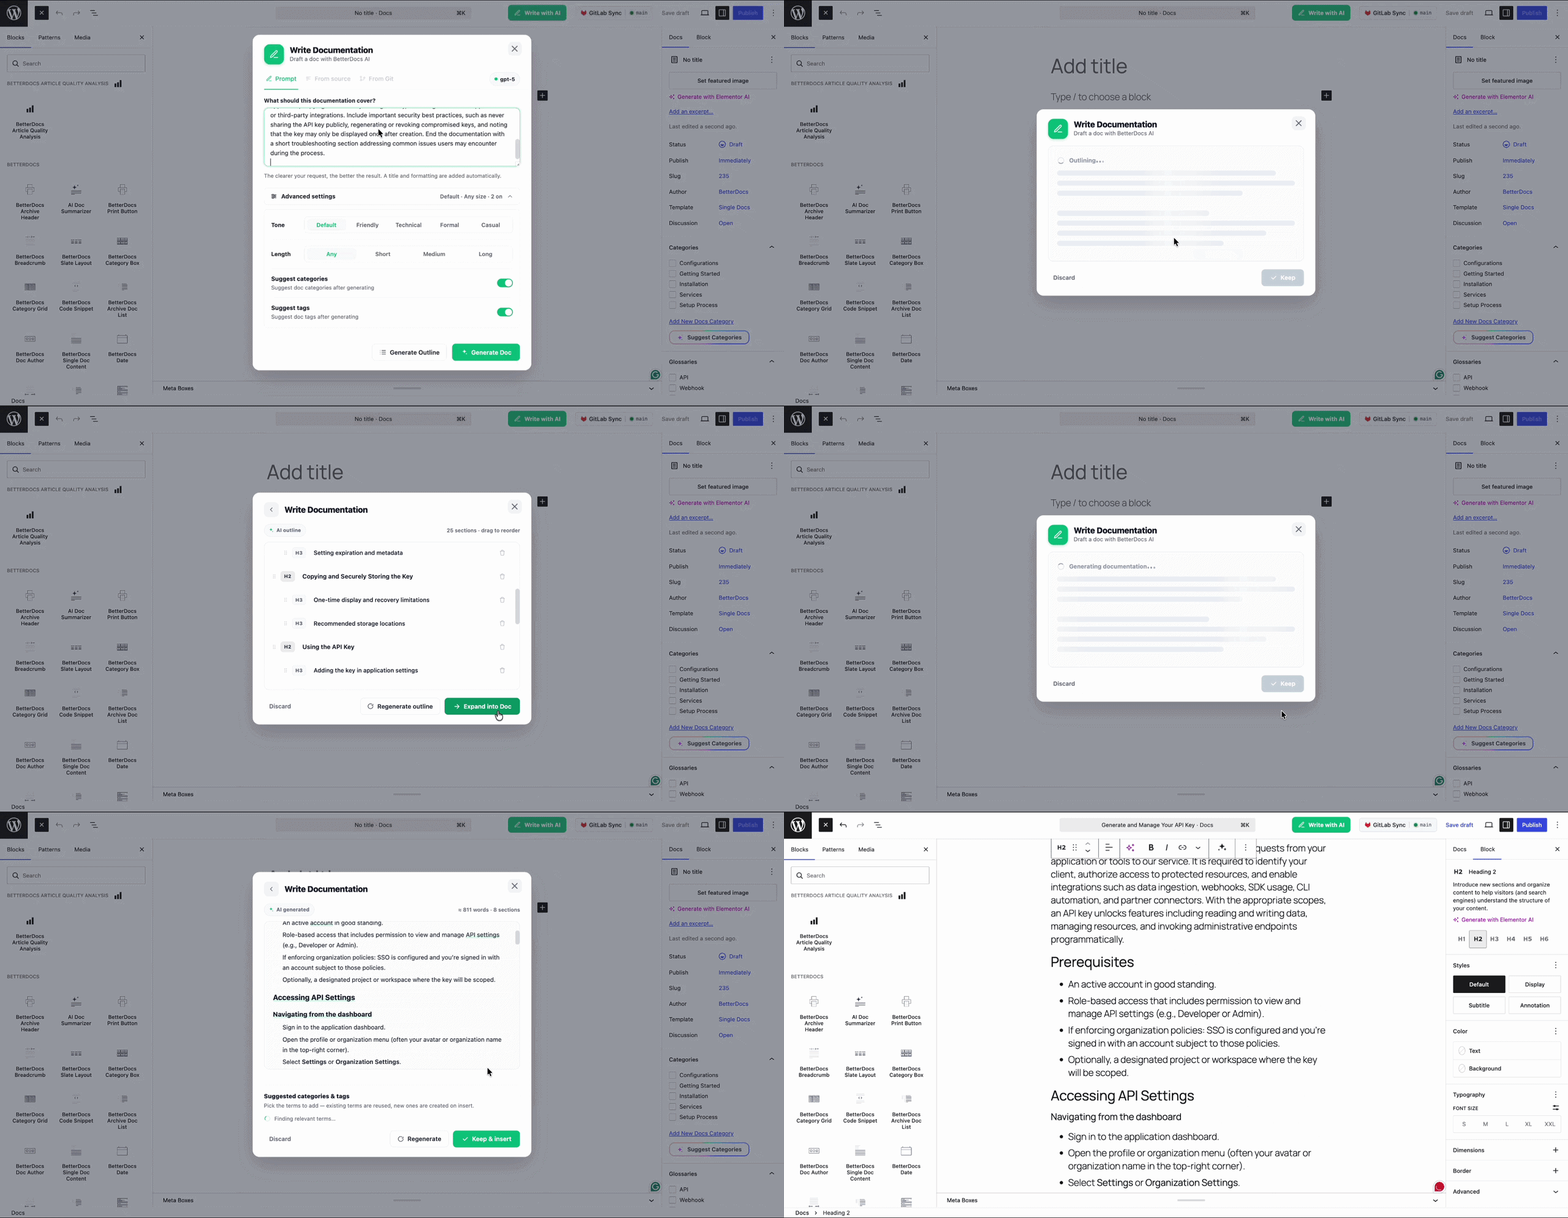
Click “Write with AI” in the top right, and the “Write Documentation” modal pops up with three ways to generate your doc. Now, here you will find three different options.
Step 3.1. Generate from Prompt
On the “Prompt” tab, just describe what the doc should cover. BetterDocs AI handles the title and formatting for you. Want more control? Expand “Advanced settings”:
- Tone: Default, Friendly, Technical, Formal, or Casual
- Length: Any, Short, Medium, or Long
- Suggest categories: get category suggestions after generating
- Suggest tags: get tag suggestions after generating
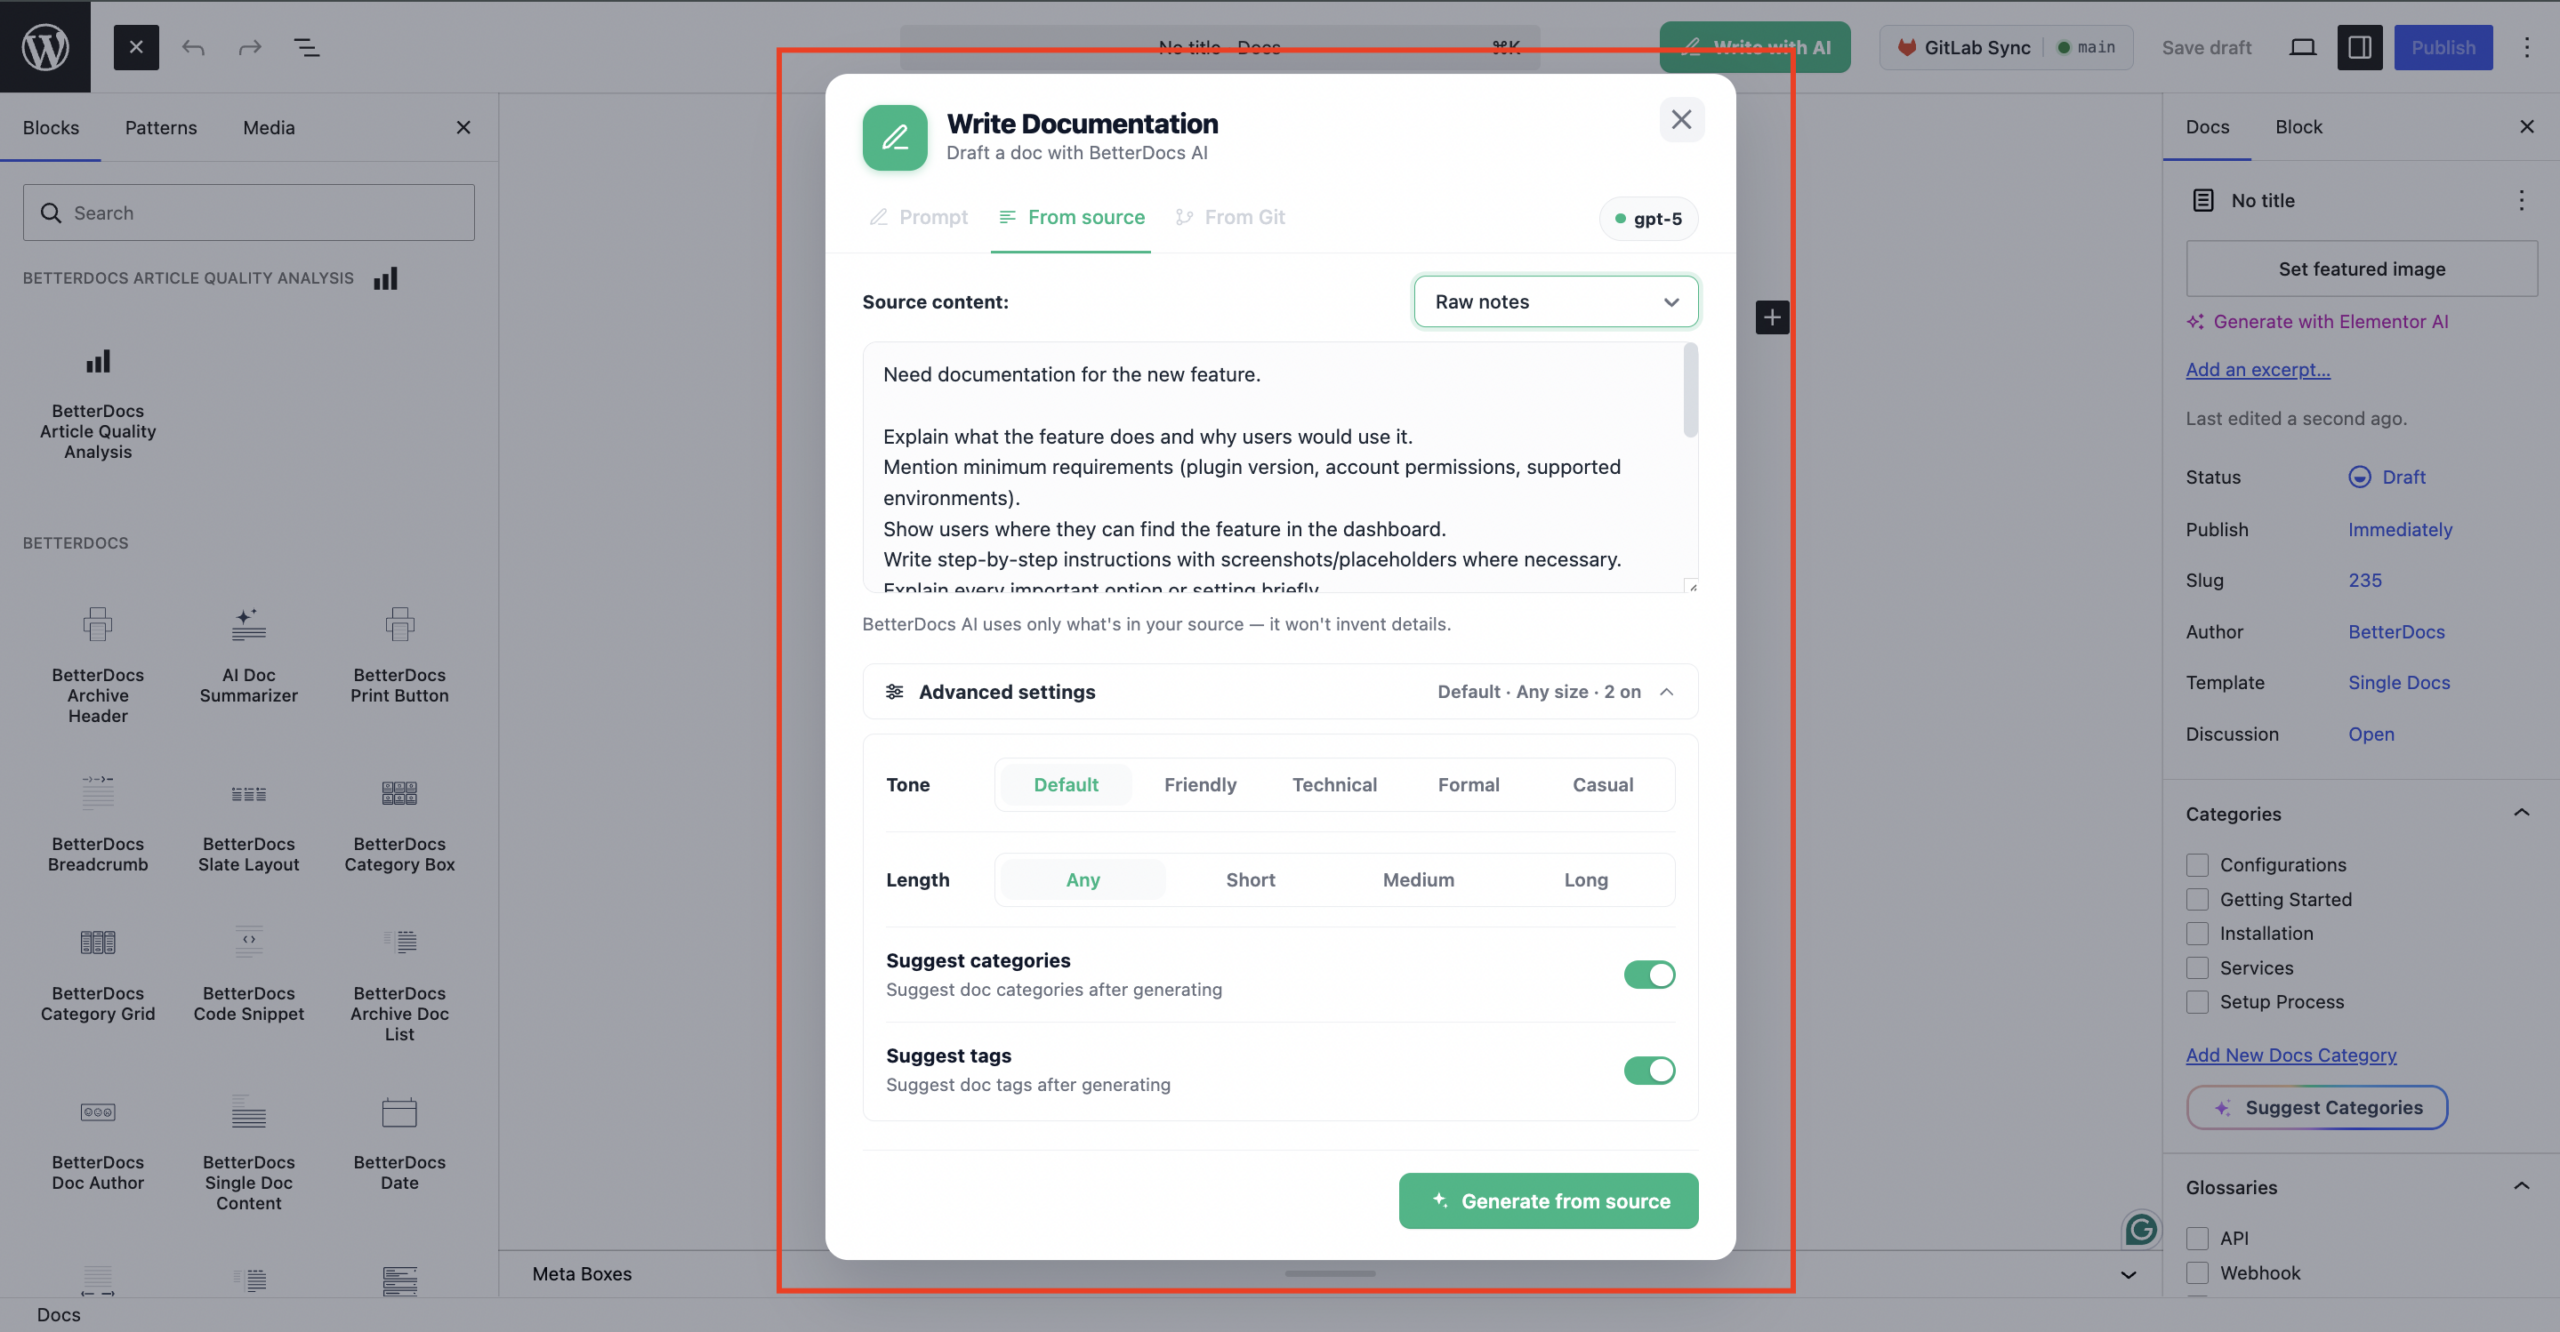
Step 3.2. Generate from Existing Source Content
Got a support chat, forum thread, or rough notes lying around? Switch to “From source”, pick the content type from the dropdown (or leave it on “Auto-detect”), paste your text in, and click “Generate from source.” No made-up details, it sticks strictly to what you paste in.
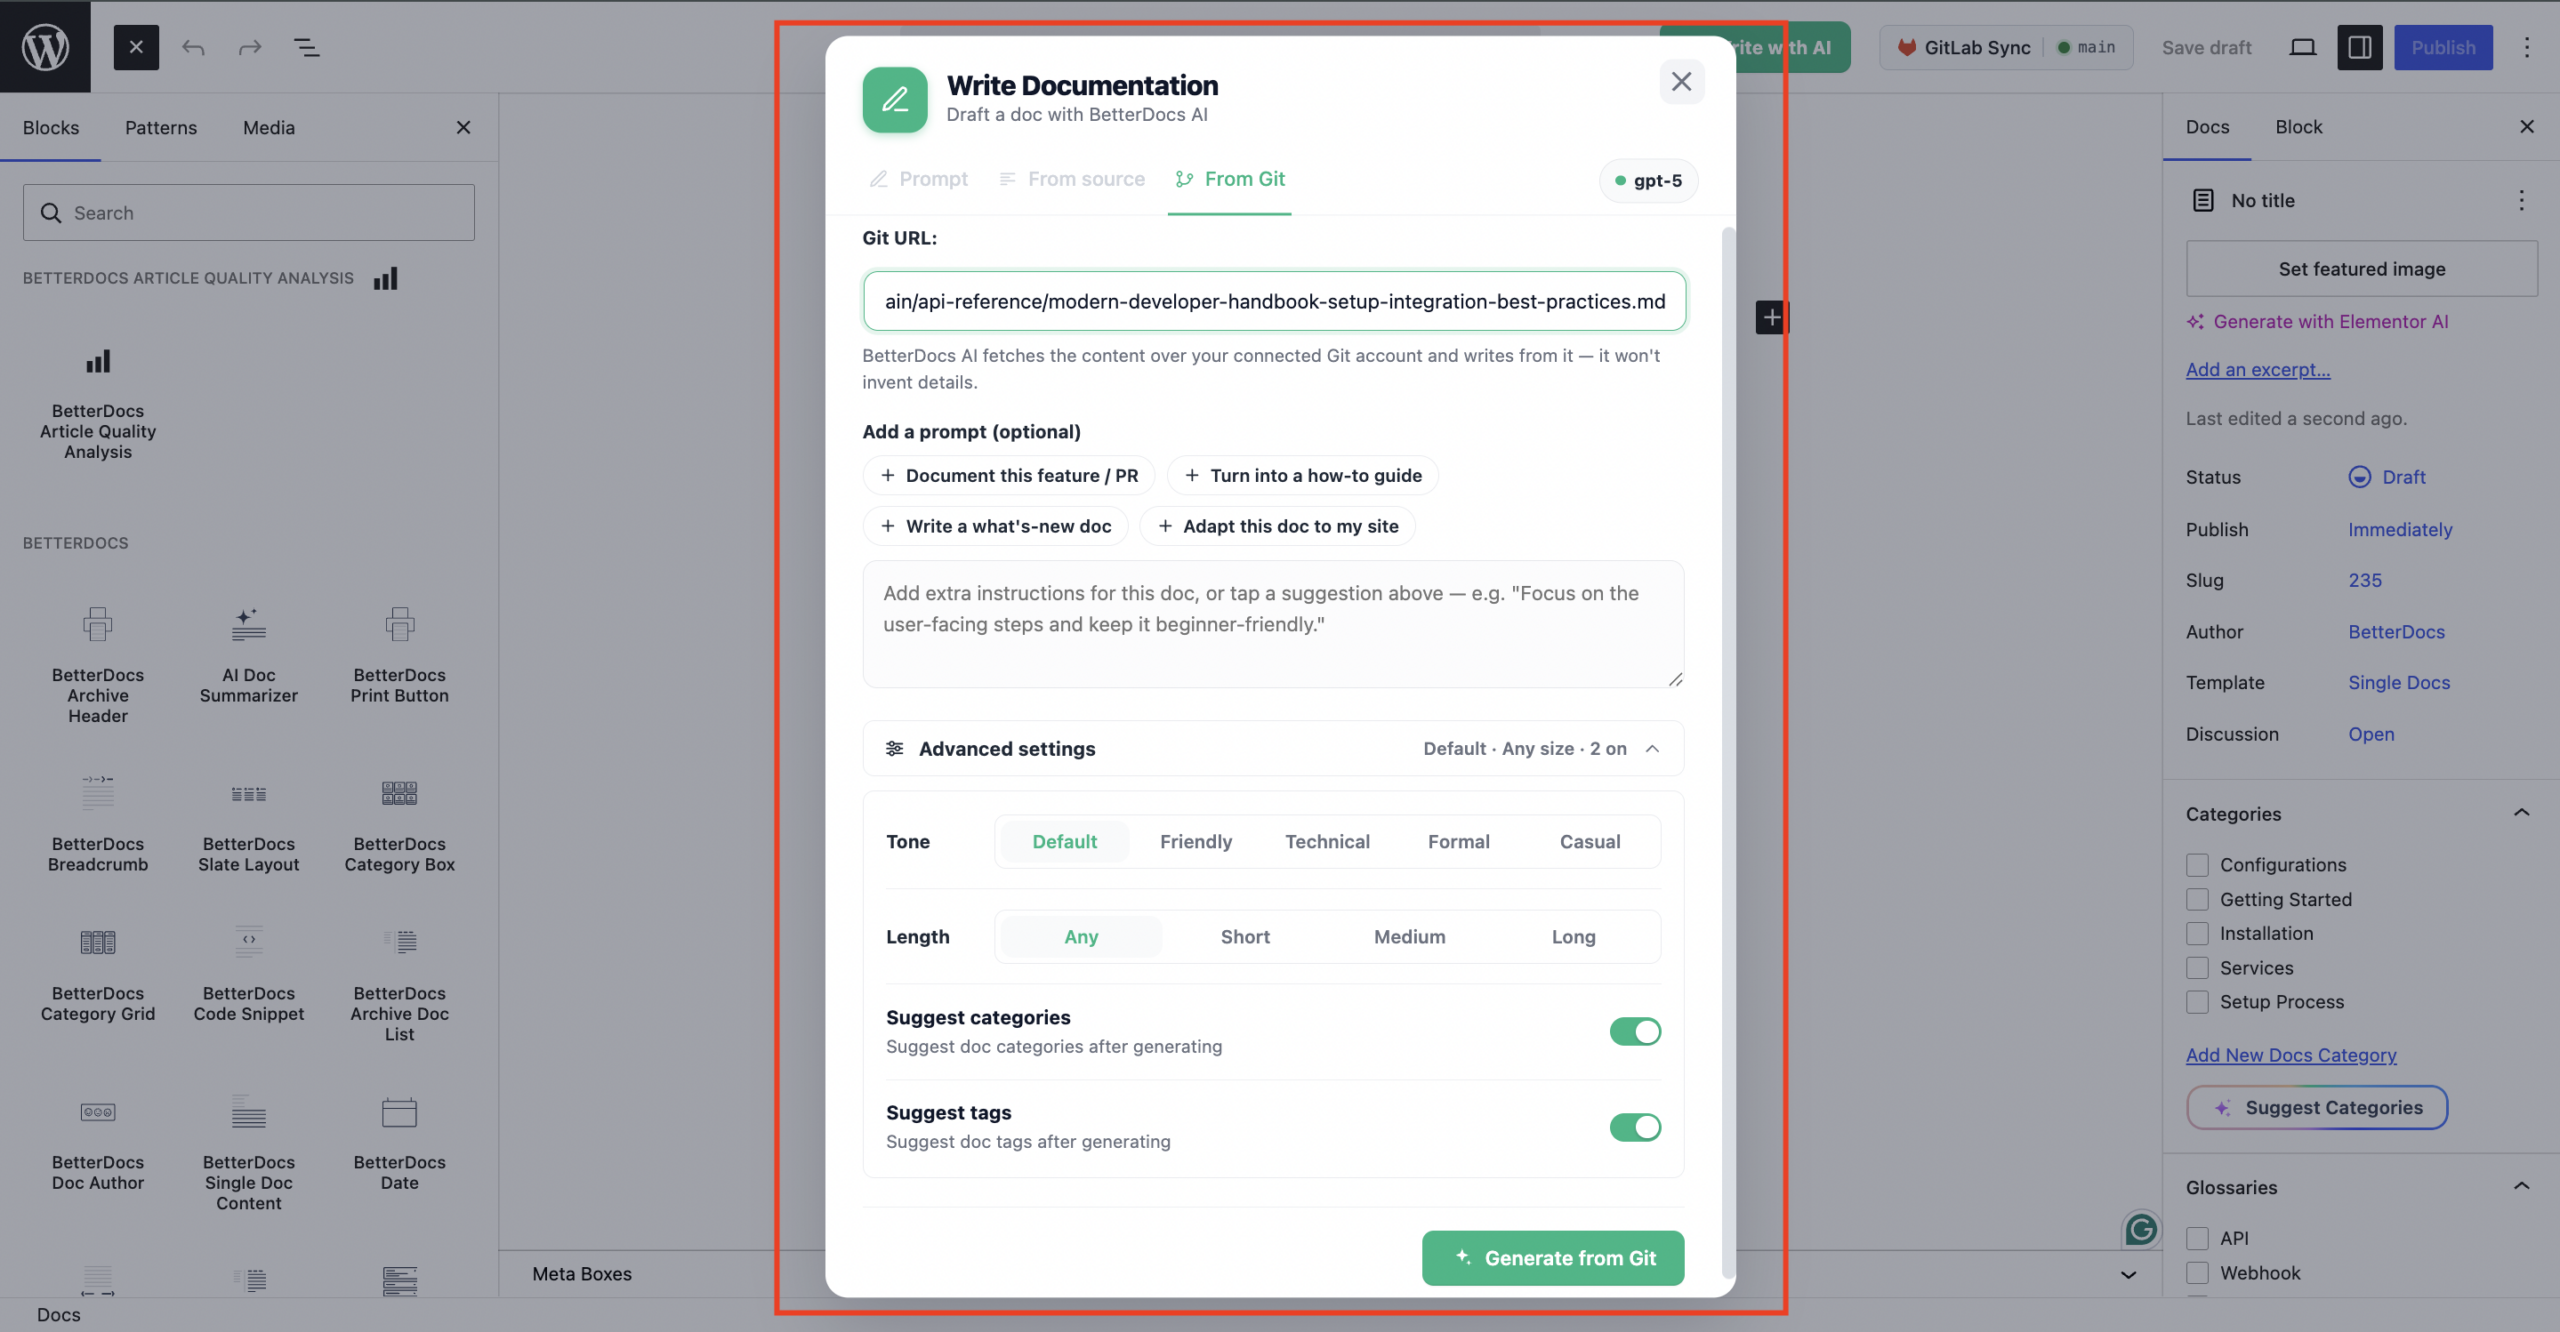
Generate from Git
Switch to “From Git” to turn a GitHub pull request or file URL into a doc. Paste the link, then optionally add a prompt using a quick suggestion:
- Document this feature / PR
- Turn into a how-to guide
- Write a what’s-new doc
- Adapt this doc to my site
This is how you can generate documentation with AI instantly with BetterDocs. To learn more about the process, check the documentation: How To Configure The Write With AI Feature In BetterDocs?
Bonus: Automatically Generate Docs With AI For Your Shopify Site
Considering the vast potential of AI, we have seamlessly incorporated artificial intelligence into our Shopify knowledge base and FAQ app, BetterDocs for Shopify. We call it the ‘Magic AI Autowrite’ feature, a revolutionary automatic documentation generator.
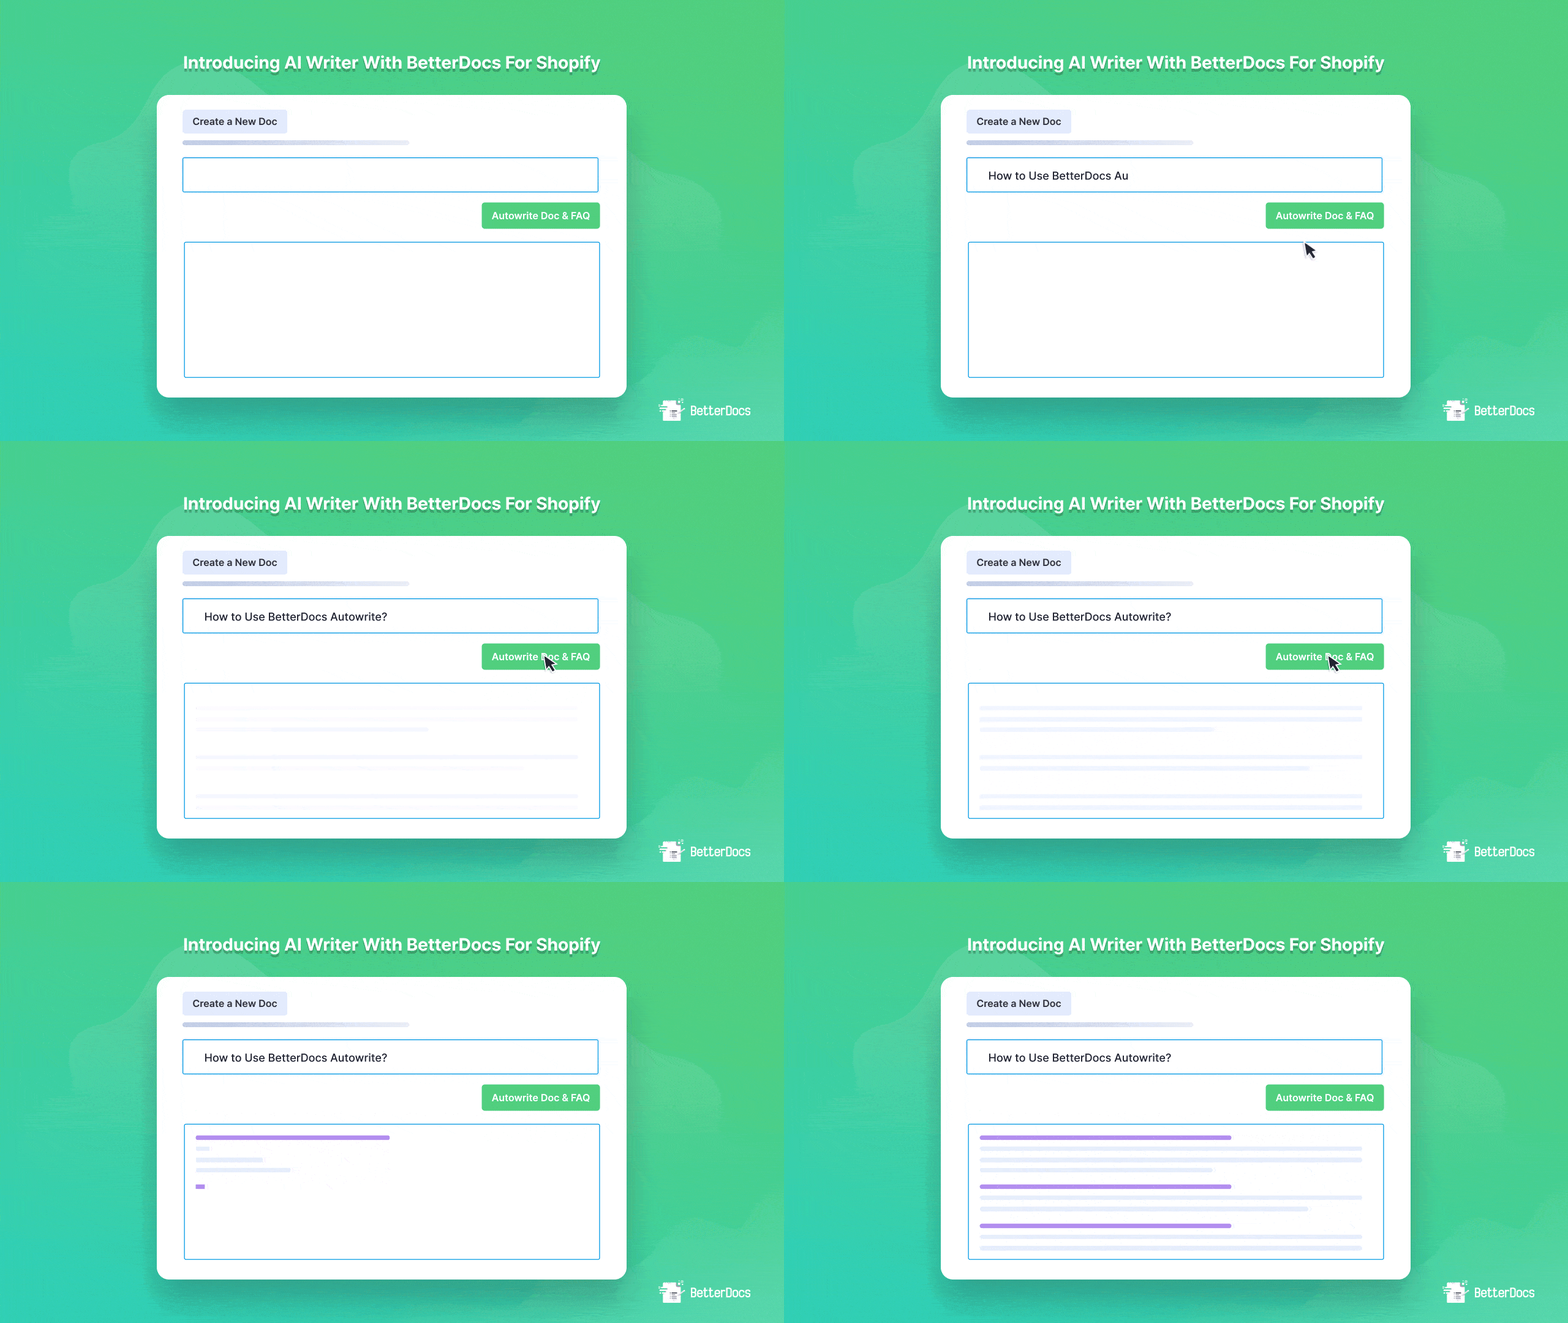
With just a few clicks, you can effortlessly construct a comprehensive self-help center for your Shopify store using this remarkable functionality. To learn more, dive into this comprehensive blog where we have compiled everything to let you know how you can use this magic AI feature in your Shopify documentation.
However, to get more blogs on AI & its benefits, subscribe to our blogs and join the Facebook Community to connect with fellow enthusiasts.