Developers decide whether to integrate with your product within the first few minutes of reading your API reference. If they cannot find the right endpoint, guess which parameters are required or copy a working request, they open a support ticket or leave. Publishing proper API documentation in WordPress used to mean hand-formatting every endpoint, embedding an external tool or keeping a second docs site in sync.
The new API Docs feature in BetterDocs removes that work: you upload an OpenAPI (Swagger) spec or a Postman Collection, and BetterDocs builds a browsable API reference inside your existing knowledge base.

In this guide, we cover what the feature does, walk through every setting from import to publishing, show a worked example with a real-world style order API, and share best practices that make generated docs useful for the developers reading them.
Why API Documentation Needs More Than a Regular Help Article
A help article explains a task in prose. An API reference has a different job: it has to answer the same set of questions for every single endpoint, in the same order, every time. What is the method and path? Which parameters are required? What does the request body look like? What comes back, and in what shape? Developers scan for these answers rather than reading top to bottom, so a reference that changes layout from page to page slows them down and leads to mistakes in their code.
Writing that structure by hand does not scale. For example, an API with 40 operations would mean 40 pages to format, and every release that renames a field or adds a parameter means finding and fixing the affected pages. Many teams give up and host the reference on a separate platform, which splits branding, search and navigation across two sites. Users searching your WordPress knowledge base for “refund” then find the help article but not the endpoint that issues refunds. Keeping guides and references in one place, generated from the spec your engineers already maintain, solves both problems.
What Is the BetterDocs API Docs Feature?
BetterDocs API Docs turns an API specification into a fully rendered API reference inside your knowledge base. You import an OpenAPI (Swagger) spec in JSON or YAML, or a Postman Collection export in JSON, and BetterDocs reads every operation in it. Each endpoint can become its own editable doc with its own URL, grouped by tag and labeled with a method badge such as GET, POST or DELETE. Every page includes request and response tables and code samples, plus a live Try it playground (which you can turn off) where developers can send a test request without leaving your site.
Because the reference is made of regular BetterDocs docs, it sits in the same knowledge base structure, design and navigation as the rest of your documentation. You can restrict it to logged-in users, sync it with the BetterDocs AI Chatbot so the chatbot can answer API questions (the AI Chatbot is a separate addon that requires BetterDocs PRO), and edit any generated page to add context. Titles and content you edit are kept when you re-sync the reference, so your own writing is not overwritten when the spec changes.
Key Features of BetterDocs API Documentation
Here is what you get once a spec is imported, and why each part matters to the developers using your API.
Import OpenAPI (Swagger) Or Postman Collections
You can upload either of the two formats most API teams already produce. OpenAPI specs in JSON or YAML define their schema explicitly, so BetterDocs uses the schema in your spec with no inference needed. Postman Collection exports in JSON work too, which helps teams that test in Postman but have never written a formal spec. BetterDocs detects the format automatically, so there is nothing to configure before the upload.
For Postman files, BetterDocs builds the request body table from a schema it infers from the example values in your requests. If a request body contains “quantity”: 2, the field is shown as a number. For the most precise tables, use an OpenAPI spec where you can; use a Postman export when it is what you have.
One Editable Doc per Endpoint, Grouped by Tag
With Generate endpoint docs turned on, every operation becomes a separate doc with its own URL. Endpoints are grouped by the tags in your spec, so an e-commerce API might show Products, Orders and Customers as groups, with method badges that make GET /orders and POST /orders easy to tell apart at a glance.
A dedicated URL per endpoint means your support team can send a developer straight to POST /refunds instead of a long page with an anchor link. It also means each endpoint is a regular doc in your knowledge base that you can edit, link to and organize like any other.
AI-Generated Descriptions And Examples
Most real-world specs have gaps: an endpoint with no summary, a parameter with no description, a response with no example. BetterDocs can fill these with AI, either during import through the AI content option or later with the AI generate button on the reference. It reports how many fields it generated, and if your spec is already fully documented, it tells you there is nothing to generate. AI content uses the AI provider connected in your BetterDocs settings, so connect one before you use it. [VERIFY: which provider and where it is configured.]
This is useful for internal APIs that grew without documentation. You get a readable first draft for every endpoint, which your team can then review and correct in the editor instead of writing each description from a blank page.
Live Try It Playground with cURL
Each endpoint doc can include a Try it button that opens a playground drawer. It shows the base URL and an editable request body, plus a live cURL command that updates as you edit, with a copy button. A developer can change a value, send the request and copy the exact command into their terminal or script.
If your API does not allow browser requests from your docs domain, turn on the Try it proxy. It forwards requests through your server so the browser’s CORS policy does not block them.
Brand Styling, Code Snippets And Access Control
You can set an accent color and accent text color for the Try it banner and Send button, choose Light or Dark styling for generated code blocks, and hide the Try it button when you only want to show the method and path. Code can also be displayed through the BetterDocs Code Snippet block in Gutenberg or element in Elementor.
For private or partner-only APIs, access is controlled at the category level through BetterDocs Access & Restrictions, the same way you manage an internal knowledge base. If you use the BetterDocs AI Chatbot addon (requires BetterDocs PRO), you can also sync API docs with it so it answers questions from your reference.
How to Generate API Documentation with BetterDocs: Step-by-Step Guide
Before you start, have your OpenAPI spec (JSON or YAML) or Postman Collection export (JSON) saved on your computer, and make sure BetterDocs is updated to the latest version. Some options in this guide also need BetterDocs PRO or a paid addon: creating the reference as its own knowledge base (Multiple Knowledge Bases), category-level access control (Internal Knowledge Base), AI Chatbot sync (the AI Chatbot addon, which requires PRO) and Git integration (PRO).
Step 1: Open the API Docs Screen
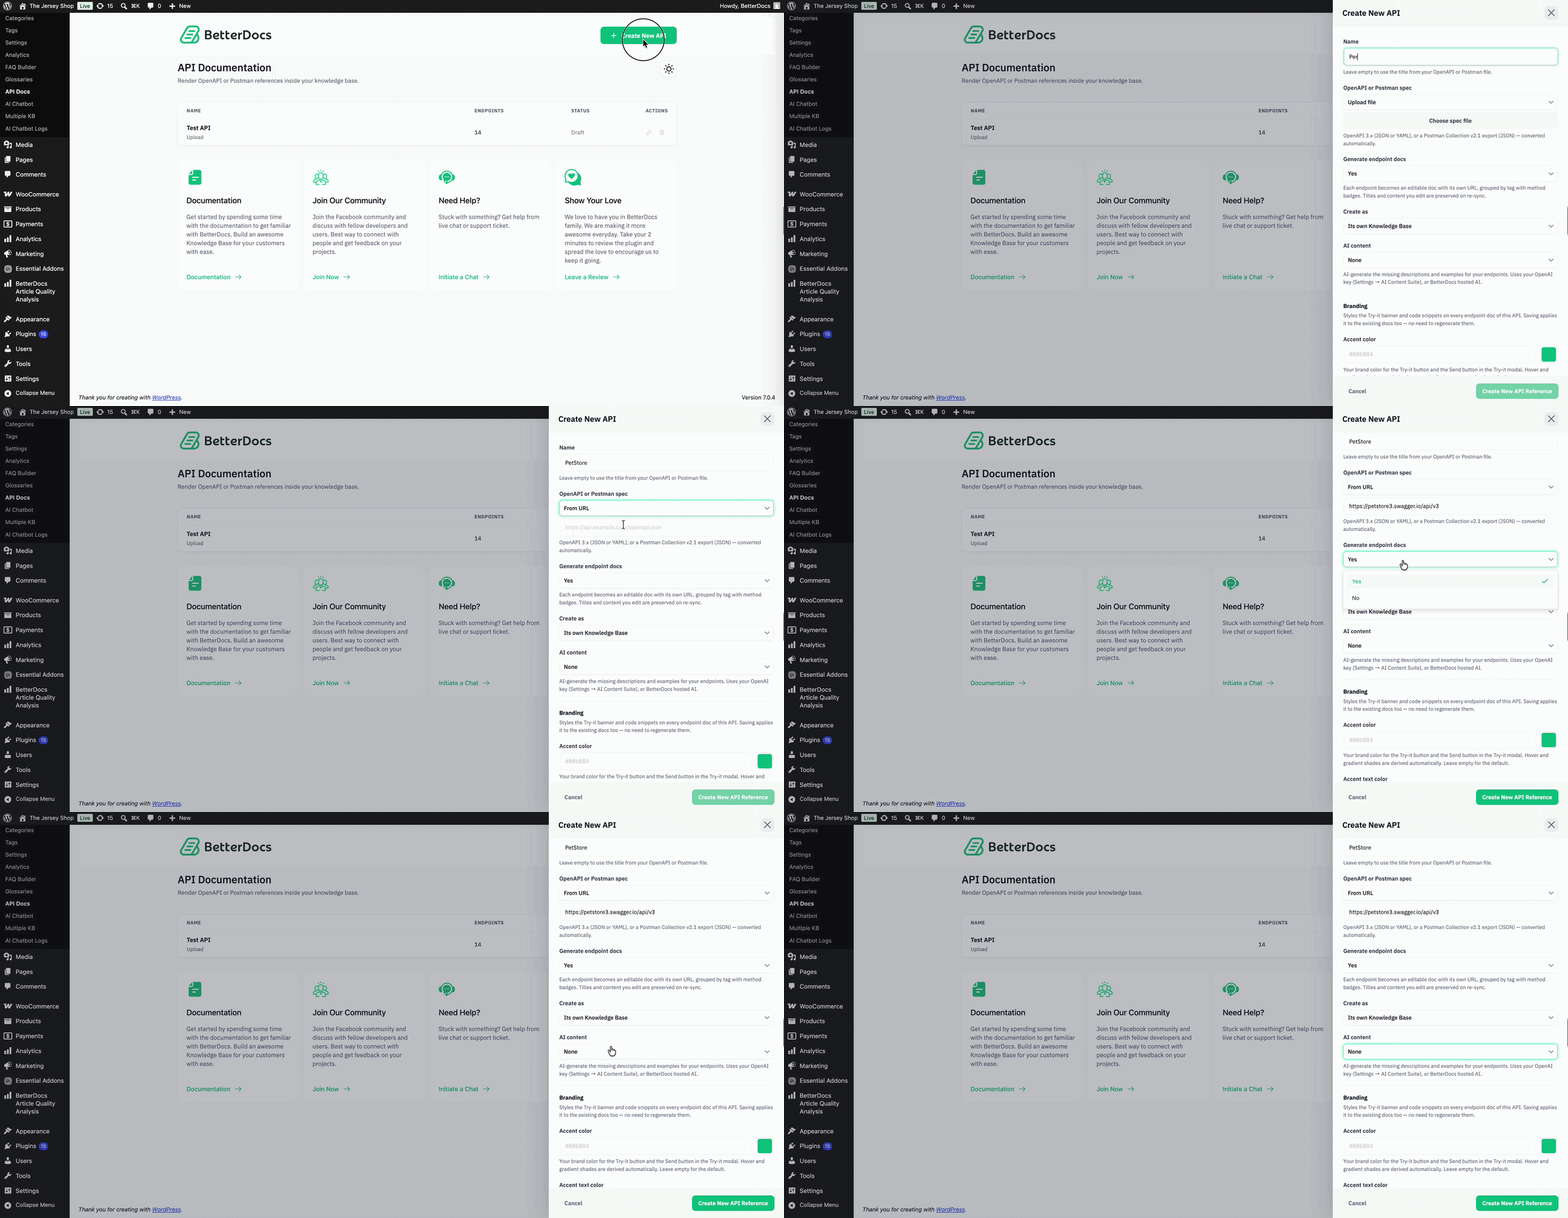
In your WordPress dashboard, go to BetterDocs → API Docs. The API Documentation screen lists every API reference you have created. To add one, click Create New API in the top-right corner.

Step 2: Import Your API Spec
A panel opens with the import options. Leave Name empty to use the title from your spec, or type your own, for example, “Store API v2”. Under OpenAPI or Postman spec, choose Upload file and select your file. Set Generate endpoint docs to Yes if you want each endpoint as its own editable doc, grouped by tag with method badges. Under Create as, choose Its own Knowledge Base or add the reference to an existing one. Under AI content, keep None, or choose Descriptions, Examples or both to fill gaps with AI during import.
Step 3: Customize Your Reference’s Appearance And Behavior
Before you create the reference, scroll down in the same panel to the display settings. These work the same way for OpenAPI and Postman imports. Set the Accent color and Accent text color to match your brand; they apply to the Try it banner and Send button on every endpoint doc in the reference. Turn off the “Show the Try-it button” if you only want to show the method and path, and pick Light or Dark for “Code Snippet default mode”.
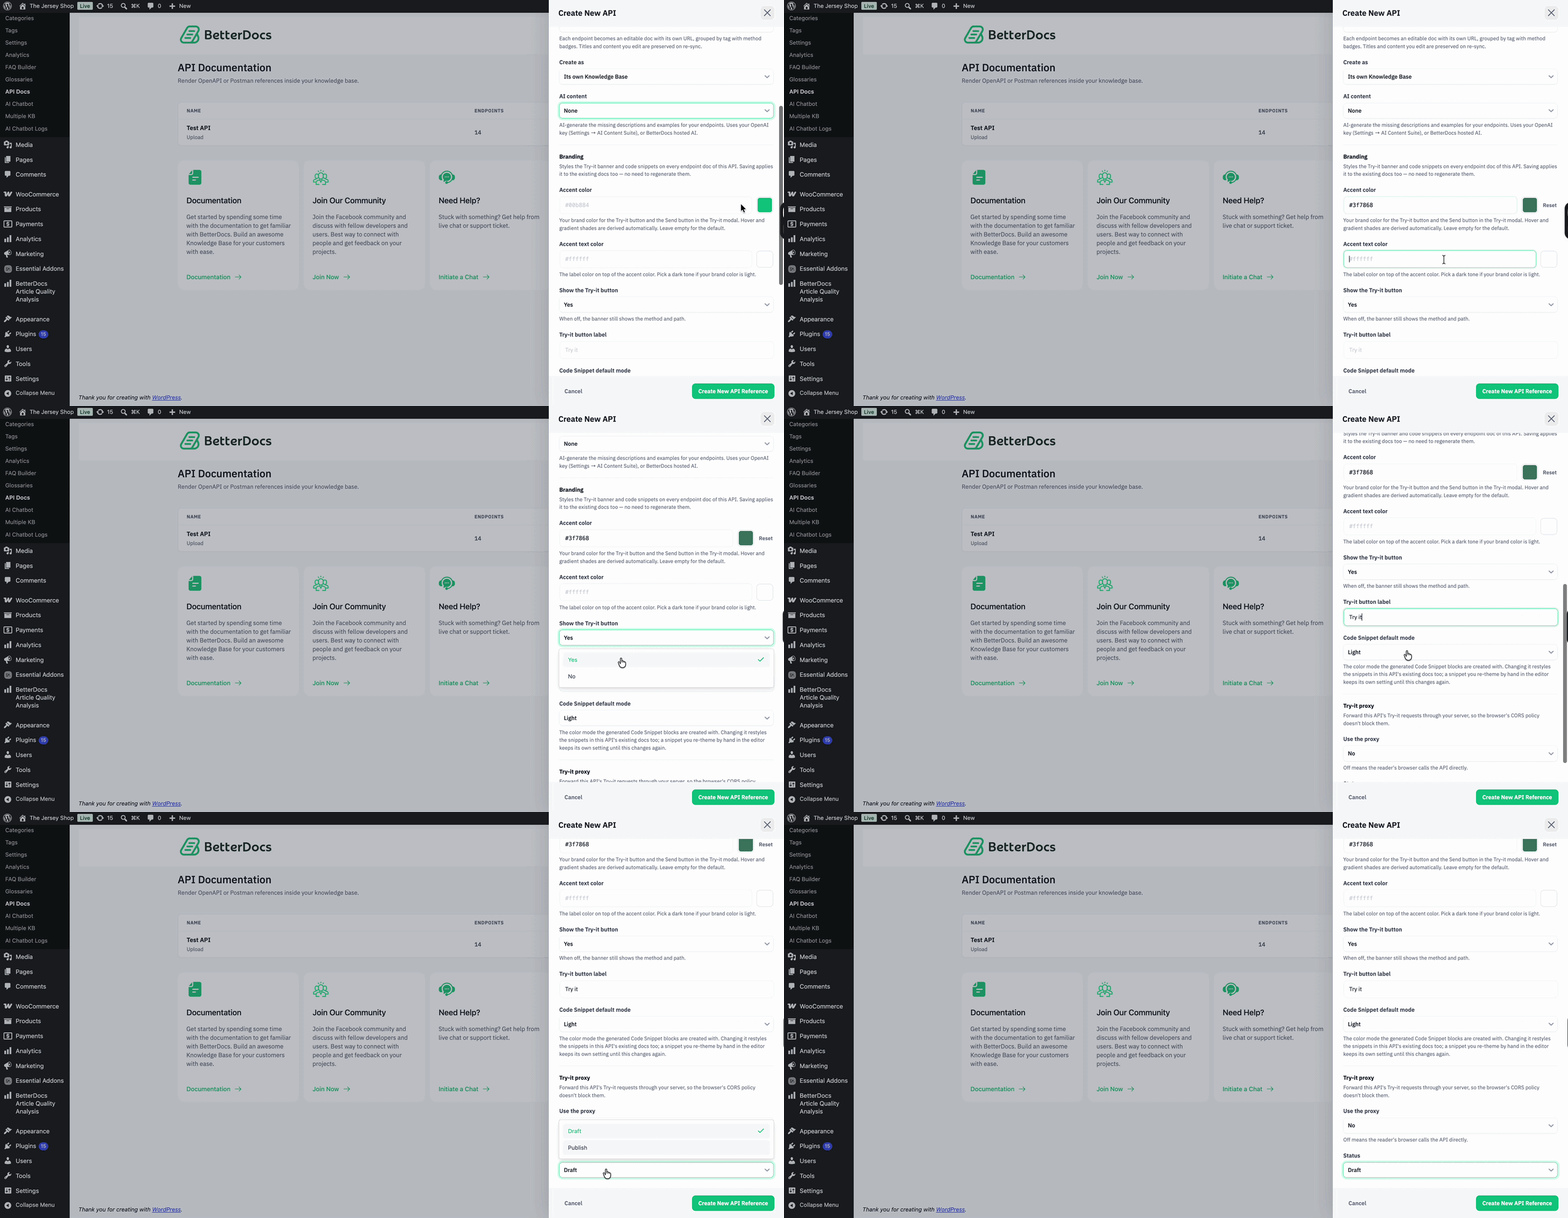
If browser requests to your API are blocked by CORS, enable Use the proxy under Try-it proxy. Finally, set Status to Draft while you review, and switch it to Published when the reference is ready.
When everything is set, click Create New API Reference. BetterDocs shows a summary with the detected format, the number of operations and the spec title. Check that the operation count matches your API; if your spec has 24 operations and the summary shows 18, some paths may be missing from the file you uploaded.
Step 4: Generate Endpoint Docs
Click Generate Endpoint Doc on the reference if you set Generate endpoint docs to No in Step 2. BetterDocs creates an editable doc for every endpoint, each with its own URL, grouped by tag with method badges. If you chose Yes in Step 2, these docs already exist, so you can go straight to reviewing them. If you use the AI Chatbot addon, you can also see the sync status here.

Open a few endpoint docs and add the context a spec cannot hold: when to use the endpoint, rate limits, and common mistakes. Your edited titles and content are preserved when you re-sync after an API update.
Step 5: Auto-Generate Missing Descriptions with AI
If your spec was missing descriptions, open the reference and click AI generate. BetterDocs fills the missing descriptions and examples across the whole reference and tells you how many fields it generated.

Review the generated text before publishing, especially for endpoints with side effects such as payments or deletions, where a vague description can lead to costly mistakes in a developer’s integration.
Step 6: Test Endpoints with the Try It Playground
Open any endpoint doc and click Try it. The playground drawer shows the base URL, an editable request body and a live cURL command that updates as you type. Change a value, send the request and confirm the response matches what the doc describes.
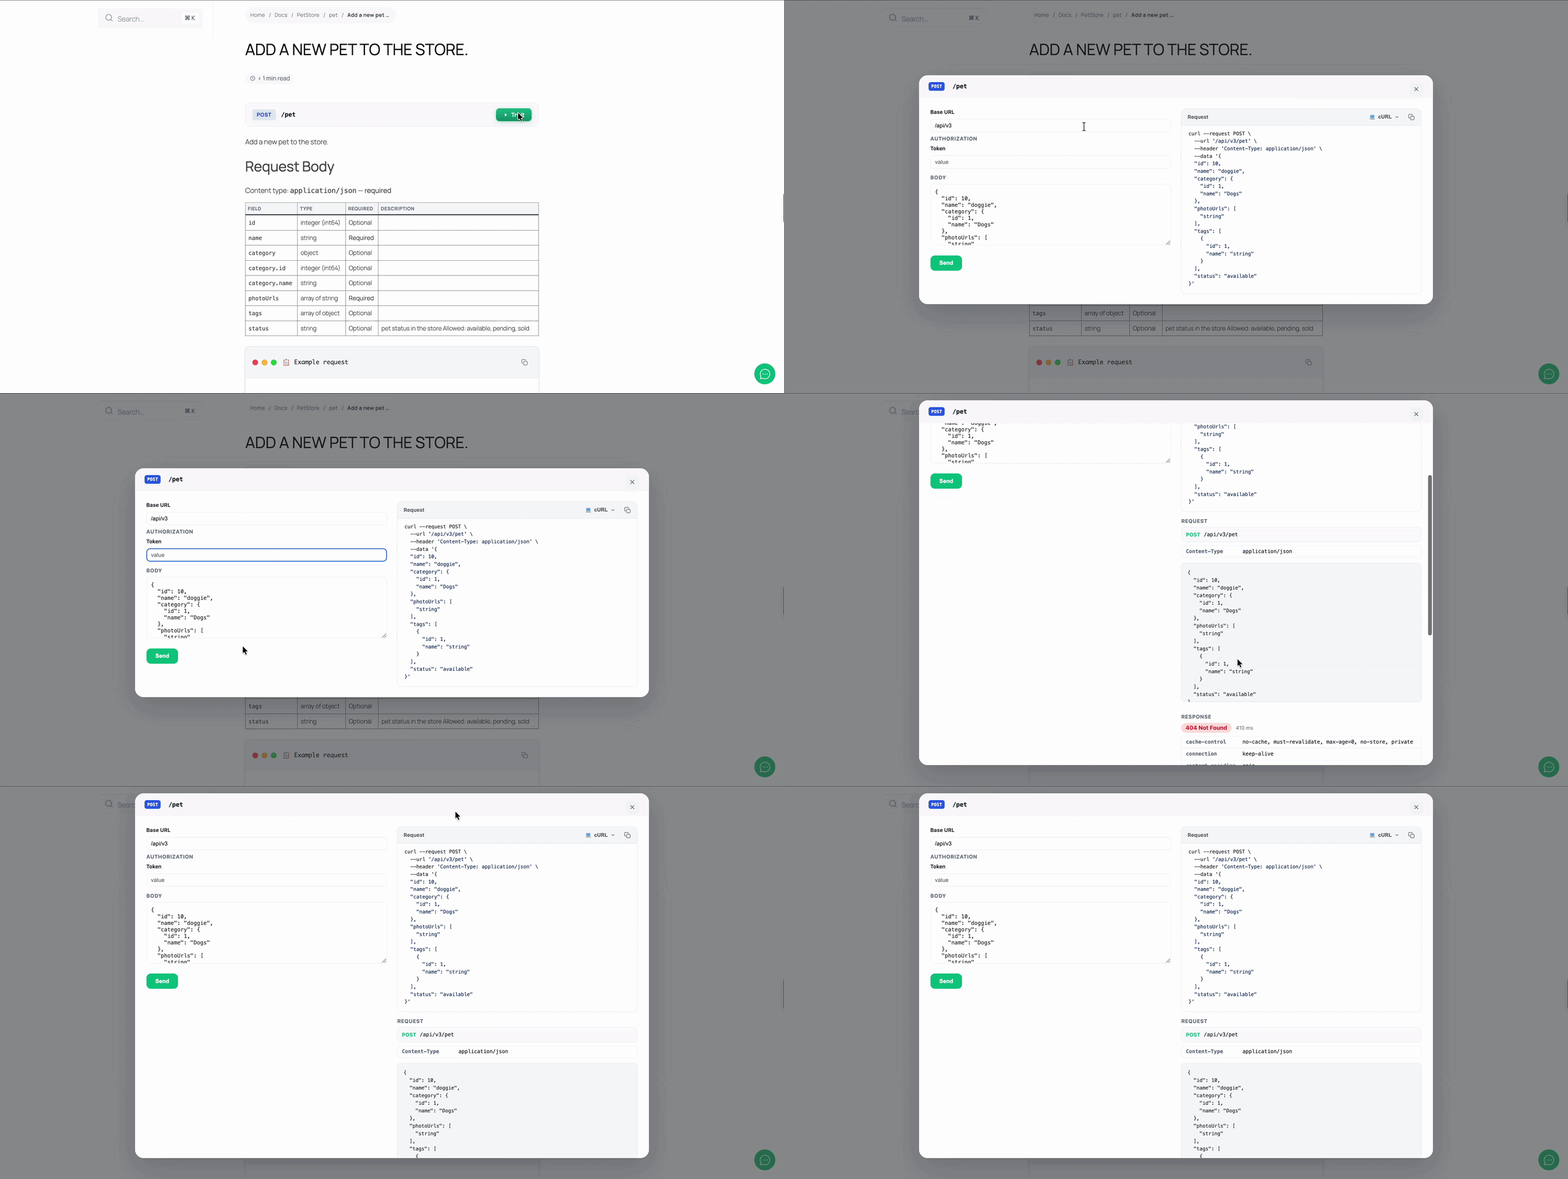
Testing a handful of endpoints yourself before launch is the quickest way to catch a wrong base URL, a missing auth header or an outdated example in the spec.
Step 7: Restrict Who Can See Your API Docs
API Docs has no separate visibility toggle; access is set at the category level. Go to BetterDocs → Access & Restrictions, select the category your endpoint docs live in, and set it to logged-in users only.

To confirm it works, open an endpoint doc in a private or incognito window. You should be asked to log in instead of seeing the reference.
Step 8: Sync with AI Chatbot And Show Code Snippets
Sync your API docs with the BetterDocs AI Chatbot so it can answer questions such as “Which endpoint creates a customer?” using your reference. This needs the AI Chatbot addon, which requires BetterDocs PRO and an OpenAI API key on a paid plan. To display code inside any doc, add the Code Snippet block in Gutenberg or the Code Snippet element in Elementor.
Once this is done, your spec is a live, browsable API reference with code samples, request and response tables and a working Try it playground.
For a more detailed walkthrough, follow the API documentation setup guide.
Example: Publishing an Order API Reference from a Postman Collection
Picture a WooCommerce extension team that has tested their order API in Postman for two years but never written a spec. Their collection has 16 requests across three folders: Orders, Products and Webhooks. They export it as JSON, upload it in BetterDocs, set Name to “Order Sync API”, choose Its own Knowledge Base and select Descriptions under AI content because half the requests have no description.
After import, the summary shows 16 operations. They generate endpoint docs, which gives them 16 pages such as POST /orders and GET /orders/{id}, grouped by tag. The request body table for POST /orders is inferred from the example values, so “total”: 49.99 shows as a number and “status”: “pending” as a string.
They set the accent color to their brand blue, enable the proxy because their API blocks cross-origin requests, test POST /orders in the Try it drawer and copy the cURL command into their onboarding email for partners. Finally, they limit the category to logged-in users so only partners with accounts can see it. Instead of formatting 16 endpoint pages by hand, they publish a complete reference from the collection they already had.
Best Practices for API Documentation That Developers Use
Generation handles structure; these habits make the content around it worth reading.
Write a Quickstart before the Reference
Link your reference from a short getting-started doc that takes a developer from zero to a first successful call: get an API key, send one request, read the response. A developer who succeeds in five minutes is far more likely to keep going.
Use the Try it playground in that quickstart. For example, link directly to GET /products so readers can see a real response on their first visit.
Fill Your Spec Before You Import
The better your spec, the better your docs. Add summaries, parameter descriptions and example values in OpenAPI where you can, and use AI content only for the gaps. Your engineers then maintain one source, and the docs follow.
Document Errors And Authentication Clearly
Add a section on each important endpoint that lists error codes, what triggers them and how to fix them, for example a 422 on POST /orders when a product is out of stock. Do the same for authentication: say where the key goes, how long tokens last and what a 401 means.
Re-sync on Every Release
When the API changes, upload the updated spec and re-sync. Your edited titles and content stay in place. Pair each release with a changelog doc, and if your docs live in a repository, look at BetterDocs Git integration (PRO) to keep content updated with your code.
Who Should Use BetterDocs API Documentation?
Any team that ships an API and already runs, or wants to run, its documentation on WordPress can use this feature. These are the groups that benefit most.
SaaS Companies
Publish your public API reference next to your user guides, so a customer reading about webhooks can open the webhook endpoint in the same search results. Your support team gets one knowledge base to link from, and the AI chatbot can answer both product and API questions.
WordPress Plugin And Theme Developers
Document the REST API endpoints your plugin registers so integrators and agencies can extend it without reading your source code. One reference per major version keeps older integrations supported.
Agencies And Internal Teams
Turn the Postman collection you built during a project into handover documentation for the client, and restrict it to logged-in users. Internal platform teams can do the same for private service APIs.
E-commerce And Partner Programs
Give wholesalers, resellers and fulfillment partners a private API reference for orders, inventory and shipping, with a Try it playground they can use to test their integration before going live.
Publish Your First API Reference with BetterDocs Today
Good API documentation shortens integrations and cuts the support tickets that come from guesswork. With BetterDocs API Docs, you upload the OpenAPI spec or Postman Collection you already have, and get one editable doc per endpoint, AI help for missing descriptions, a Try it playground with cURL, brand styling and category-level access control, all inside your WordPress knowledge base. Update BetterDocs, open BetterDocs → API Docs and click Create New API to publish your first reference.
Which feature are you going to try out after upgrading to PRO? Let us know in our Facebook Community. Do not forget to subscribe to our blog for more information and industry insights.