
BetterDocs Write With AI feature helps you automatically write documentation from scratch using a few keywords and prompts. With this, you can quickly build a powerful and enriched knowledge base for your WordPress website with the help of artificial intelligence.
[Note: You can also generate FAQ with AI in BetterDocs for FREE. Follow this documentation to learn how to write FAQ with AI on WordPress Using BetterDocs.]
How To Configure an OpenAI API Key In BetterDocs? #
Follow the step-by-step guide below to learn how to configure the Write With AI feature in your knowledge base for WordPress websites with just a few steps.
Note: Before getting started, you need to install and activate BetterDocs on your website.
Step 1: Navigate to AI Content Suite #
To use this feature, you have to integrate OpenAI into BetterDocs on your website. And to do so, first, you need to retrieve your OpenAI API Key.
From the BetterDocs dashboard, navigate to Settings → AI Content Suite. There you will find the option to add an API key from the ‘API Settings’ tab.

Step 2: Create API Key from OpenAI Platform Page #
To get the API key, go to the OpenAI platform page. Click the ‘Create new secret key’ button, and a prompt will ask you to give a name.

Type any name of your preference and hit the ‘Create secret key’ button. Your secret key will be generated automatically and instantly. Then copy the key by clicking on the copy icon.

Step 3: Paste the API Key in BetterDocs Settings #
After copying the API key, now paste it into the ‘API Key’ field inon your BetterDocs settings. Then, hit the ‘Save Changes‘ button as shown below.

How to Configure the ‘Write with AI’ Settings? #
After you add the OpenAI API key, you can personalize the entire AI settings. For this, switch to the ‘Write with AI’ tab from the settings. From there, you will first find the option to configure the settings. Here you can enable or disable the AI doc features and set the OpenAI API model to generate your documentation with AI.

Step 1: Personalize How BetterDocs AI Writes #
Go to wp-admin → BetterDocs → Settings → AI Content Suite → Write with AI → Write AI Personalize. This is where you manage the instruction sets that steer BetterDocs AI’s writing style. The ‘Default/Core’ set is always applied as the base prompt, and any extra sets you add can be picked from the ‘Write with AI’ popup when generating a doc.
Step 1.1: Edit the Default/Core Instructions #
Click the pencil icon next to ‘Default/Core’ to open the ‘Edit Instruction’ modal. The title is locked; this set cannot be renamed or deleted since it is applied as the base prompt for every generation. Update the text in the ‘Instructions’ field, or use ‘Upload a .md file’ to import instructions from a Markdown file, then click ‘Update’.

Step 1.2: Add a Custom Instruction Set
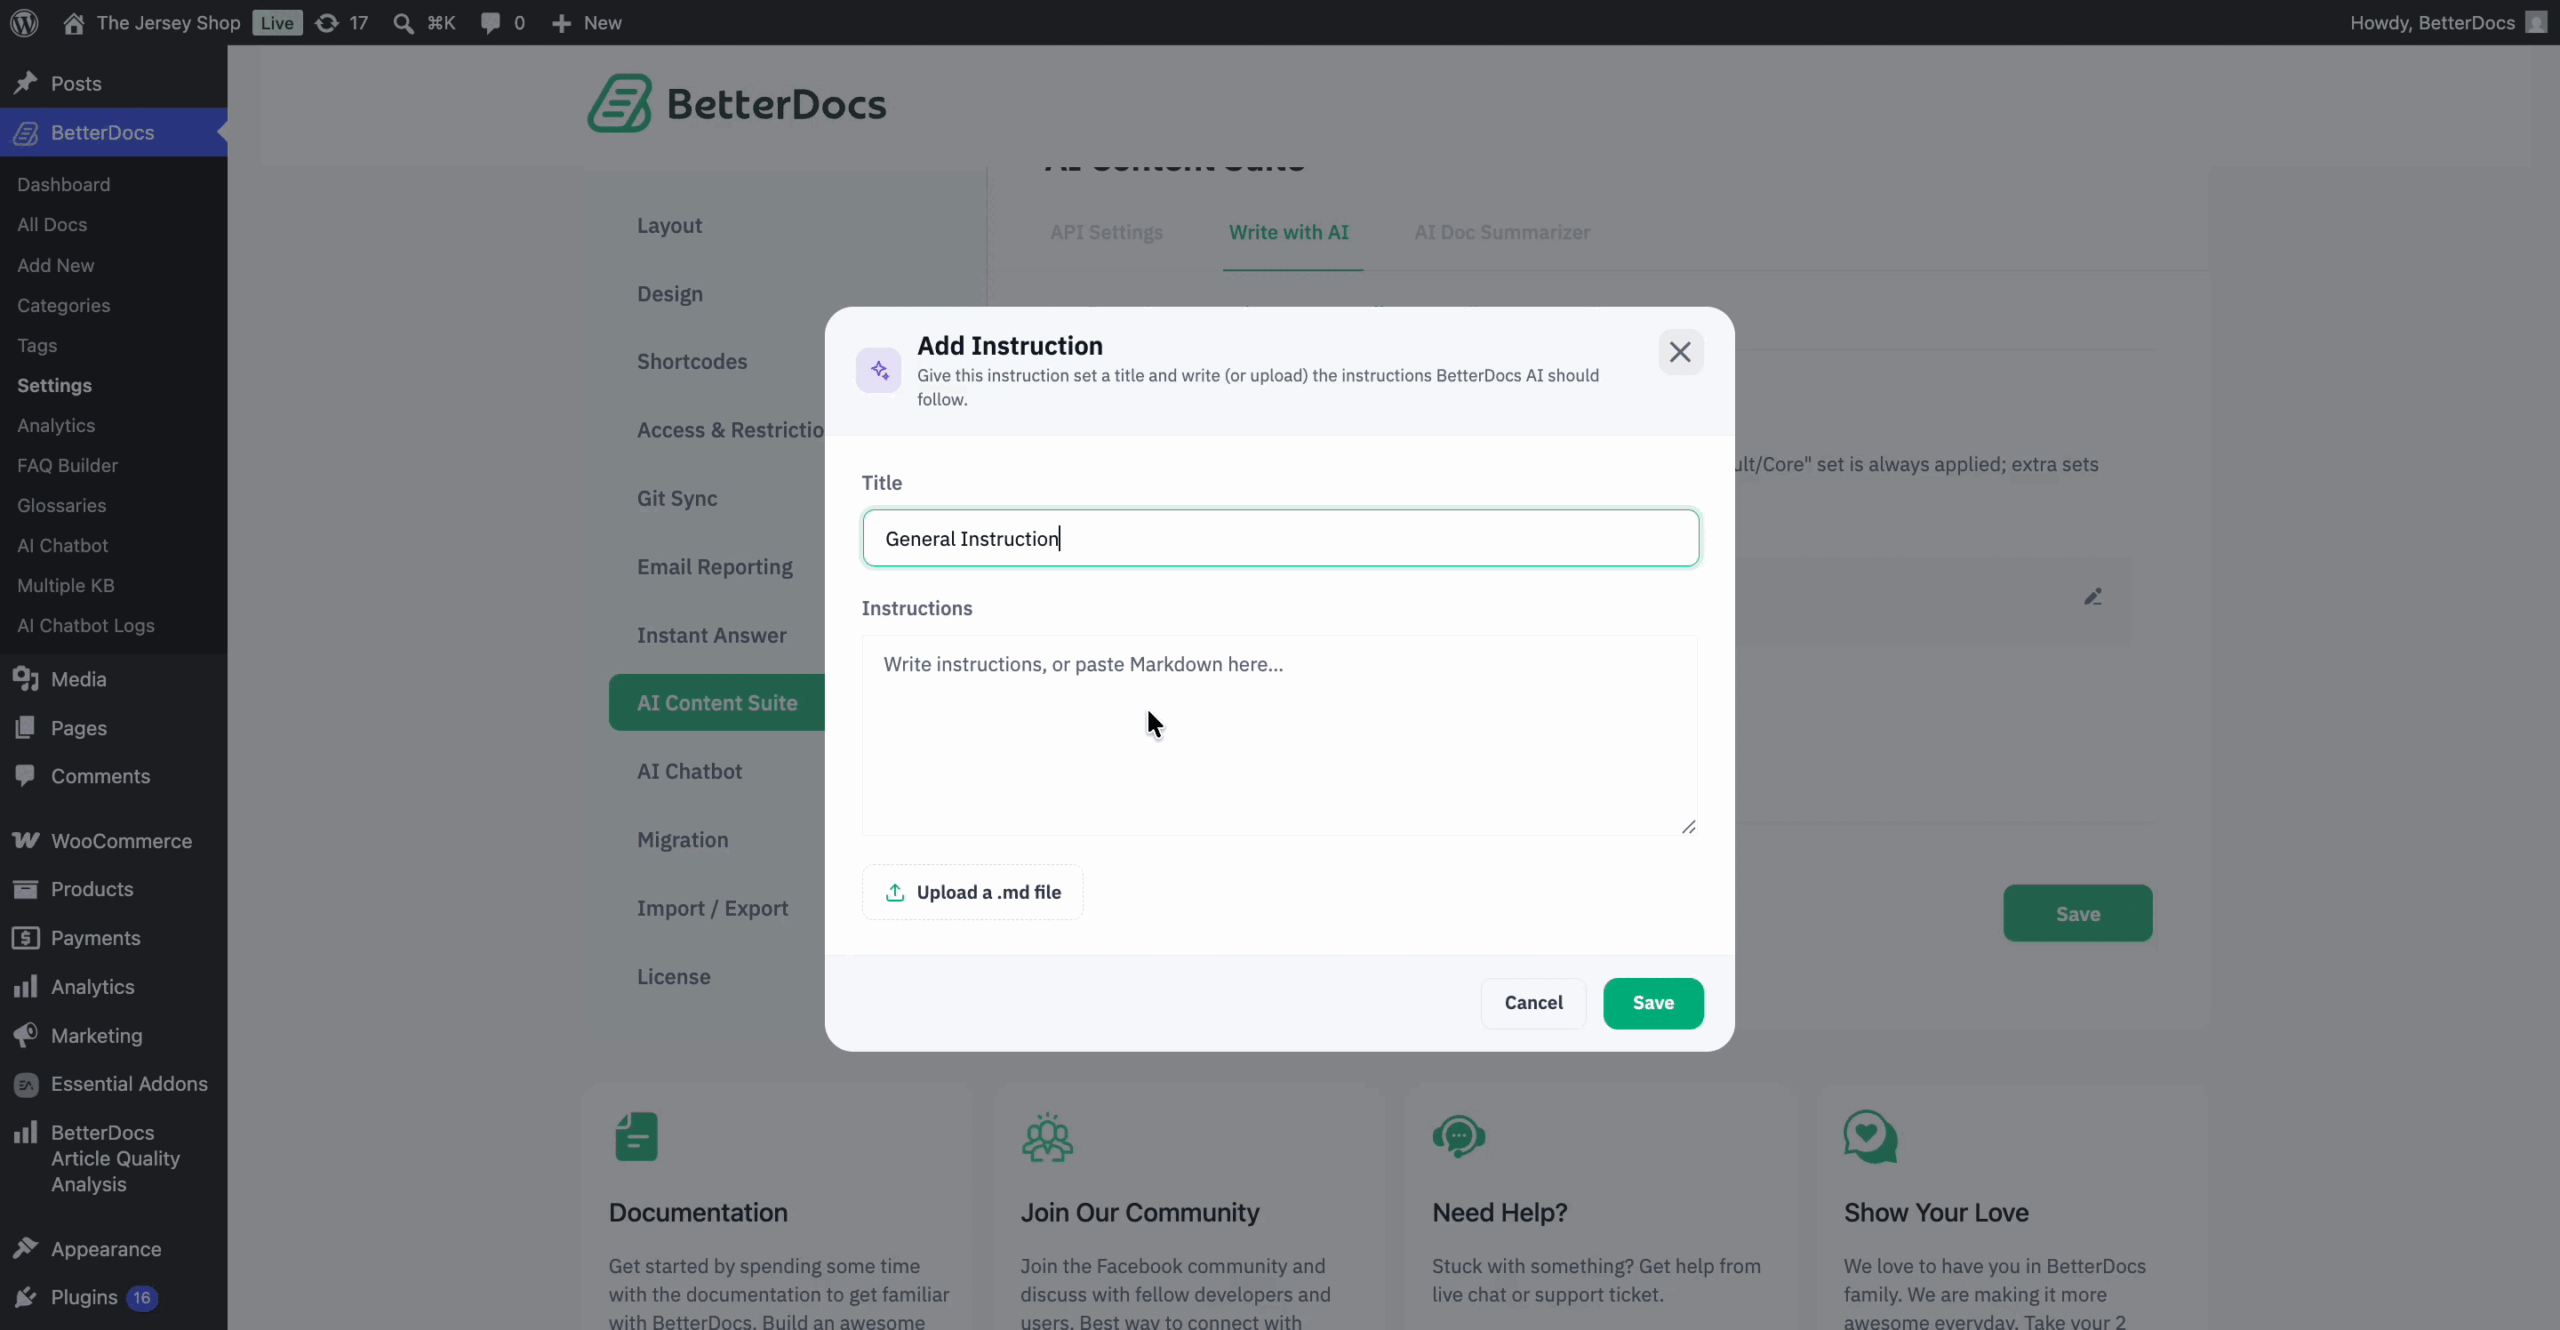
To add a new instruction, click ‘+ Add Instruction’ to create an additional, optional instruction set (for example, a specific voice for API reference docs). Fill in:
- Title: a short label so you can recognize it later (e.g. “API Reference voice”)
- Instructions: write directly or paste Markdown, or use ‘Upload a .md file’
Click ‘Save’. This set now appears as a selectable option in the ‘Write with AI’ popup alongside Default/Core.
Step 2: Customize Edit with AI Actions #
Switch to the ‘Edit AI Personalize’ tab. This controls which ‘Edit with AI’ actions show up in the doc editor’s selection toolbar. All predefined actions are enabled by default, and each can be toggled off, edited, or left as-is:
- Improve Writing
- Make Shorter
- Make Longer
- Simplify
- Fix Grammar
- Change Tone
- Translate
- Summarize
- Create Table

Use the toggle to enable/disable an action, or click the pencil icon to edit its underlying instruction.
Step 2.1: Add a Custom Action #
Click ‘+ Add Action’ to create your own. Enter:
- Action name: shown in the editor’s Edit with AI menu (e.g. “Add a TL;DR”)
- Instruction: describe exactly what the AI should do with the selected content

Click ‘Save’ to add it to the list.
How to Generate a Doc With Write with AI #
Open the doc editor and click ‘Write with AI’ in the top right. The ‘Write Documentation’ modal opens with three options for generating content.
Generate from a Prompt #
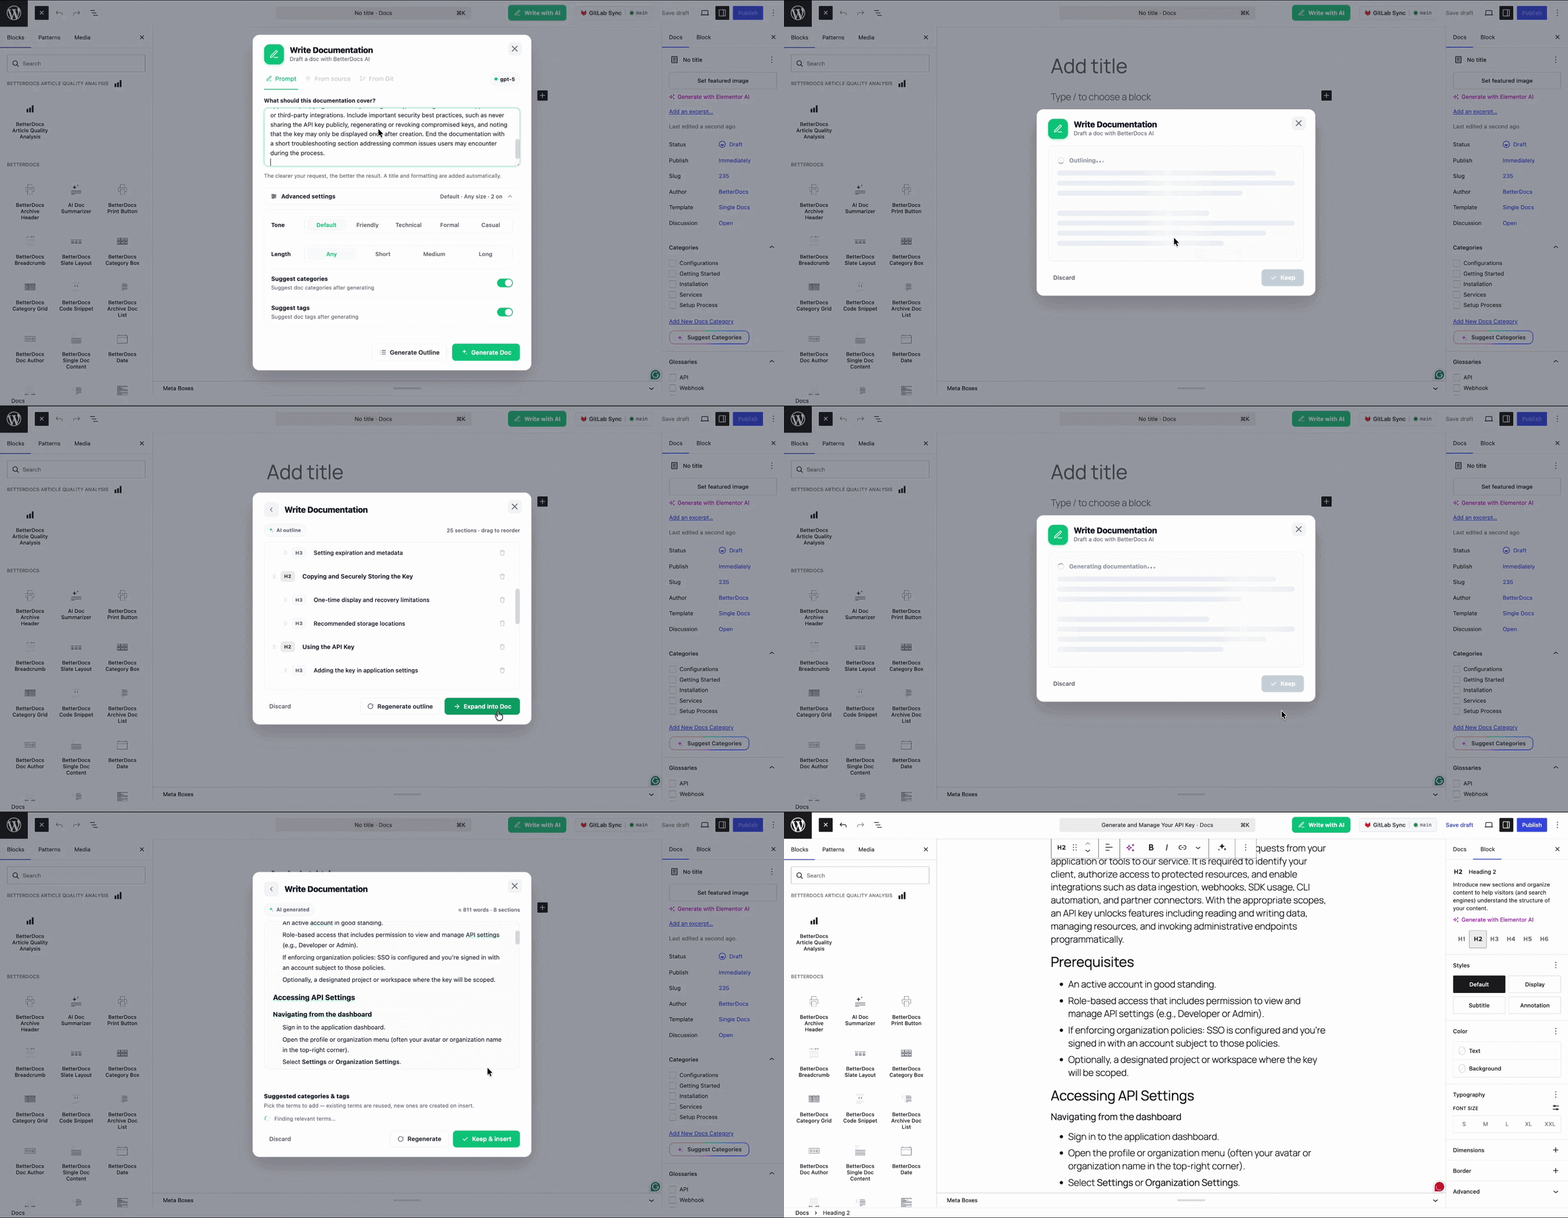
On the ‘Prompt’ tab, describe what the documentation should cover. BetterDocs AI adds the title and formatting automatically.
Expand ‘Advanced settings’ to fine-tune the output:
- Tone: Default, Friendly, Technical, Formal, or Casual
- Length: Any, Short, Medium, or Long
- Suggest categories: suggest doc categories after generating
- Suggest tags: suggest doc tags after generating
Click ‘Generate Outline’ to get a structure first, or ‘Generate Doc’ to generate the full draft directly.
Generate from Existing Source Content #
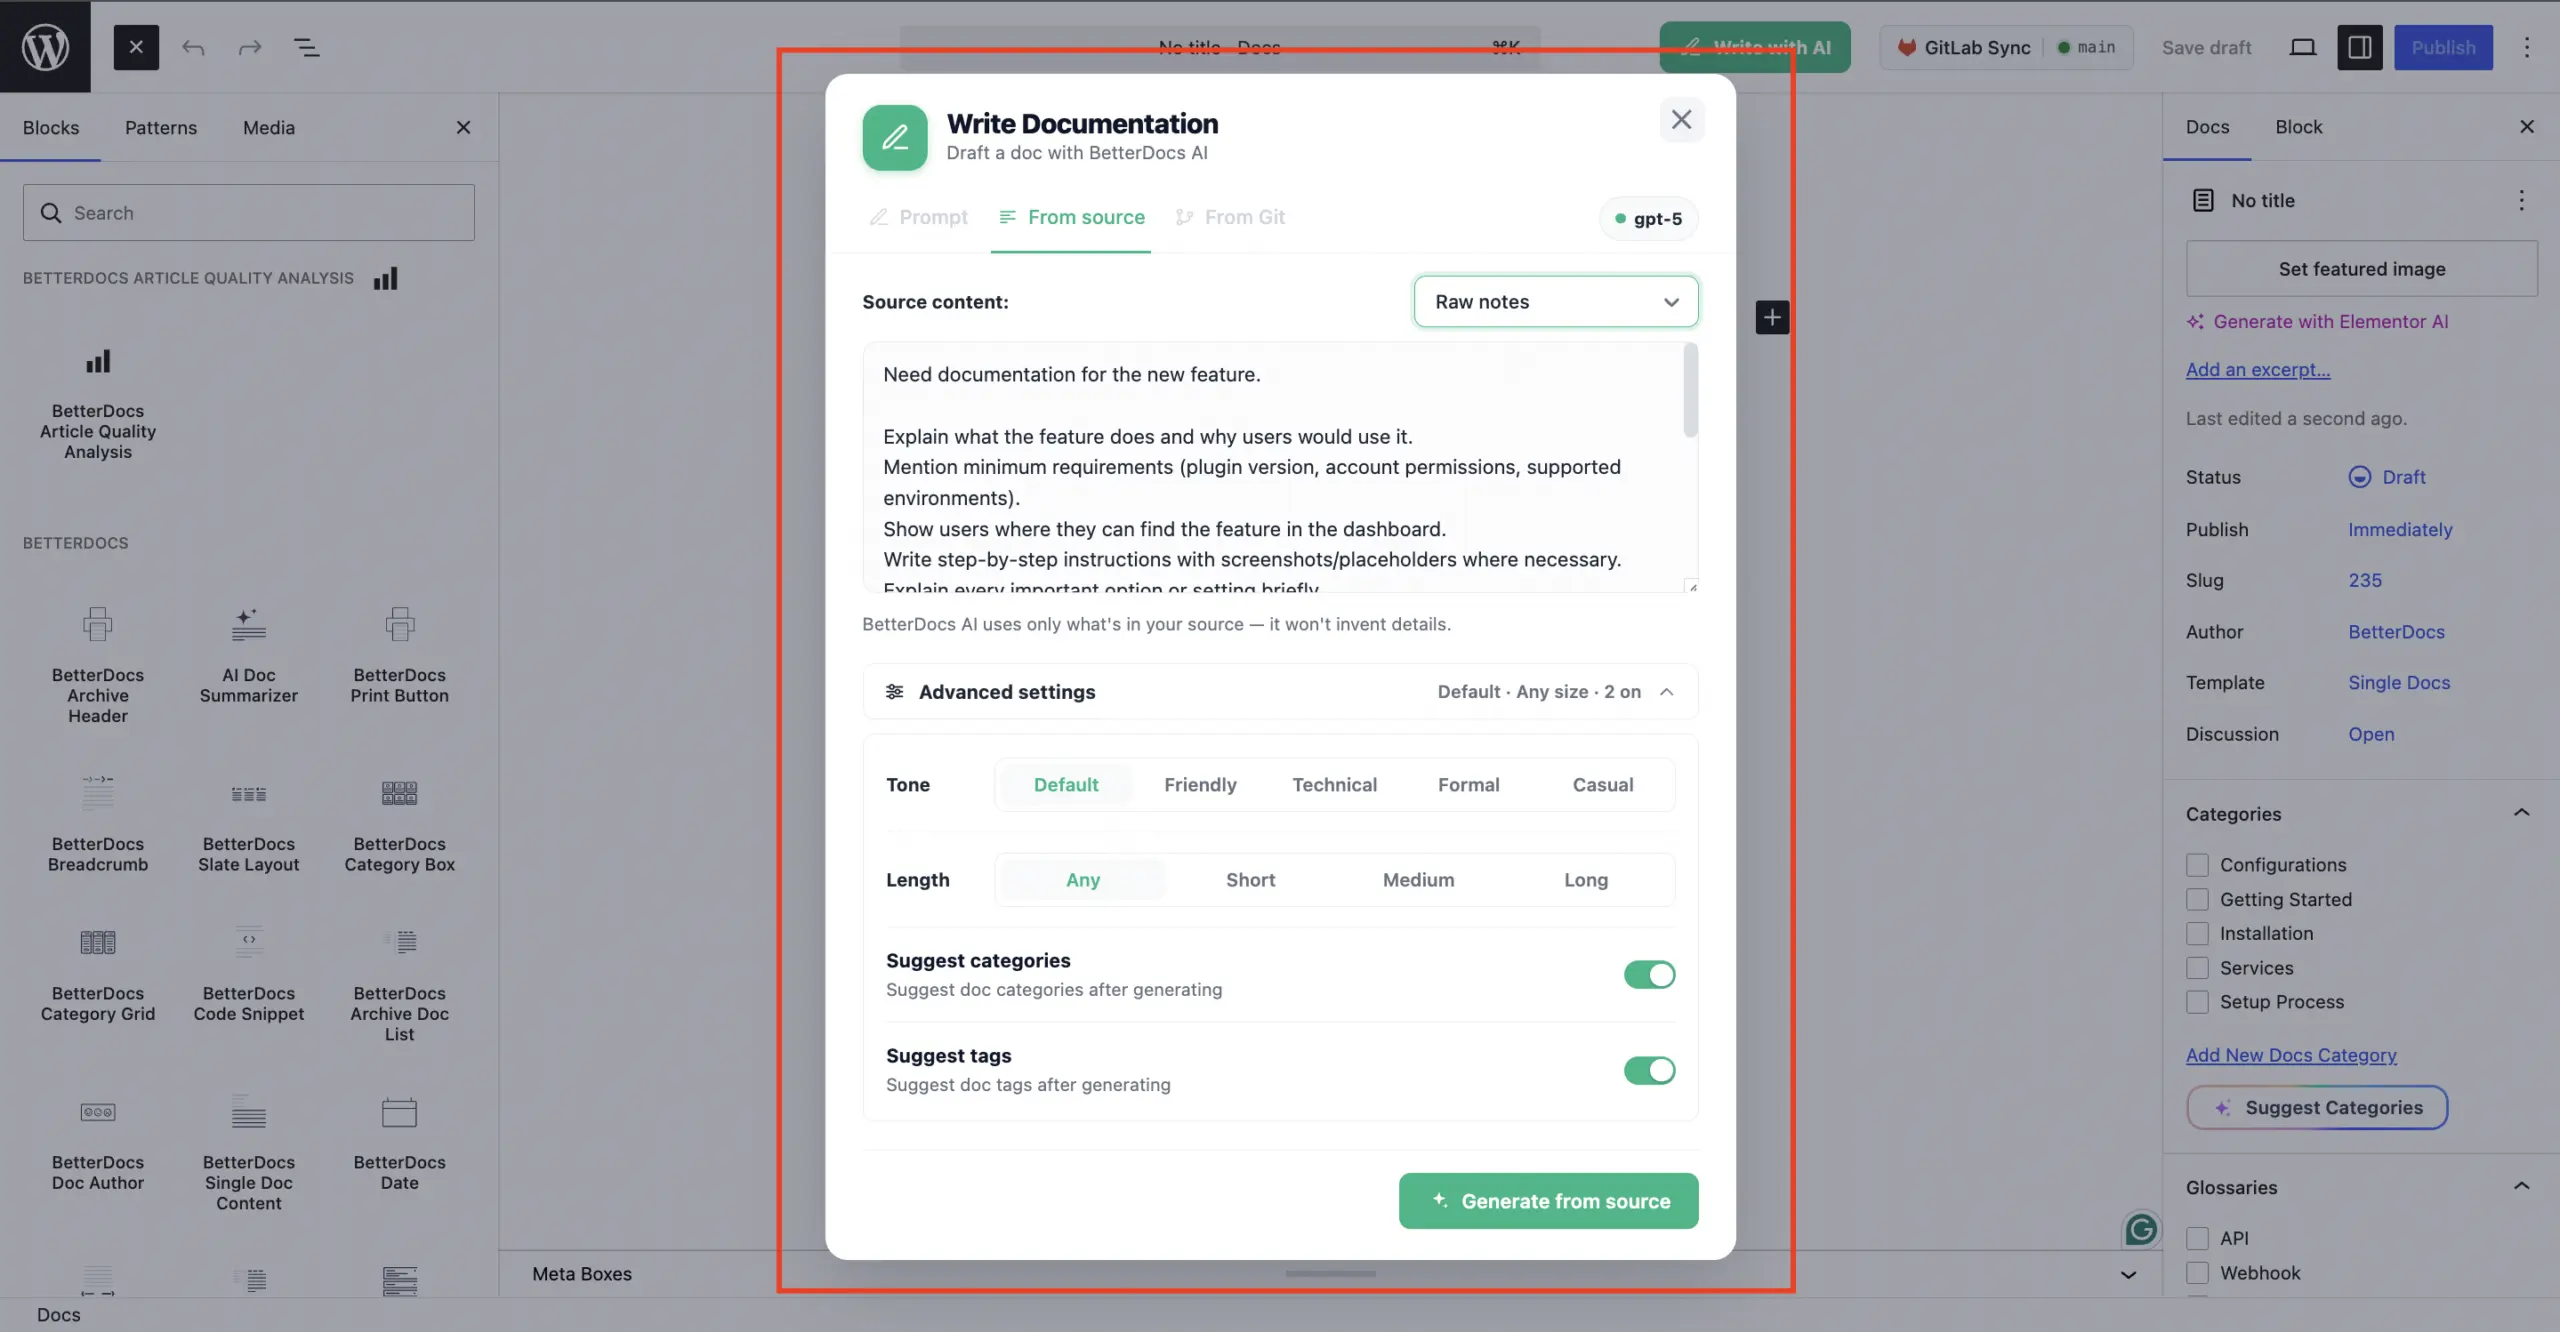
Switch to the ‘From source’ tab to turn existing material, a support chat, forum thread, or rough notes, into a structured doc. Choose the source type from the ‘Source content’ dropdown (defaults to ‘Auto-detect’), paste your content into the text box, then click ‘Generate from source’. BetterDocs AI only uses what’s in your pasted source; it will not invent details.
Generate from Git #
Switch to the ‘From Git’ tab to generate a doc straight from a GitHub pull request or file URL. Paste the link, then optionally add a prompt using one of the quick suggestions:
- Document this feature / PR
- Turn into a how-to guide
- Write a what’s-new doc
- Adapt this doc to my site
Note: To learn more about how to sync your Git account with BetterDocs, check the documentation.

Or type your own instructions in the text box below. Click ‘Generate from Git’. BetterDocs AI fetches the content from your connected Git account and writes from it without inventing details.
Final Outcome #
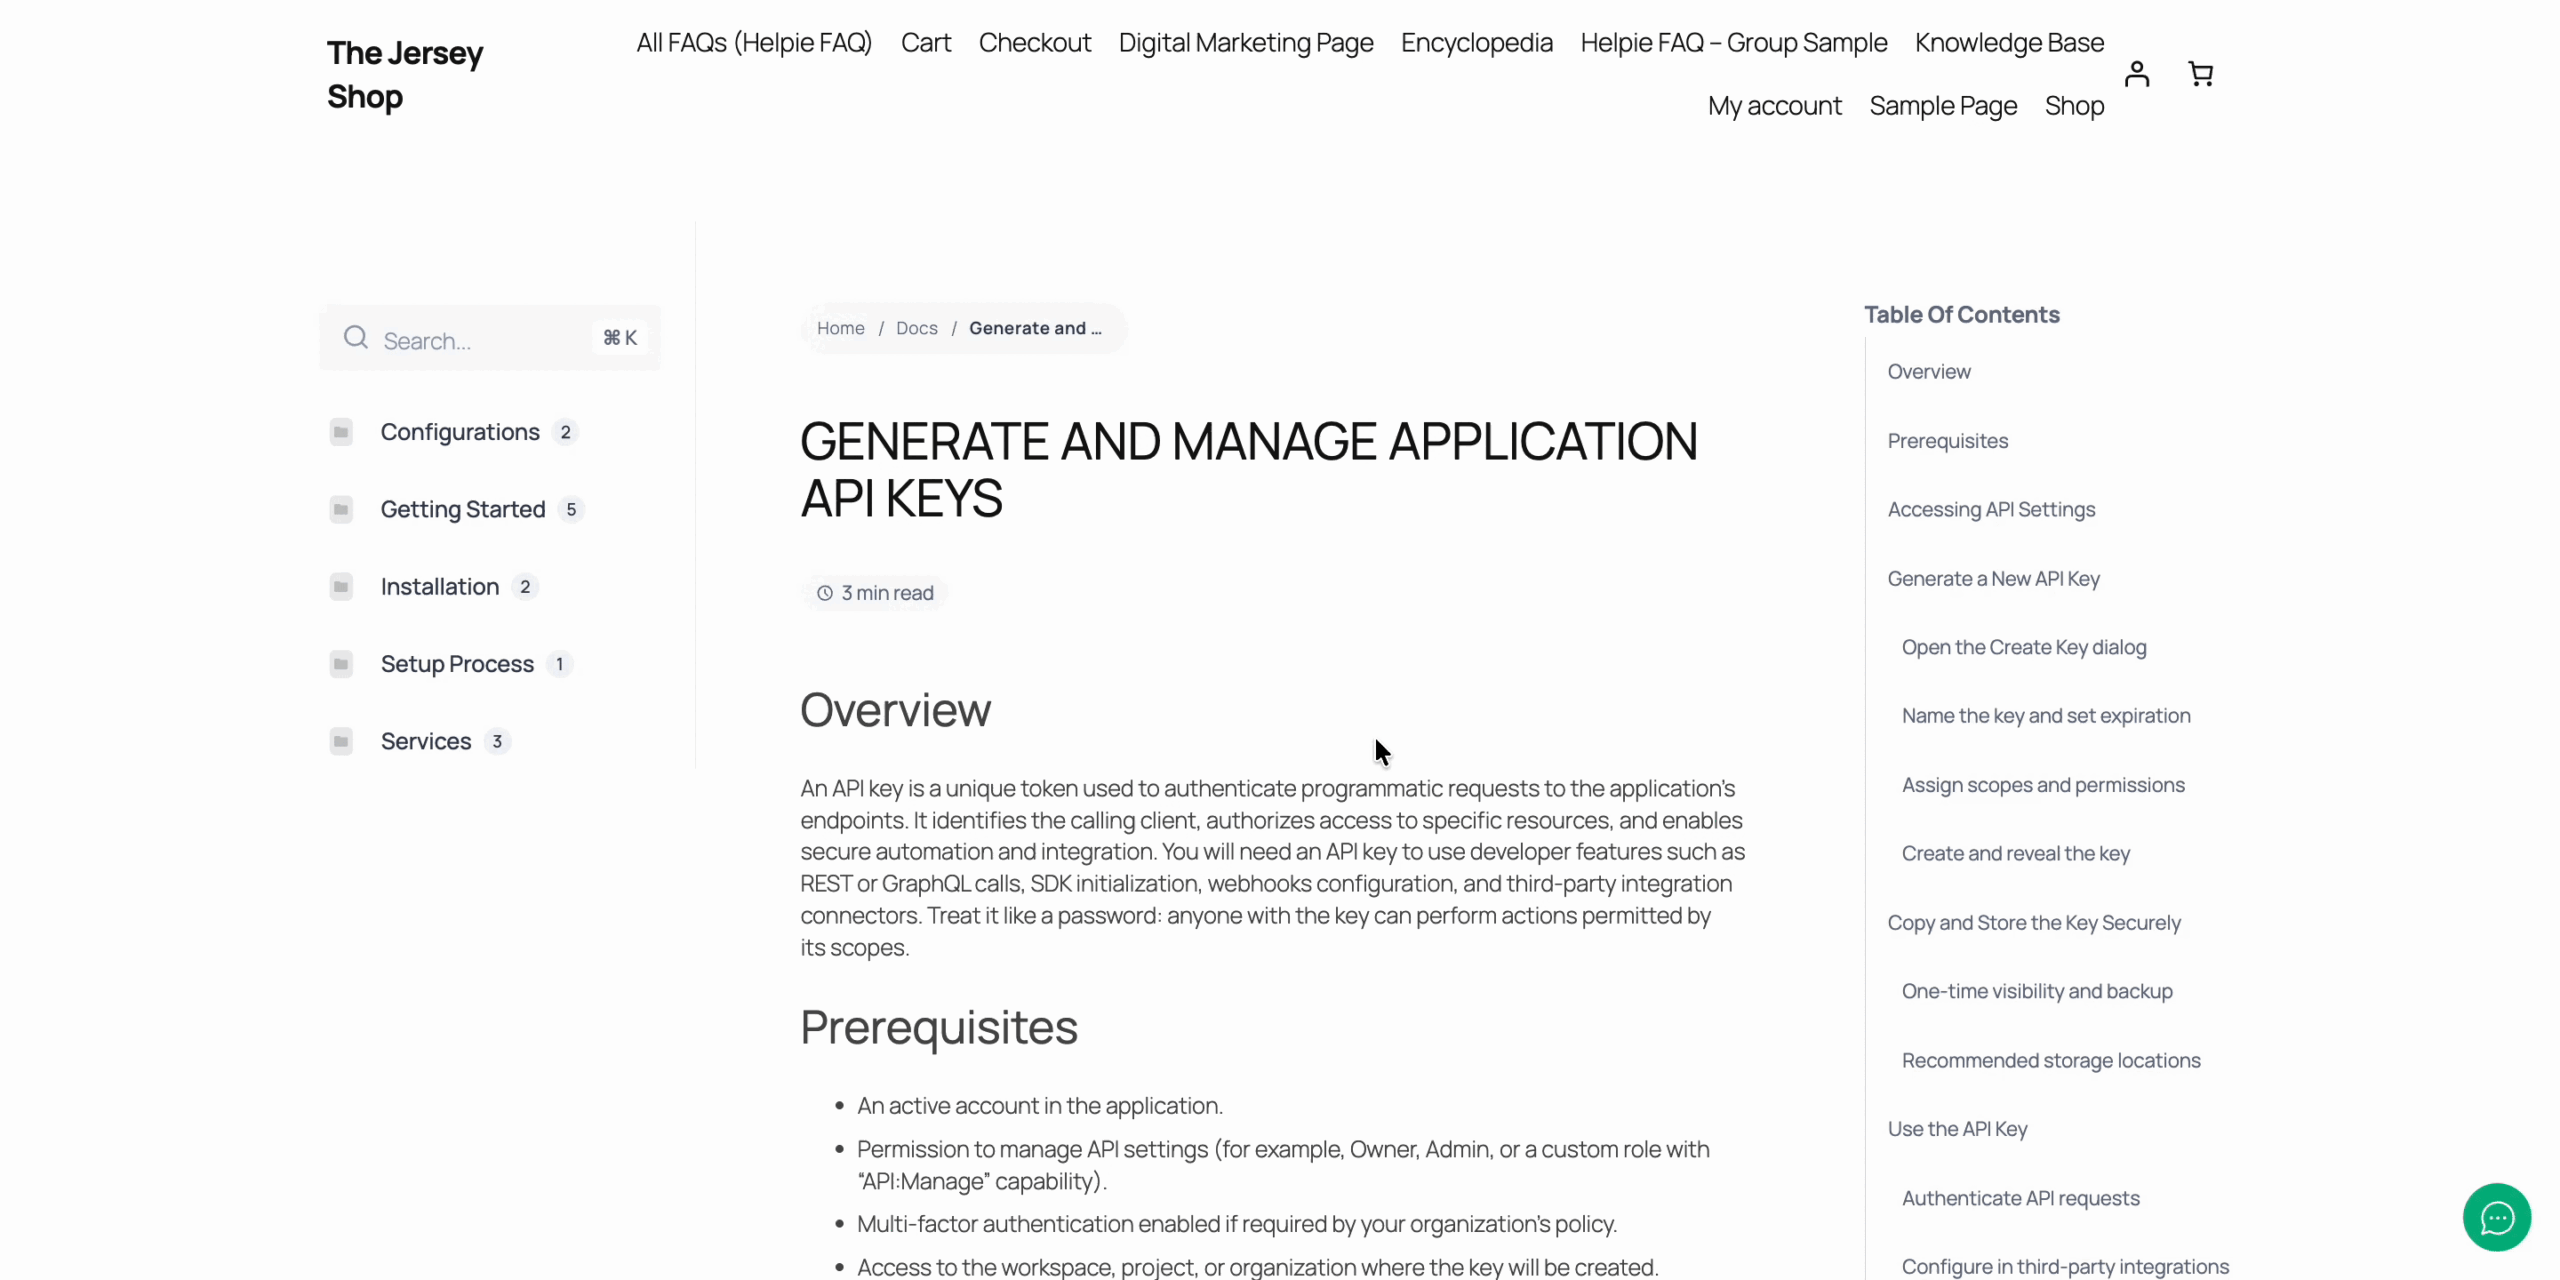
You now have a fully drafted doc, written in your personalized voice, with suggested categories, tags, and glossary terms ready for review, generated from a prompt, existing content, or a Git source.
That’s how simply you can configure this ‘Write With AI’ feature and write documentation with BetterDocs with a few clicks and keywords.
Getting Stuck? Feel free to contact our dedicated support team for further assistance.